Kyocera ECOSYS P5021cdw ECOSYS P5021cdn/P5021cdw/M5026cdn/P5026cdw Operation G - Page 46
Default Settings of the Machine, Setting Date and Time
 |
View all Kyocera ECOSYS P5021cdw manuals
Add to My Manuals
Save this manual to your list of manuals |
Page 46 highlights
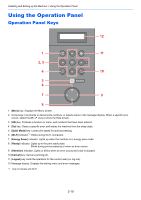
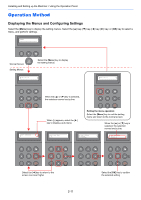
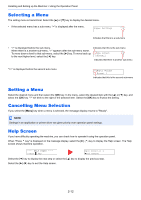
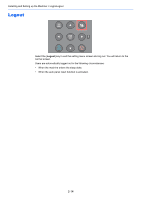
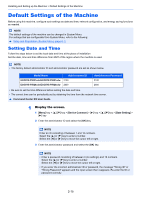
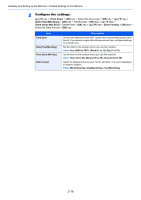
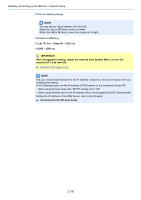
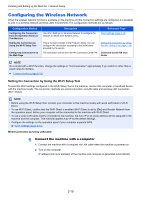
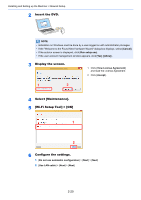
Installing and Setting up the Machine > Default Settings of the Machine Default Settings of the Machine Before using this machine, configure such settings as date and time, network configuration, and energy saving functions as needed. NOTE The default settings of the machine can be changed in System Menu. For settings that are configurable from System Menu, refer to the following: Setup and Registration (System Menu) (page 6-1) Setting Date and Time Follow the steps below to set the local date and time at the place of installation. Set the date, time and time difference from GMT of the region where the machine is used. NOTE • The factory default administrator ID and administrator password are set as shown below. Model Name ECOSYS P5021cdn/ECOSYS P5021cdw ECOSYS P5026cdn/ECOSYS P5026cdw Administrator ID 2100 2600 Administrator Password 2100 2600 • Be sure to set the time difference before setting the date and time. • The correct time can be periodically set by obtaining the time from the network time server. Command Center RX User Guide 1 Display the screen. 1 [Menu] key key > [Device Common] > [►] key key > [Date Setting] > [►] key 2 Enter the administrator ID and select the [OK] key. NOTE Enter an ID consisting of between 1 and 16 numbers. Select the [▲] or [▼] key to enter a number. Select the [◄] or [►] key to move the cursor left or right. 3 Enter the administrator password and select the [OK] key. NOTE • Enter a password consisting of between 0 (no settings) and 16 numbers. Select the [▲] or [▼] key to enter a number. Select the [◄] or [►] key to move the cursor left or right. • If you enter the incorrect administrator ID or password, the message "Wrong ID" or "Wrong Password" appears and the input screen then reappears. Re-enter the ID or password correctly. 2-15
-
 1
1 -
2
-
3
-
4
-
5
-
6
-
7
-
8
-
9
-
10
-
11
-
12
-
13
-
14
-
15
-
16
-
17
-
18
-
19
-
20
-
21
-
22
-
23
-
24
-
25
-
26
-
27
-
28
-
29
-
30
-
31
-
32
-
33
-
34
-
35
-
36
-
37
-
38
-
39
-
40
-
 41
41 -
 42
42 -
 43
43 -
 44
44 -
 45
45 -
 46
46 -
 47
47 -
 48
48 -
 49
49 -
 50
50 -
 51
51 -
52
-
53
-
54
-
55
-
56
-
57
-
58
-
59
-
60
-
61
-
62
-
63
-
64
-
65
-
66
-
67
-
68
-
69
-
70
-
71
-
72
-
73
-
74
-
75
-
76
-
77
-
78
-
79
-
80
-
81
-
82
-
83
-
84
-
85
-
86
-
87
-
88
-
89
-
90
-
91
-
92
-
93
-
94
-
95
-
96
-
97
-
98
-
99
-
100
-
101
-
102
-
103
-
104
-
105
-
106
-
107
-
108
-
109
-
110
-
111
-
112
-
113
-
114
-
115
-
116
-
117
-
118
-
119
-
120
-
121
-
122
-
123
-
124
-
125
-
126
-
127
-
128
-
129
-
130
-
131
-
132
-
133
-
134
-
135
-
136
-
137
-
138
-
139
-
140
-
141
-
142
-
143
-
144
-
145
-
146
-
147
-
148
-
149
-
150
-
151
-
152
-
153
-
154
-
155
-
156
-
157
-
158
-
159
-
160
-
161
-
162
-
163
-
164
-
165
-
166
-
167
-
168
-
169
-
170
-
171
-
172
-
173
-
174
-
175
-
176
-
177
-
178
-
179
-
180
-
181
-
182
-
183
-
184
-
185
-
186
-
187
-
188
-
189
-
190
-
191
-
192
-
193
-
194
-
195
-
196
-
197
-
198
-
199
-
200
-
201
-
202
-
203
-
204
-
205
-
206
-
207
-
208
-
209
-
210
-
211
-
212
-
213
-
214
-
215
-
216
-
217
-
218
-
219
-
220
-
221
-
222
-
223
-
224
-
225
-
226
-
227
-
228
-
229
-
230
-
231
-
232
-
233
 |
 |