Lenovo ThinkPad Yoga 14 (English) User Guide - ThinkPad Yoga 14 - Page 132
To replace the storage drive, do the following
 |
View all Lenovo ThinkPad Yoga 14 manuals
Add to My Manuals
Save this manual to your list of manuals |
Page 132 highlights
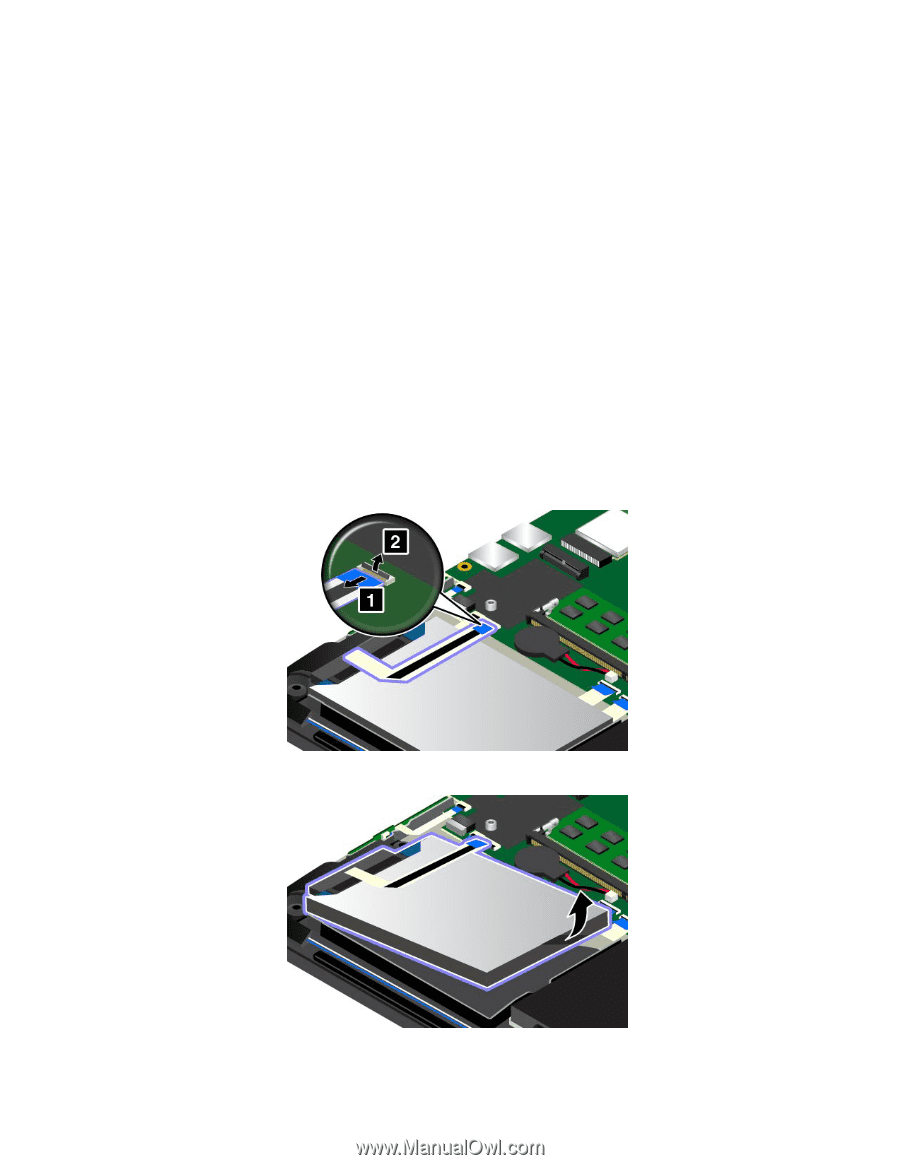
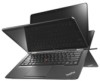
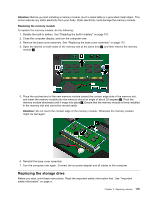
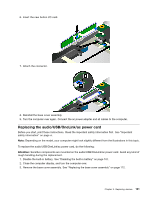
Note: Depending on the model, your computer might look slightly different from the illustrations in this topic. Attention: The storage drive is very sensitive. Incorrect handling can cause damage and permanent loss of data. Observe the following guidelines: • Replace the storage drive only if you upgrade it or have it repaired. The connectors and slot of the storage drive are not designed for frequent changes, or drive swapping. • Do not drop the drive or subject it to physical shocks. Put the drive on a material, such as soft cloth, that absorbs any physical shocks. • Do not apply pressure to the cover of the drive. • Do not touch the connector. • Before removing the storage drive, make a backup copy of all the information on it, and then turn off the computer. • Never remove the drive while the computer is operating, in sleep mode, or in hibernation mode. To replace the storage drive, do the following: 1. Disable the built-in battery. See "Disabling the built-in battery" on page 107. 2. Close the computer display, and turn the computer over. 3. Remove the base cover assembly. See "Replacing the base cover assembly" on page 112. 4. Detach the connector. 5. Take the drive tab and lift the drive. Then take the drive out of the drive bay. 116 User Guide
-
 1
1 -
2
-
3
-
4
-
5
-
6
-
7
-
8
-
9
-
10
-
11
-
12
-
13
-
14
-
15
-
16
-
17
-
18
-
19
-
20
-
21
-
22
-
23
-
24
-
25
-
26
-
27
-
28
-
29
-
30
-
31
-
32
-
33
-
34
-
35
-
36
-
37
-
38
-
39
-
40
-
41
-
42
-
43
-
44
-
45
-
46
-
47
-
48
-
49
-
50
-
51
-
52
-
53
-
54
-
55
-
56
-
57
-
58
-
59
-
60
-
61
-
62
-
63
-
64
-
65
-
66
-
67
-
68
-
69
-
70
-
71
-
72
-
73
-
74
-
75
-
76
-
77
-
78
-
79
-
80
-
81
-
82
-
83
-
84
-
85
-
86
-
87
-
88
-
89
-
90
-
91
-
92
-
93
-
94
-
95
-
96
-
97
-
98
-
99
-
100
-
101
-
102
-
103
-
104
-
105
-
106
-
107
-
108
-
109
-
110
-
111
-
112
-
113
-
114
-
115
-
116
-
117
-
118
-
119
-
120
-
121
-
122
-
123
-
124
-
125
-
126
-
 127
127 -
 128
128 -
 129
129 -
 130
130 -
 131
131 -
 132
132 -
 133
133 -
 134
134 -
 135
135 -
 136
136 -
 137
137 -
138
-
139
-
140
-
141
-
142
-
143
-
144
-
145
-
146
-
147
-
148
-
149
-
150
-
151
-
152
-
153
-
154
-
155
-
156
-
157
-
158
-
159
-
160
-
161
-
162
-
163
-
164
-
165
-
166
-
167
-
168
-
169
-
170
-
171
-
172
-
173
-
174
-
175
-
176
-
177
-
178
 |
 |