Marantz SR6004 SR6004 / SR5004 User Manual - English - Page 10
SOURCE ON/OFF button - remote control
 |
View all Marantz SR6004 manuals
Add to My Manuals
Save this manual to your list of manuals |
Page 10 highlights
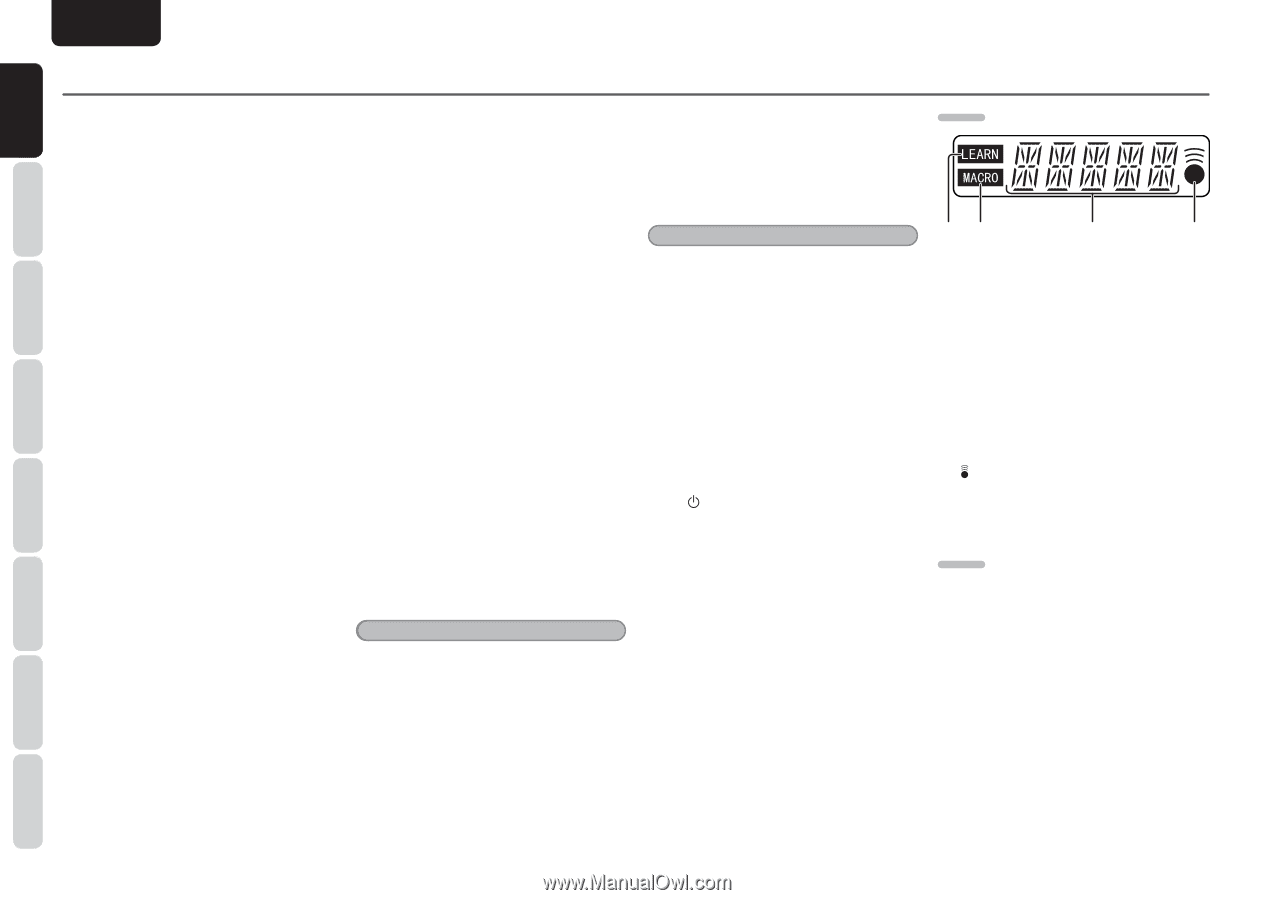
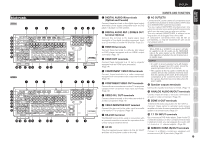
NAMES AND FUNCTIONS CONNECTIONS BASIC BASIC OPERATION ADVANCED CONNECTIONS ENGLISH NAMES AND FUNCTION 8/NIGHT button Pressing this button prevents the Dolby Digital signal from playback at a loud voice. When this button is pressed, the "NIGHT" indicator is illuminated. 9/D.EQ/VOL buton This button is used to select Audyssey Dynamic EQ/Dynamic Volume modes. 0/CH SEL button This button is used to call up CH LEVEL ADJUST and adjust speaker levels or 7.1 ch input level. +10/V.OFF button This button is used to turn off the video signal. ¤1 M (MACRO) button (SR6004) This button is used to program Macros. Pressing this button switches between Normal mode and Macro mode. HT-EQ button (SR5004) This button is used to turn on or off HT (Home Theater)-EQ mode. ¤2 MENU button (When AMP mode is selected) This button is used to call up the SETUP MAIN MENU of the unit. (When USB mode is selected) Pressing this button during iPod operation moves you to higher-level page. ¤3 TOP button (When AMP mode is selected) Pressing this button during setup returns you to the top screen of the setup main menu. (When USB mode is selected) Pressing this button displays the highest-level item. ¤4 DISPLAY button (When a mode other than USB is selected) This button is used to selects the display mode for the front display of the unit. (When USB mode is selected) This button is used to select the previous page. ¤5 INPUT 3 button This button is for forward-feeding the input source to select a desired source. INPUT 4 button This button is for backward-feeding the input source to select a desired source. ¤6 SETUP/MODE button This button is used to setup for DVD and other device. (When USB mode is selected) This buttong is used to switch between direct/ remote mode during iPod opetation. ¤7 SOURCE button These buttons are used to switch the source of your A/V Receiver. Each time a source button is pressed, the remote controller changes to the source which was pressed. This remote controller can control 12 types of equipment. To change the A/V Receiver source, press this button twice within two seconds. The signal is sent when it is pressed the second time. Notes • Select the AMP as the source to use this remote controller with the unit. • In the case of SR5004, the USB button cannot be used. ¤8 ATT button When the input signal is too high and the voice distorts even by throttling the unit VOLUME control, turn on this function. "ATT" is indicated when this function is activated. The input level reduced. Attenuator is invalid for the output signal of "REC OUT". Note This function is unavailable while the digital input is selected. ¤9 A/D button This button is used to switch between the analog and digital inputs. ‹0 HDMI button (SR6004) This button is used to select HDMI OUTPUT 1 or 2. ‹1 SET button This button is used to enter learn mode and preset mode. ‹2 I / SOURCE ON/OFF button This button is used to turn a specific source (such as a DVD player) on or off independently from the rest of the system. ‹3 Infrared transmitter and learning sensor This transmitter emits infrared light. Press the buttons while pointing the transmitter towards the infrared receiver window of the unit or other AV equipment. Be sure to also point towards other remote controllers when using the learning function. SR6004 ‹4 ‹5 ‹6 ‹7 ‹4 LEARN indicator This indicator is displayed when the remote controller is in the LEARN mode. ‹5 MACRO indicator This is displayed when a macro program is selected by the remote controller. ‹6 Information indicator Information about the sources and modes are shown on the LCD. ‹7 indicator This indicator is displayed when the remote controller is transmitting a signal. SR5004 ‹8 SEND indicator Indicates when the remote controller is transmitting a signal. ‹9 LEARN indicator Indicates when the remote controller is in the LEARN mode. SETUP ADVANCED OPERATION TROUBLESHOOTING OTHERS 8
-
 1
1 -
2
-
3
-
4
-
 5
5 -
 6
6 -
 7
7 -
 8
8 -
 9
9 -
 10
10 -
 11
11 -
 12
12 -
 13
13 -
 14
14 -
 15
15 -
16
-
17
-
18
-
19
-
20
-
21
-
22
-
23
-
24
-
25
-
26
-
27
-
28
-
29
-
30
-
31
-
32
-
33
-
34
-
35
-
36
-
37
-
38
-
39
-
40
-
41
-
42
-
43
-
44
-
45
-
46
-
47
-
48
-
49
-
50
-
51
-
52
-
53
-
54
-
55
-
56
-
57
-
58
-
59
-
60
-
61
-
62
-
63
-
64
-
65
-
66
-
67
-
68
-
69
-
70
-
71
-
72
-
73
-
74
-
75
-
76
-
77
-
78
-
79
-
80
-
81
-
82
-
83
-
84
-
85
-
86
-
87
-
88
-
89
-
90
-
91
-
92
-
93
-
94
-
95
-
96
 |
 |