Marantz SR6004 SR6004 / SR5004 User Manual - English - Page 75
Editing Macros, Using Macros, Examples Of Macro Programs
 |
View all Marantz SR6004 manuals
Add to My Manuals
Save this manual to your list of manuals |
Page 75 highlights
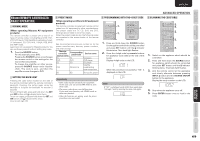
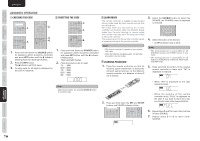
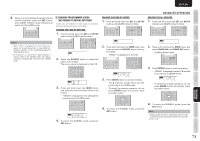
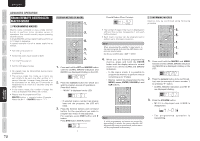
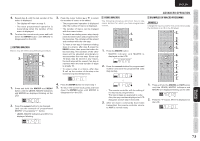
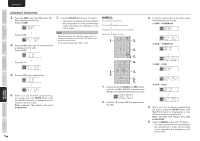
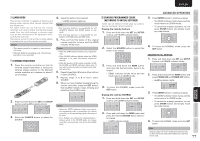
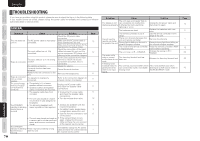
CONNECTIONS FUNCTIONS NAMES AND BASIC BASIC OPERATION ADVANCED CONNECTIONS ENGLISH 4. Repeat step 3. until the last number of the macro is displayed. • The display will return to step 1.. • The each programmed operation is transmitting when the number of the macro is displayed. 5. To return the normal mode, press and hold down the ENTER button until MACRO is disappeared on the LCD. EDITING MACROS Macros may be edited using following procedure. 4. 3. 3. 1. 2. 1. Press and hold the MACRO and MENU button until the LEARN, MACRO indicators and MACRO are displayed blinking on the LCD. 2. Press the numeric button to be changed. Let's use the example of programmed MACRO 1, by pressing "1" button. • LEARN, MACRO indicators and M1-01 is displayed blinking. 3. Press the cursor button (3 or 4) to select the number of macro to be edited. • The programmed operation is displayed after the number of macro is displayed. • The number of macro can be changed with the cursor button. • To rewrite an existing macro step, simply press function button and programed for the new step. The old step will be erased and rewritten with the new step. • To insert a new step in between existing steps in a macro, after step 3. press the MEMO button, then press the button for the new step. The numbers of the other steps will be adjusted accordingly to accommodate the new step. Since only 10 steps may be stored in any macro, the tenth step will be erased if an step is inserted when the total number of steps is already 10. • To erase a step in a macro, after step 3. call up the number of the step to be erased and press the CL button. 4. Press the ENTER button to return step 1. 5. To return the normal mode, press and hold down the ENTER button until MACRO is disappeared on the LCD. USING MACROS The following procedure will show how to use macro buttons for which you have programmed macros. 1. 2. 1. Press the MACRO button • MACRO indicator and MACRO is displayed on the LCD. ADVANCED OPERATION EXAMPLES OF MACRO PROGRAMS EXAMPLE 1 Change the input source for the unit to CD and play the 3rd track on a CD in the CD player. 2. 3. 4. 5. 3. 6. 2. Press the numeric button for programmed number and send the programmed code step by step. ↓ • The remote controller will do nothing if no macros are programmed. The macro steps are executed in order. Also, the step numbers displayed on LCD disappear as each step is executed. 3. After all macro commands have been transmitted, the remote controller returns to AMP in normal mode. 5. 7. 1. 4. 7. 2. 1. Press and hold the MACRO and SET button until the LEARN, MACRO indicators and MACRO are displayed blinking on the LCD. 2. Press the "1" button. M1-01 is displayed on the LCD. SETUP ADVANCED OPERATION TROUBLESHOOTING OTHERS 73
-
 1
1 -
2
-
3
-
4
-
5
-
6
-
7
-
8
-
9
-
10
-
11
-
12
-
13
-
14
-
15
-
16
-
17
-
18
-
19
-
20
-
21
-
22
-
23
-
24
-
25
-
26
-
27
-
28
-
29
-
30
-
31
-
32
-
33
-
34
-
35
-
36
-
37
-
38
-
39
-
40
-
41
-
42
-
43
-
44
-
45
-
46
-
47
-
48
-
49
-
50
-
51
-
52
-
53
-
54
-
55
-
56
-
57
-
58
-
59
-
60
-
61
-
62
-
63
-
64
-
65
-
66
-
67
-
68
-
69
-
 70
70 -
 71
71 -
 72
72 -
 73
73 -
 74
74 -
 75
75 -
 76
76 -
 77
77 -
 78
78 -
 79
79 -
 80
80 -
81
-
82
-
83
-
84
-
85
-
86
-
87
-
88
-
89
-
90
-
91
-
92
-
93
-
94
-
95
-
96
 |
 |
