Marantz SR6004 SR6004 / SR5004 User Manual - English - Page 6
Names And Function - windows 7
 |
View all Marantz SR6004 manuals
Add to My Manuals
Save this manual to your list of manuals |
Page 6 highlights
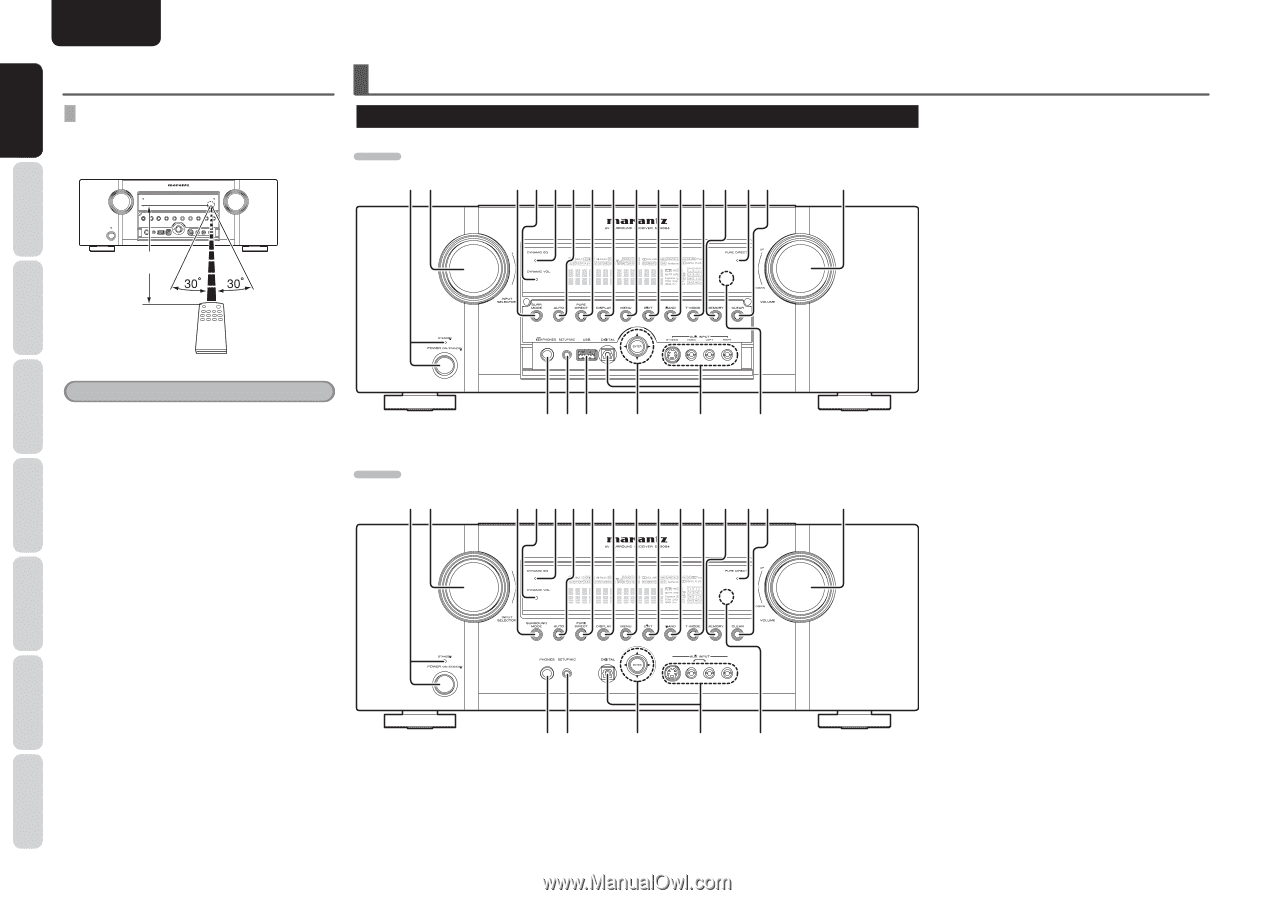
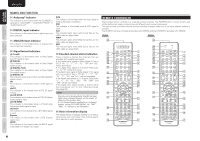
NAMES AND FUNCTIONS CONNECTIONS BASIC BASIC OPERATION ADVANCED CONNECTIONS ENGLISH BEFORE USE NAMES AND FUNCTION REMOTE CONTROL FRONT PANEL Operate the remote controller within a distance of approx. 16.4 ft from the infrared receptor window on the front of the unit. SR6004 qw ertyu i o !0 !1 !2 !3 !4!5 !6 Approx. 5m (16.4 ft) Remote controller Caution • Do not allow direct sunlight, an inverter fluorescent light or other strong source of light to shine onto the playerʼs infrared receptor window. Otherwise, the operation of the remote controller may be disabled. • Bear in mind that operating the remote controller may cause other devices operated by infrared rays to be operated by mistake. • The remote controller cannot be operated if the space between the controller and the playerʼs infrared receptor window is obstructed. • Do not place any objects on top of the remote controller. Doing so may cause one or more buttons to be held down which will cause the batteries to run down. SR5004 qw @2@1@0 !9 !8 !7 ertyu i o !0 !1 !2 !3 !4!5 !6 @2 @1 !9 !8 !7 q POWER switch and STANDBY indicator When this switch is pressed once, the unit turns ON and the display illuminates. When pressed again, the unit turns OFF and the STANDBY indicator will be illuminated. w INPUT SELECTOR knob This knob is used to select the input sources. (See page 16) e SURR. MODE button Press this button to select the surround mode. r DYNAMIC VOL. indicator This indicator illuminates while the Audyssey Dynamic VolumeTM is in use. t DYNAMIC EQ. indicator This indicator illuminates while the Audyssey Dynamic EQTM is in use. y AUTO button Press this button to select the AUTO mode from the surround modes. When this mode is selected, the unit determines the surround mode corresponding to a digital input signal automatically. u PURE DIRECT button Press this button to select the pure direct mode or source direct mode. i DISPLAY button Press this button to change the FL display mode. SETUP ADVANCED OPERATION TROUBLESHOOTING OTHERS 4
-
 1
1 -
 2
2 -
 3
3 -
 4
4 -
 5
5 -
 6
6 -
 7
7 -
 8
8 -
 9
9 -
 10
10 -
 11
11 -
 12
12 -
13
-
14
-
15
-
16
-
17
-
18
-
19
-
20
-
21
-
22
-
23
-
24
-
25
-
26
-
27
-
28
-
29
-
30
-
31
-
32
-
33
-
34
-
35
-
36
-
37
-
38
-
39
-
40
-
41
-
42
-
43
-
44
-
45
-
46
-
47
-
48
-
49
-
50
-
51
-
52
-
53
-
54
-
55
-
56
-
57
-
58
-
59
-
60
-
61
-
62
-
63
-
64
-
65
-
66
-
67
-
68
-
69
-
70
-
71
-
72
-
73
-
74
-
75
-
76
-
77
-
78
-
79
-
80
-
81
-
82
-
83
-
84
-
85
-
86
-
87
-
88
-
89
-
90
-
91
-
92
-
93
-
94
-
95
-
96
 |
 |