Marantz SR6004 SR6004 / SR5004 User Manual - English - Page 53
Listening To, Sirius Satellite Radio
 |
View all Marantz SR6004 manuals
Add to My Manuals
Save this manual to your list of manuals |
Page 53 highlights
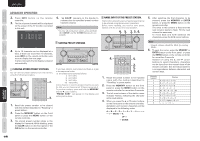
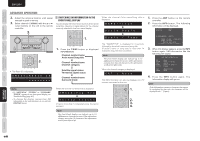
CONNECTIONS FUNCTIONS NAMES AND PRESET SCAN 1. ENGLISH CLEARING STORED PRESET CHANNELS You can remove preset channels from the memory using the following procedure. 2. 3. LISTENING TO SIRIUS SATELLITE RADIO SELECTING AN INPUT SOURCE Before you can listen to SIRIUS Satellite Radio, you must first select the input source on the unit. 1. 2. ADVANCED OPERATION CHECKING THE SIRIUS SIGNAL STRENGTH AND RADIO ID 1. BASIC BASIC OPERATION ADVANCED CONNECTIONS SETUP ADVANCED OPERATION 5. 2. 3. 6. 1. Press the TUNE button twice within two seconds on the remote controller. 2. Press the BAND button to select XM band. 3. Press the P.SCAN button on the remote controller. 4. Preset channels are recalled in sequence (No.1 → No.2 → etc.) for about 10 seconds each. The time changes by the received condition. No stored preset number will be skipped. 5. Pressing the 2 button during prescanning speeds up scanning. Also, pressing the 1 button returns to the previous preset channel. 6. When the desired preset channel is received, cancel the preset scan operation by press the P. SCAN button. 2. 3. 1. Recall the preset number to be cleared with the method described in "PRESET SEARCH MODE". 2. Press the MEMORY button on the front panel or press the MEMO button on the remote controller. 3. The stored preset number blinks in the display for 5 seconds. WhiIe blinking, press the CLEAR button on the front panel or CLR button on the remote controller. 4. "xx CLEAR" appears on the dispIay to indicate that the specified preset number has been cleared. Notes • To clear all stored preset channel, press and hold the T.MODE and the ENTER buttons on the unit for two seconds. • There are 50 preset channels prepared at the factory default. The 50 channels are all set to "CHANNEL 001". Each channel can be stored in the preset memory. You can search for only the preset channels. 2. 1. Press the TUNE button on the remote controller. 2. Press the T.DISP button 3 times to display the signal status on the front display of the unit. 1. SR SAT : SR TERR: 2. (Using the unit) 1. Turn the INPUT SELECTOR knob to select "TUNER". 2. Press the BAND button to select SIRIUS. (Using the remote controller) 1. To select tuner, press the TUNE button twice within two seconds on the remote controller. 2. Press the BAND button to select SIRIUS. • The top line of the display shows the strength of the signal received from satellite, while the bottom line displays the strength of the terrestrial signal received. • An mark indicates the strength of the stronger of the satellite and terrestrial signals. • The display changes as shown below according to the receiving condition. EXCELENT display SRɹɹɹɹ: GOOD display SR : WEAK display SR : NO SIGNAL display SR : 51 TROUBLESHOOTING OTHERS
-
 1
1 -
2
-
3
-
4
-
5
-
6
-
7
-
8
-
9
-
10
-
11
-
12
-
13
-
14
-
15
-
16
-
17
-
18
-
19
-
20
-
21
-
22
-
23
-
24
-
25
-
26
-
27
-
28
-
29
-
30
-
31
-
32
-
33
-
34
-
35
-
36
-
37
-
38
-
39
-
40
-
41
-
42
-
43
-
44
-
45
-
46
-
47
-
 48
48 -
 49
49 -
 50
50 -
 51
51 -
 52
52 -
 53
53 -
 54
54 -
 55
55 -
 56
56 -
 57
57 -
 58
58 -
59
-
60
-
61
-
62
-
63
-
64
-
65
-
66
-
67
-
68
-
69
-
70
-
71
-
72
-
73
-
74
-
75
-
76
-
77
-
78
-
79
-
80
-
81
-
82
-
83
-
84
-
85
-
86
-
87
-
88
-
89
-
90
-
91
-
92
-
93
-
94
-
95
-
96
 |
 |
