Marantz SR6004 SR6004 / SR5004 User Manual - English - Page 7
Fl Display And Indicator - a v receiver
 |
View all Marantz SR6004 manuals
Add to My Manuals
Save this manual to your list of manuals |
Page 7 highlights
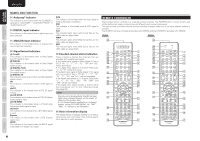
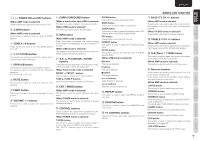
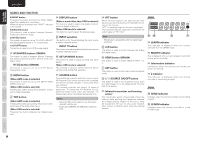
ENGLISH CONNECTIONS FUNCTIONS NAMES AND BASIC BASIC OPERATION ADVANCED CONNECTIONS o MENU button Press this button to enter the SETUP MAIN MENU. !0 EXIT button Press this button to exit from the SETUP MAIN MENU. !1 BAND button Press this button to switch between FM and AM in the TUNER mode. !2 T.MODE button Press this button to select the auto stereo mode or mono mode when the FM band is selected. The "AUTO" indicator lights in the auto stereo mode. (See page 17) !3 MEMORY button Press this button to enter the tuner preset memory numbers or station names. (See page 45) !4 PURE DIRECT indecator This indicator illuminates when PURE DIRECT mode has been selected. !5 CLEAR button Press this button to cancel the station-memory setting mode or preset scan tuning. (See page 46) !6 VOLUME control knob This knob is used to adjust the overall sound level. Turning the control clockwise increases the sound level. !7 Infrared receiving sensor window This window receives infrared signals for the remote controller. !8 AUX INPUT jacks These auxiliary video/audio input jacks accept the connections of a camcorder, portable DVD, game etc. Note VIDEO terminal and S-VIDEO terminal cannot be used at the same time. When using S-VIDEO teminal, do not connect any component to the VIDEO terminal. !9 Cursor (3, 4, 1, 2) / ENTER button Press these buttons to operate the SETUP MAIN MENU and TUNER function. @0 USB connector (SR6004) Connect USB media or iPod to this USB connector. (See page 19, 57) @1 SETUP MIC jack Automatically measure speaker characteristics using the included microphone. (See page 28) @2 PHONES jack This jack may be used to listen to the unit's output through a pair of headphones. Be certain that the headphones have a standard 1/4" stereo phono plug. NAMES AND FUNCTION FL DISPLAY AND INDICATOR a sd f ghjk l ¡0¡1 ¡2 ¡3¡4¡5¡6 ¡7 ¡8 ™0 a SP (speaker) ABC indicator This indicator is illuminated when the speaker system is active. s SLEEP timer indicator This indicator is illuminated when the sleep timer function in the main-ZONE is in use. d DISP (Display Off) indicator This indicator is illuminated when this unit is in the display off mode. f MULTI (ZONE system) AB indicator This indicator is illuminated when the ZONE system is active. g TUNER's indicators AUTO : This indicator illuminates when the tuner's Auto mode is in use. TUNED : This indicator illuminates when the tuner receives a sufficiently strong radio signal. ST(Stereo) : This indicator illuminates when an FM station is being tuned into stereo condition. h (Signal strength) indicator This indicator indicates the strength of the XM Satellite Radio or SIRIUS Satellite Radio signal that is received. j ATT (Attenuation) indicator This indicator is illuminated when the attenuation function is active. Express A AC ex1 ex2 WMA MP3 ¡9 k PEAK indicator This indicator is a monitor for an analog audio input signal. If the selected analog audio input signal is greater than the capable level of internal processing, this will illuminate. If this happens, you should press the ATT button on the remote controller. (See page 8, 42) l V-OFF (Video off mode) indicator This indicator is illuminated when the Video-OFF function is active. ¡0 A-SURR (Auto Surround mode) indicator This indicator is illuminated when the AUTO SURROUND mode is in use. ¡1 EQ mode indicator This indicator is illuminated when the HT-EQ function is active. ¡2 NIGHT mode indicator This indicator is illuminated when this unit is in the Night mode, which reduces the dynamic range of digital program material at low volume levels. ¡3 M-DAX indicator This indicator illuminates when this unit is in the M-DAX mode. ¡4 HDMI indicator This indicator is illuminated when the HDMI device is connected to the unit. 5 SETUP ADVANCED OPERATION TROUBLESHOOTING OTHERS
-
 1
1 -
 2
2 -
 3
3 -
 4
4 -
 5
5 -
 6
6 -
 7
7 -
 8
8 -
 9
9 -
 10
10 -
 11
11 -
 12
12 -
13
-
14
-
15
-
16
-
17
-
18
-
19
-
20
-
21
-
22
-
23
-
24
-
25
-
26
-
27
-
28
-
29
-
30
-
31
-
32
-
33
-
34
-
35
-
36
-
37
-
38
-
39
-
40
-
41
-
42
-
43
-
44
-
45
-
46
-
47
-
48
-
49
-
50
-
51
-
52
-
53
-
54
-
55
-
56
-
57
-
58
-
59
-
60
-
61
-
62
-
63
-
64
-
65
-
66
-
67
-
68
-
69
-
70
-
71
-
72
-
73
-
74
-
75
-
76
-
77
-
78
-
79
-
80
-
81
-
82
-
83
-
84
-
85
-
86
-
87
-
88
-
89
-
90
-
91
-
92
-
93
-
94
-
95
-
96
 |
 |
