Marantz SR6004 SR6004 / SR5004 User Manual - English - Page 21
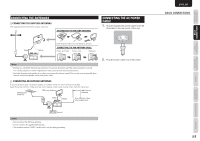
Advanced Connections - bluetooth
 |
View all Marantz SR6004 manuals
Add to My Manuals
Save this manual to your list of manuals |
Page 21 highlights
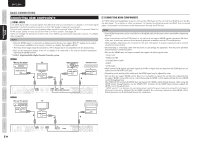
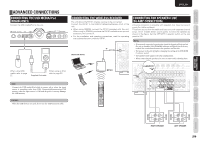
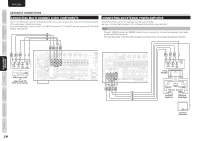
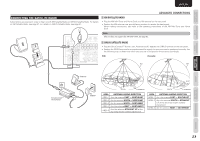
CONNECTIONS FUNCTIONS NAMES AND BASIC BASIC OPERATION ADVANCED CONNECTIONS CONNECTING THE USB MEDIA/iPod (SR6004 ONLY) Connect the USB media/iPod to the unit. ENGLISH CONNECTING THE WIRELESS RECEIVER The unit allows the RX101 wireless receiver to be connected. Connect the RX101 to the M-XPort (Marantz-eXtension Port) of the unit. • When using SR6004, connect the RX101 provided with the unit. When using an SR5004, purchase the RX101 available as an optional accessory, and connect it. • For the installation and operating procedures, read the operating instructions that come with the RX101. Bluetooth device CONNECTING FOR SPEAKER C USE (BI-AMP CONNECTION) A bi-amp connection is possible with speakers that have two sets of inputs (for treble and bass). This allows you to drive the treble and bass units with separate channel amps, which enables better sound quality. Connect the speakers as shown in the figure. Set the SPEAKER C selector switch on the rear panel to ON. Notes • If incorrectly connected, a protective circuit in the unit will trip and set the unit to standby. (The STANDBY indicator will flash.) In such case, recheck the connections between the speakers and the unit. • Turn power to the unit off before changing the setting of the SPEAKER C selector switch. • Use speakers that support a bi-amp configuration. • When connecting the speakers, be sure to remove their shorting bars. When using USB media, refer to page 57. Supplied iPod cable When using an iPod, refer to page 60. Note Connect the USB media/iPod while in power off or when the input source is something other than USB. Connecting/disconnecting USB memory when the input source is USB and the power is on may damage the USB memory. Caution When the USB devices are used, do not use the USB extension cable. RX101 R L R L R L R L FRONT B/HEIGHT FRONT A SURROUND BACK SPEAKER C ZONE SPEAKER A SPEAKER SYSTEMS SURROUND CENTER ADVANCED CONNECTIONS SETUP ADVANCED OPERATION TROUBLESHOOTING OTHERS RIGHT SPEAKER LEFT SPEAKER 19
-
 1
1 -
2
-
3
-
4
-
5
-
6
-
7
-
8
-
9
-
10
-
11
-
12
-
13
-
14
-
15
-
 16
16 -
 17
17 -
 18
18 -
 19
19 -
 20
20 -
 21
21 -
 22
22 -
 23
23 -
 24
24 -
 25
25 -
 26
26 -
27
-
28
-
29
-
30
-
31
-
32
-
33
-
34
-
35
-
36
-
37
-
38
-
39
-
40
-
41
-
42
-
43
-
44
-
45
-
46
-
47
-
48
-
49
-
50
-
51
-
52
-
53
-
54
-
55
-
56
-
57
-
58
-
59
-
60
-
61
-
62
-
63
-
64
-
65
-
66
-
67
-
68
-
69
-
70
-
71
-
72
-
73
-
74
-
75
-
76
-
77
-
78
-
79
-
80
-
81
-
82
-
83
-
84
-
85
-
86
-
87
-
88
-
89
-
90
-
91
-
92
-
93
-
94
-
95
-
96
 |
 |
