Marantz SR6004 SR6004 / SR5004 User Manual - English - Page 26
Setup - user manual
 |
View all Marantz SR6004 manuals
Add to My Manuals
Save this manual to your list of manuals |
Page 26 highlights
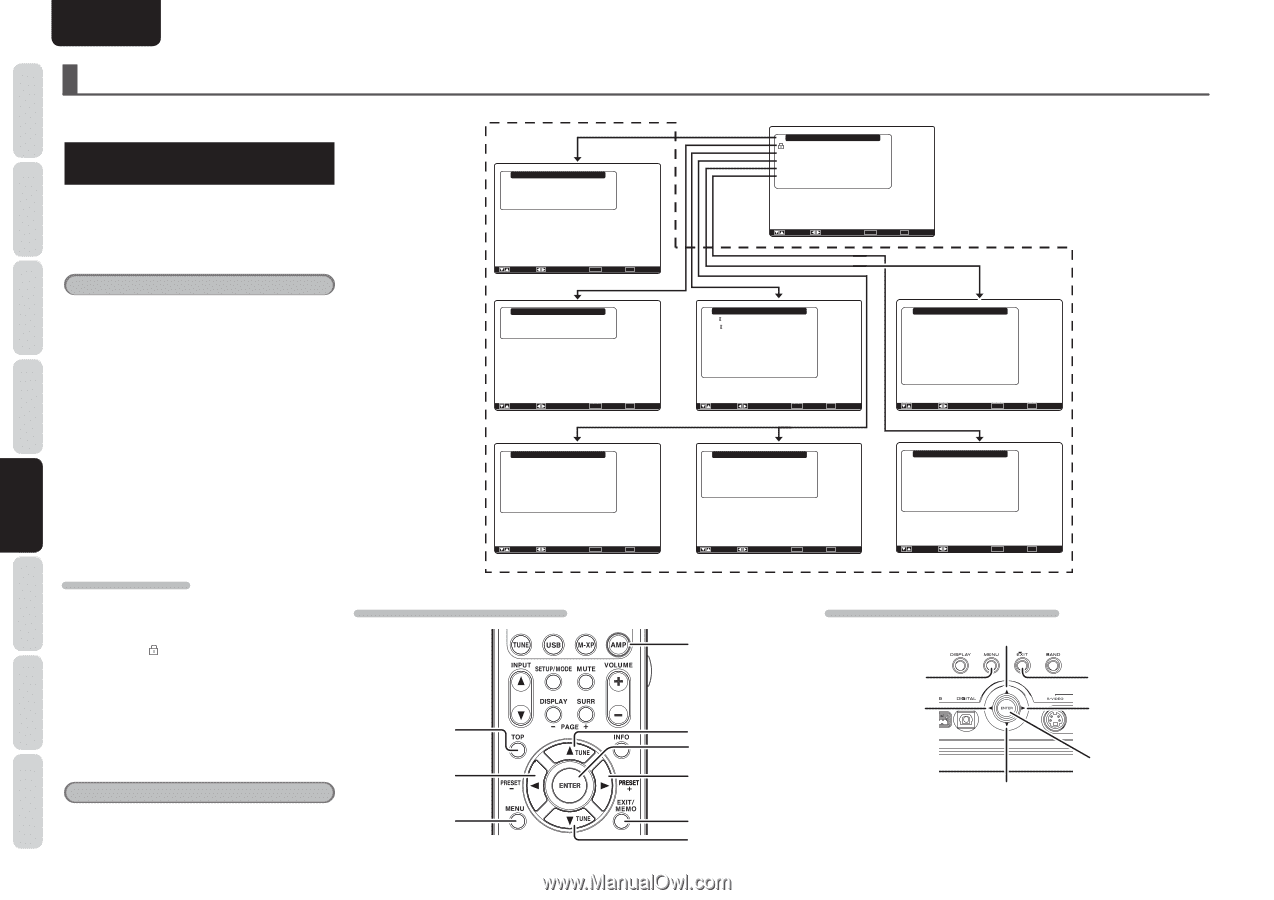
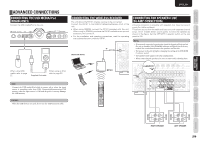
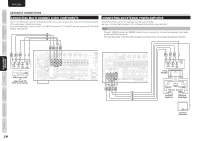
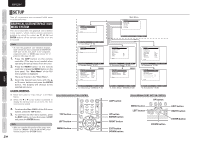
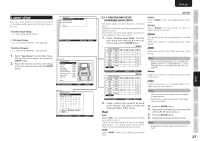
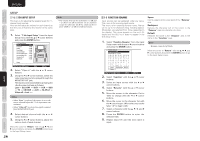
OTHERS TROUBLESHOOTING ADVANCED OPERATION SETUP ADVANCED CONNECTIONS BASIC OPERATION FUNCTIONS CONNECTIONS ENGLISH BASIC NAMES AND SETUP After all components are connected, initial setup must be performed. GRAPHICAL USER INTERFACE (GUI) MENU SYSTEM This unit incorporates the graphical user interface menu system, which makes various operations possible by using the cursor (3, 4, 1 , 2) and ENTER buttons on the remote controller or on the front panel. Note • To view the graphical user interface displays, make certain you have connected the MONITOR OUT jack on the rear panel to the composite, component video or HDMI input of your TV or projector. (See page 13, 14) 1. Press the AMP button on the remote controller. (This step is not needed when operating the setup menus from the unit.) 2. Press the MENU button on the remote controller or press the MENU button on the front panel. The "Main Menu" of the GUI menu system is displayed. There are 6 items in the "Main Menu". 3. Select the desired sub-menu with the 3 or 4 cursor buttons and press the ENTER button. The display will change to the selected sub-menu. LOCKING SUBMENUS (1) Move the cursor to "Input Setup" in the Main Menu. (2) When the 1 or 2 cursor button is pressed to display the (key) icon on an item, the item concerned is locked. 4. To returns the Main MENU of the GUI menu system, press the TOP button. 5. To exit from the GUI menu system, press the EXIT button, or move the cursor to EXIT and press the ENTER button. Note • After you complete this portion of the setup, move cursor to "Return" with the 3 and 4 cursor buttons and press the ENTER button. 24 Input Setup Function Input Setup 7.1ch Input Setup Function Rename Return : Up / Down : Enter : Select Exit : Exit "1. Input Setup" (P. 25) Speaker Setup Auto Setup Manual Setup Return : Up / Down : Enter : Select Exit : Exit "2. Speaker Setup" (P. 27) Video Setup Video Convert OSD Information HDMI Output HDMI Output Resolution Component Output Component I / P Convert : Enable : Output1 : Auto : Main Zone : Disable Return SR6004 : Up / Down : Enter : Select Exit : Exit "4. Video Setup" (SR6004) (P. 35) RC007SR/RC008SR BUTTON CONTROL TOP button LEFT button MENU button Main Menu Main Menu Input Setup Speaker Setup Surround Setup Video Setup Preference Acoustic EQ : Up / Down : Lock / Unlock Enter : Select Exit : Exit Surround Setup Channel Level PL x Music Parameter CS Parameter NEO: 6 Parameter HT-EQ LFE Level M-DAX Return : Off : 0dB : Off : Up / Down : Enter : Select Exit : Exit "3. Surround Setup" (P. 33) Video Setup Video Convert OSD Information HDMI Output Resolution Component I / P Convert : Enable : Auto : Disable SR5004 Return Preference Zone A Setup Zone B Setup DC Trigger Setup Optical Output Standby Mode Audio HDMI Audio HDMI Lip Sync Return : Rec : Normal : Main : Enable : Disable : Up / Down : Enter : Select Exit : Exit "5. Preference" (P. 36) Acoustic EQ EQ. Mode Adjust User EQ Check Audyssey MultEQ Audyssey Dynamic EQ Audyssey Dynamic EQ Adj. Audyssey Dynamic Volume : Off : Off : 0dB : Off Return : Up / Down : Enter : Select Exit : Exit "4. Video Setup" (SR5004) (P. 35) : Up / Down : Change Enter : "6. Acoustic EQ" (P. 38) Exit : Exit AMP button UP button ENTER button RIGHT button EXIT button DOWN button SR6004/SR5004 FRONT BUTTON CONTROL UP button MENU button LEFT button DOWN button EXIT button RIGHT button ENTER button
-
 1
1 -
2
-
3
-
4
-
5
-
6
-
7
-
8
-
9
-
10
-
11
-
12
-
13
-
14
-
15
-
16
-
17
-
18
-
19
-
20
-
 21
21 -
 22
22 -
 23
23 -
 24
24 -
 25
25 -
 26
26 -
 27
27 -
 28
28 -
 29
29 -
 30
30 -
 31
31 -
32
-
33
-
34
-
35
-
36
-
37
-
38
-
39
-
40
-
41
-
42
-
43
-
44
-
45
-
46
-
47
-
48
-
49
-
50
-
51
-
52
-
53
-
54
-
55
-
56
-
57
-
58
-
59
-
60
-
61
-
62
-
63
-
64
-
65
-
66
-
67
-
68
-
69
-
70
-
71
-
72
-
73
-
74
-
75
-
76
-
77
-
78
-
79
-
80
-
81
-
82
-
83
-
84
-
85
-
86
-
87
-
88
-
89
-
90
-
91
-
92
-
93
-
94
-
95
-
96
 |
 |