NVIDIA FX1300 User Guide - Page 117
Restore, Apply, Application, controlled, Modify Profile, Save As, Save Settings, Remove
 |
UPC - 683728142919
View all NVIDIA FX1300 manuals
Add to My Manuals
Save this manual to your list of manuals |
Page 117 highlights
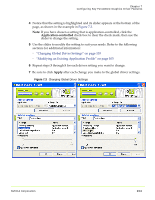
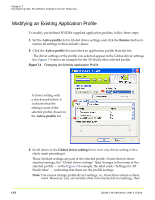
Chapter 7 Configuring Key ForceWare Graphics Driver Features check the associated check box, and save the profile with a new name. Or if you don't save the profile with a new name, you can always use the Restore button to restore the profile to its original state. 4 From the driver settings list, click a setting that you want to change for the selected application profile. Notice that the setting is highlighted. 5 Select the check box (inserts a check mark) for that setting and click Apply. Notice that its slider appears at the bottom of the page. 6 If the Application‐controlled check box is checked, click the check box to clear the check mark and click Apply. 7 Use the slider to modify the setting to suit your needs. Refer to the following sections for additional information: 8 Repeat steps 4 through 7 for each driver setting you want to change. 9 Be sure to click Apply after each change you make to a driver setting. Note: If you do not want to save these settings with a new name, these settings automatically become part of the existing profile. But you can always click the Restore button to restore the settings to their original state. 10To save the changed profile settings with a new name, click the Modify Profile button, then click Save As to display the Save Settings dialog box (Figure 7.5). 11 From the Save Settings dialog box, you can either retain the existing name or rename the profile. If you retain the existing name, thus overwriting the profile with the new settings, you can always click the Restore button to restore the original settings when you select this profile from the Application profile list. If you renamed the profile (Figure 7.6), then it is considered a "new" profile and the Remove button appears when you retrieve the profile from the Application profile list. You can always remove these types of profiles from the list. NVIDIA Corporation 106
-
 1
1 -
2
-
3
-
4
-
5
-
6
-
7
-
8
-
9
-
10
-
11
-
12
-
13
-
14
-
15
-
16
-
17
-
18
-
19
-
20
-
21
-
22
-
23
-
24
-
25
-
26
-
27
-
28
-
29
-
30
-
31
-
32
-
33
-
34
-
35
-
36
-
37
-
38
-
39
-
40
-
41
-
42
-
43
-
44
-
45
-
46
-
47
-
48
-
49
-
50
-
51
-
52
-
53
-
54
-
55
-
56
-
57
-
58
-
59
-
60
-
61
-
62
-
63
-
64
-
65
-
66
-
67
-
68
-
69
-
70
-
71
-
72
-
73
-
74
-
75
-
76
-
77
-
78
-
79
-
80
-
81
-
82
-
83
-
84
-
85
-
86
-
87
-
88
-
89
-
90
-
91
-
92
-
93
-
94
-
95
-
96
-
97
-
98
-
99
-
100
-
101
-
102
-
103
-
104
-
105
-
106
-
107
-
108
-
109
-
110
-
111
-
 112
112 -
 113
113 -
 114
114 -
 115
115 -
 116
116 -
 117
117 -
 118
118 -
 119
119 -
 120
120 -
 121
121 -
 122
122 -
123
-
124
-
125
-
126
-
127
-
128
-
129
-
130
-
131
-
132
-
133
-
134
-
135
-
136
-
137
-
138
-
139
-
140
-
141
-
142
-
143
-
144
-
145
-
146
-
147
-
148
-
149
-
150
-
151
-
152
-
153
-
154
-
155
-
156
-
157
-
158
-
159
-
160
-
161
-
162
-
163
-
164
-
165
-
166
-
167
-
168
-
169
-
170
-
171
-
172
-
173
-
174
-
175
-
176
-
177
-
178
-
179
-
180
-
181
-
182
-
183
-
184
-
185
-
186
-
187
-
188
-
189
-
190
-
191
-
192
-
193
-
194
-
195
-
196
-
197
-
198
-
199
-
200
-
201
-
202
-
203
-
204
-
205
-
206
-
207
-
208
-
209
-
210
-
211
-
212
-
213
-
214
-
215
-
216
-
217
-
218
-
219
-
220
-
221
-
222
-
223
-
224
-
225
-
226
-
227
-
228
-
229
-
230
-
231
-
232
-
233
-
234
-
235
-
236
-
237
-
238
 |
 |
