NVIDIA FX1300 User Guide - Page 120
Adding Profiles With an SLI Configuration, Deleting Application Profiles, Apply
 |
UPC - 683728142919
View all NVIDIA FX1300 manuals
Add to My Manuals
Save this manual to your list of manuals |
Page 120 highlights
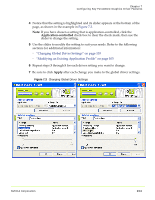
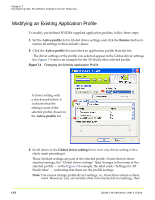
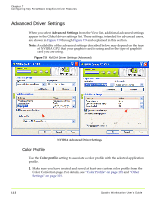
Chapter 7 Configuring Key ForceWare Graphics Driver Features 6 Click OK to return to the previous page. The Application profiles list displays the new profile name, as shown in the image on the right in Figure 7.7. 7 For each driver setting you want to change for this new profile, follow these steps: a Select the check box of the driver setting you want to change and save as part of the new profile. b Click Apply. c If needed, clear the Application controlled check box and click Apply. d Use the slider to set the value you want and click Apply. For additional information on specific driver settings, see "Basic Driver Settings" on page 110 or "Advanced Driver Settings" on page 113. e Click Apply. Adding Profiles With an SLI Configuration If you are an advanced user running an SLI multi‐GPU configuration and want to create profiles that utilize SLI rendering technology, see • "SLI Rendering Mode" on page 119 and "About Using Other SLI‐based Advanced Settings" on page 119. • "Using NVIDIA SLI Technology" on page 156 Deleting Application Profiles You can remove the following types of profiles - i.e., the Remove button is available for use when: • From the Active profile list, you have selected a profile you have added. • From the Active profile list, you have selected an existing pre‐defined profile that you have modified and then renamed. Note: Remember that when you delete a profile that is associated with a single application or multiple applications, all NVIDIA settings for that one or multiple applications as you've set in that profile are remove. d If you have created another profile that contains any of these same applications, you may want to use that profile. 109 Quadro Workstation User's Guide
-
 1
1 -
2
-
3
-
4
-
5
-
6
-
7
-
8
-
9
-
10
-
11
-
12
-
13
-
14
-
15
-
16
-
17
-
18
-
19
-
20
-
21
-
22
-
23
-
24
-
25
-
26
-
27
-
28
-
29
-
30
-
31
-
32
-
33
-
34
-
35
-
36
-
37
-
38
-
39
-
40
-
41
-
42
-
43
-
44
-
45
-
46
-
47
-
48
-
49
-
50
-
51
-
52
-
53
-
54
-
55
-
56
-
57
-
58
-
59
-
60
-
61
-
62
-
63
-
64
-
65
-
66
-
67
-
68
-
69
-
70
-
71
-
72
-
73
-
74
-
75
-
76
-
77
-
78
-
79
-
80
-
81
-
82
-
83
-
84
-
85
-
86
-
87
-
88
-
89
-
90
-
91
-
92
-
93
-
94
-
95
-
96
-
97
-
98
-
99
-
100
-
101
-
102
-
103
-
104
-
105
-
106
-
107
-
108
-
109
-
110
-
111
-
112
-
113
-
114
-
 115
115 -
 116
116 -
 117
117 -
 118
118 -
 119
119 -
 120
120 -
 121
121 -
 122
122 -
 123
123 -
 124
124 -
 125
125 -
126
-
127
-
128
-
129
-
130
-
131
-
132
-
133
-
134
-
135
-
136
-
137
-
138
-
139
-
140
-
141
-
142
-
143
-
144
-
145
-
146
-
147
-
148
-
149
-
150
-
151
-
152
-
153
-
154
-
155
-
156
-
157
-
158
-
159
-
160
-
161
-
162
-
163
-
164
-
165
-
166
-
167
-
168
-
169
-
170
-
171
-
172
-
173
-
174
-
175
-
176
-
177
-
178
-
179
-
180
-
181
-
182
-
183
-
184
-
185
-
186
-
187
-
188
-
189
-
190
-
191
-
192
-
193
-
194
-
195
-
196
-
197
-
198
-
199
-
200
-
201
-
202
-
203
-
204
-
205
-
206
-
207
-
208
-
209
-
210
-
211
-
212
-
213
-
214
-
215
-
216
-
217
-
218
-
219
-
220
-
221
-
222
-
223
-
224
-
225
-
226
-
227
-
228
-
229
-
230
-
231
-
232
-
233
-
234
-
235
-
236
-
237
-
238
 |
 |
