Nokia N-GAGE User Guide - Page 100
Messaging settings, Text message settings, multimedia message.
 |
UPC - 758478517055
View all Nokia N-GAGE manuals
Add to My Manuals
Save this manual to your list of manuals |
Page 100 highlights
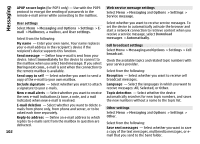
Messaging Before you can view SIM messages, you must copy them to a folder in your device. 1 Select Options > Mark/Unmark > Mark or Mark all to mark messages. 2 Select Options > Copy. A list of folders opens. 3 To start copying, select a folder. To view the messages, open the folder. Messaging settings The settings may be preconfigured in your device, or you may receive them in a message. To enter settings manually, fill in all fields marked with Must be defined or an asterisk. Some or all message centres or access points may be preset for your device by your service provider, and you may not be able to change, create, edit, or remove them. Text message settings Select Menu > Messaging and Options > Settings > Text message. Select from the following: Message centres - View a list of all text message centres that have been defined. Message centre in use - Select which message centre to use to deliver text messages. Character encoding - To use character conversion to another encoding system when available, select Reduced support. 100 Receive report - Select whether the network sends delivery reports on your messages (network service). Message validity - Select how long the message centre resends your message if the first attempt fails (network service). If the message cannot be sent within the validity period, the message is deleted from the message centre. Message sent as - To learn if your message centre is able to convert text messages into these other formats, contact your service provider. Preferred connection - Select the connection to use. Reply via same centre - Select whether you want the reply message to be sent using the same text message centre number (network service). Multimedia message settings Select Menu > Messaging and Options > Settings > Multimedia message. Select from the following: Image size - Define the size of the image in a multimedia message. MMS creation mode - If you select Guided, the device informs you if you try to send a message that may not be supported by the recipient. If you select Restricted, the device prevents you from sending messages that may not be supported. To include content in your messages without notifications, select Free. Access point in use - Select which access point is used as the preferred connection. Multimedia retrieval - Select how you want to receive messages. To receive messages automatically in your home network, select Auto in home netw.. Outside your home network, you receive a notification that there is a message to retrieve in the multimedia message centre. If you select Always automatic, your device automatically
-
 1
1 -
2
-
3
-
4
-
5
-
6
-
7
-
8
-
9
-
10
-
11
-
12
-
13
-
14
-
15
-
16
-
17
-
18
-
19
-
20
-
21
-
22
-
23
-
24
-
25
-
26
-
27
-
28
-
29
-
30
-
31
-
32
-
33
-
34
-
35
-
36
-
37
-
38
-
39
-
40
-
41
-
42
-
43
-
44
-
45
-
46
-
47
-
48
-
49
-
50
-
51
-
52
-
53
-
54
-
55
-
56
-
57
-
58
-
59
-
60
-
61
-
62
-
63
-
64
-
65
-
66
-
67
-
68
-
69
-
70
-
71
-
72
-
73
-
74
-
75
-
76
-
77
-
78
-
79
-
80
-
81
-
82
-
83
-
84
-
85
-
86
-
87
-
88
-
89
-
90
-
91
-
92
-
93
-
94
-
 95
95 -
 96
96 -
 97
97 -
 98
98 -
 99
99 -
 100
100 -
 101
101 -
 102
102 -
 103
103 -
 104
104 -
 105
105 -
106
-
107
-
108
-
109
-
110
-
111
-
112
-
113
-
114
-
115
-
116
-
117
-
118
-
119
-
120
-
121
-
122
-
123
-
124
-
125
-
126
-
127
-
128
-
129
-
130
-
131
-
132
-
133
-
134
-
135
-
136
-
137
-
138
-
139
-
140
-
141
-
142
-
143
-
144
-
145
-
146
-
147
-
148
-
149
-
150
-
151
-
152
-
153
-
154
-
155
-
156
-
157
-
158
-
159
 |
 |