Onkyo TX SR805 Owner Manual - Page 16
TEST TONE, CH SEL, LEVEL-, and LEVEL, Rewind and Fast Forward - front display
 |
UPC - 751398007606
View all Onkyo TX SR805 manuals
Add to My Manuals
Save this manual to your list of manuals |
Page 16 highlights
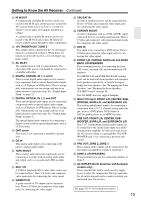
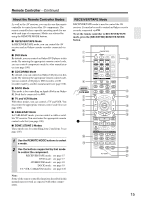
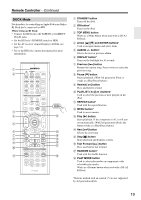
Remote Controller-Continued For detailed information, see the pages in parentheses. A STANDBY button (44) Sets the AV receiver to Standby. B ON button (44) Turns on the AV receiver. C INPUT SELECTOR buttons (62) Used to select the input source. D MACRO buttons (112) Used with the Macro function. E DIMMER button (68) Adjusts the display brightness. F Arrow and ENTER buttons Used to select and adjust settings. G CH +/- button (67) Selects radio presets. H SETUP button Used to change settings. I DISPLAY button (69) Displays information about the current input source. J LISTENING MODE buttons (71) Used to select the listening modes. The [STEREO], [SURR], and LISTENING MODE [ ]/[ ] buttons can be used at any time, regardless of the currently selected remote controller mode. K TEST TONE, CH SEL, LEVEL-, and LEVEL+ buttons (68, 90) Used to adjust the level of each speaker. L LIGHT button Turns the remote controller's illuminated buttons on or off. M D.TUN button (64) Selects the Direct tuning mode for radio. N REMOTE MODE buttons (15) Used to select the remote controller modes. When you press a button, the REMOTE MODE button for the currently selected mode lights up. O SLEEP button (69) Used with the Sleep function. P VOL [ ]/[ ] button (62) Adjusts the volume of the AV receiver regardless of the currently selected remote controller mode. Q RETURN button Returns to the previous display when changing settings. R MUTING button (68) Mutes or unmutes the AV receiver. S Re-EQ button (81) Turns the Re-EQ function on or off. T L NIGHT button (81) Turns the Late Night function on or off. U AUDIO SEL button (70) Selects the audio input: analog, digital, HDMI, or multichannel. ■ TAPE mode On twin cassette decks, only Deck B can be controlled. 1 Previous and Next [ ]/[ ] buttons The Previous [ ] button selects the previous track. During playback it selects the beginning of the current track. The Next [ ] button selects the next track. Depending on how they were recorded, the Previous and Next [ ]/[ ] buttons may not work properly with some cassette tapes. Play [ ] button Starts playback. Rewind and Fast Forward [ ]/[ ] buttons The Rewind [ ] button starts rewind. The Fast Forward [ ] button starts fast forward. Reverse Play [ ] button Starts reverse playback. Stop [ ] button Stops playback. REC [ ] button Starts recording. 16
-
 1
1 -
2
-
3
-
4
-
5
-
6
-
7
-
8
-
9
-
10
-
 11
11 -
 12
12 -
 13
13 -
 14
14 -
 15
15 -
 16
16 -
 17
17 -
 18
18 -
 19
19 -
 20
20 -
 21
21 -
22
-
23
-
24
-
25
-
26
-
27
-
28
-
29
-
30
-
31
-
32
-
33
-
34
-
35
-
36
-
37
-
38
-
39
-
40
-
41
-
42
-
43
-
44
-
45
-
46
-
47
-
48
-
49
-
50
-
51
-
52
-
53
-
54
-
55
-
56
-
57
-
58
-
59
-
60
-
61
-
62
-
63
-
64
-
65
-
66
-
67
-
68
-
69
-
70
-
71
-
72
-
73
-
74
-
75
-
76
-
77
-
78
-
79
-
80
-
81
-
82
-
83
-
84
-
85
-
86
-
87
-
88
-
89
-
90
-
91
-
92
-
93
-
94
-
95
-
96
-
97
-
98
-
99
-
100
-
101
-
102
-
103
-
104
-
105
-
106
-
107
-
108
-
109
-
110
-
111
-
112
-
113
-
114
-
115
-
116
-
117
-
118
-
119
-
120
 |
 |