Onkyo TX SR805 Owner Manual - Page 99
Tuner, Analog Multich, AM Freq Step on some models, Satellite Radio on North American model - subwoofer not working
 |
UPC - 751398007606
View all Onkyo TX SR805 manuals
Add to My Manuals
Save this manual to your list of manuals |
Page 99 highlights
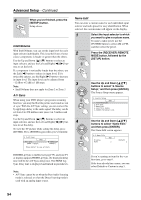
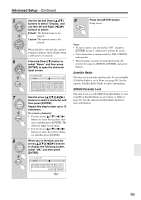
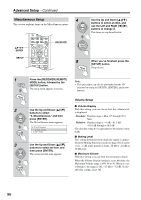
Advanced Setup-Continued Tuner ■ AM Freq Step (on some models) See "AM Frequency Step Setup (on some models)" on page 61. ■ Satellite Radio (on North American model) If you connect an XM Satellite Radio antenna or SIRIUS Satellite Radio antenna to the AV receiver (both sold separately), set this setting to XM or SIRIUS respectively. If you connect both types of antenna, select XM/SIRIUS. Otherwise, select None. See the separate Satellite Radio Guide for more information. Analog Multich ■ Subwoofer Input Sensitivity Some DVD players output the LFE channel from their analog subwoofer output at 15 dB higher than normal. With this setting, you can change the AV receiver's subwoofer sensitivity to match your DVD player. Note that this setting only affects signals connected to the AV receiver's MULTI CH SUBWOOFER jack. You can select 0 dB, 5 dB, 10 dB, or 15 dB. If you find that your subwoofer is too loud, try the 10 dB or 15 dB setting. HDMI ■ HDMI Audio This setting determines whether audio received by an HDMI input is output by the HDMI OUT. You may want to change this setting to On if your TV is connected to the HDMI OUT and you want to listen to audio from an HDMI component through your TV's speakers. Normally, it should be set to Off. Off: HDMI audio is not output (default). On: HDMI audio is output. Notes: • If On is selected and the signal can be output by the TV, the AV receiver will output no sound through its speakers. • When TV Control is enabled, this setting is set to Auto. • With some TVs and input signals, no sound may be output even if On is selected. • When the HDMI Audio setting is set to On, or TV Control is set to Enable and you're listening through your TV's speakers (see page 37), if you turn up the AV receiver's volume control, the sound will be output by the AV receiver's speakers. To stop the AV receiver's speakers producing sound, change the settings, change your TV's settings, or turn down the AV receiver's volume. ■ Lip Sync The Lip Sync function can automatically synchronize HDMI audio and video that's gotten out of sync due to the complex digital video processing being performed by your HDMI-compatible TV. With HDMI Lip Sync, the audio delay required to synchronize the audio and video is calculated and applied automatically by the AV receiver. Disable: HDMI lip sync disabled. Enable: HDMI lip sync enabled. Notes: • This function works only if your HDMI-compatible TV supports HDMI Lip Sync. • You can check the amount of delay being applied by the HDMI Lip Sync function on the A/V Sync screen (see page 94). ■ xvYCC If your HDMI source and HDMI-compatible TV both support the xvYCC color standard, you can enable xvYCC color on the AV receiver with this setting. Disable: xvYCC color disabled. Enable: xvYCC color enabled. ■ Control This function allows CEC-compatible components or RIHD-compatible components connected via HDMI to be controlled with the AV receiver. Disable: HDMI Control disabled. Enable: HDMI Control enabled. Notes: • Select Disable if a connected component is incompat- ible or you're not sure about its compatibility. • If operation is unreliable when set to Enable, select Disable instead. • When the HDMI Audio setting is set to On, or TV Control is set to Enable and you're listening through your TV's speakers (see page 37), if you turn up the AV receiver's volume control, the sound will be output by the AV receiver's speakers. To stop the AV receiver's speakers producing sound, change the settings, change your TV's settings, or turn down the AV receiver's volume. Power Control To link the power functions of CEC-compatible components or RIHD-compatible components connected via HDMI, select Enable. Disable: Power Control disabled. Enable: Power Control enabled. Notes: • The Power Control setting can be set only when the above Control setting is set to Enable. 99
-
 1
1 -
2
-
3
-
4
-
5
-
6
-
7
-
8
-
9
-
10
-
11
-
12
-
13
-
14
-
15
-
16
-
17
-
18
-
19
-
20
-
21
-
22
-
23
-
24
-
25
-
26
-
27
-
28
-
29
-
30
-
31
-
32
-
33
-
34
-
35
-
36
-
37
-
38
-
39
-
40
-
41
-
42
-
43
-
44
-
45
-
46
-
47
-
48
-
49
-
50
-
51
-
52
-
53
-
54
-
55
-
56
-
57
-
58
-
59
-
60
-
61
-
62
-
63
-
64
-
65
-
66
-
67
-
68
-
69
-
70
-
71
-
72
-
73
-
74
-
75
-
76
-
77
-
78
-
79
-
80
-
81
-
82
-
83
-
84
-
85
-
86
-
87
-
88
-
89
-
90
-
91
-
92
-
93
-
 94
94 -
 95
95 -
 96
96 -
 97
97 -
 98
98 -
 99
99 -
 100
100 -
 101
101 -
 102
102 -
 103
103 -
 104
104 -
105
-
106
-
107
-
108
-
109
-
110
-
111
-
112
-
113
-
114
-
115
-
116
-
117
-
118
-
119
-
120
 |
 |
