Onkyo TX SR805 Owner Manual - Page 56
Press [ENTER]., Notes, Retry, Cancel - no output to speakers
 |
UPC - 751398007606
View all Onkyo TX SR805 manuals
Add to My Manuals
Save this manual to your list of manuals |
Page 56 highlights
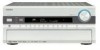
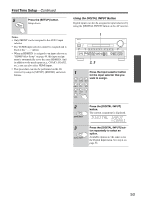
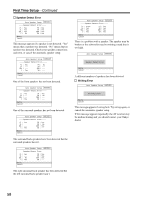
First Time Setup-Continued 1 Turn on the AV receiver and the connected TV. On the TV, select the input to which the AV receiver is connected. 2 SETUP MIC Place the setup microphone at the 1st measurement position, and connect it to the SETUP MIC jack. Auto Speaker Setup AUDYSSEY Please place microphone at center of listening area at ear height. Push Enter : Next Notes: • Make sure the microphone is hori- zontal. • If there's an obstacle between the microphone and any speaker, the automatic setup will not work correctly. Set up the room as you would when enjoying a DVD movie. • Positioning the microphone close to where your ears would normally be will provide the best results. You can set the height of the microphone by using a tripod or level table. 3 Press [ENTER]. Auto Speaker Setup AUDYSSEY Do not unplug microphone. Please keep quiet. Now Measuring... A test tone is output by each speaker in turn, as Audyssey MultEQ XT determines which speakers are connected. This takes a few minutes. Note: • If any extraneous noise is picked up by the microphone, the automatic setup may not work correctly, so keep quiet. 4 ENTER ENTER 5 6 The speaker detect results appear. Auto Speaker Setup AUDYSSEY -----SP Detect Result----- FL : Yes SL : Yes SBL : Yes C : No FR : Yes SR : Yes SBR : Yes SW : Yes Next Retry Cancel "Yes" means that the speaker was detected. "No" means that no speaker was detected. If you agree with the results, use the Up and Down [ ]/[ ] buttons to select Next, and then press [ENTER]. The options are: Next: Proceed to the next step. Retry: Return to step 2 and try again. Cancel: Cancel the automatic speaker setup. The following screen appears. Auto Speaker Setup AUDYSSEY Please place microphone at 2nd Position at ear height. Push Enter : Next Place the setup microphone at the next position (see page 55), and then press [ENTER]. Audyssey MultEQ XT performs more measurements. This takes a few minutes. Auto Speaker Setup AUDYSSEY Do not unplug microphone. Please keep quiet. Now Measuring... When prompted, place the setup microphone at the next position, and repeat step 5. 56
-
 1
1 -
2
-
3
-
4
-
5
-
6
-
7
-
8
-
9
-
10
-
11
-
12
-
13
-
14
-
15
-
16
-
17
-
18
-
19
-
20
-
21
-
22
-
23
-
24
-
25
-
26
-
27
-
28
-
29
-
30
-
31
-
32
-
33
-
34
-
35
-
36
-
37
-
38
-
39
-
40
-
41
-
42
-
43
-
44
-
45
-
46
-
47
-
48
-
49
-
50
-
 51
51 -
 52
52 -
 53
53 -
 54
54 -
 55
55 -
 56
56 -
 57
57 -
 58
58 -
 59
59 -
 60
60 -
 61
61 -
62
-
63
-
64
-
65
-
66
-
67
-
68
-
69
-
70
-
71
-
72
-
73
-
74
-
75
-
76
-
77
-
78
-
79
-
80
-
81
-
82
-
83
-
84
-
85
-
86
-
87
-
88
-
89
-
90
-
91
-
92
-
93
-
94
-
95
-
96
-
97
-
98
-
99
-
100
-
101
-
102
-
103
-
104
-
105
-
106
-
107
-
108
-
109
-
110
-
111
-
112
-
113
-
114
-
115
-
116
-
117
-
118
-
119
-
120
 |
 |