Onkyo TX SR805 Owner Manual - Page 53
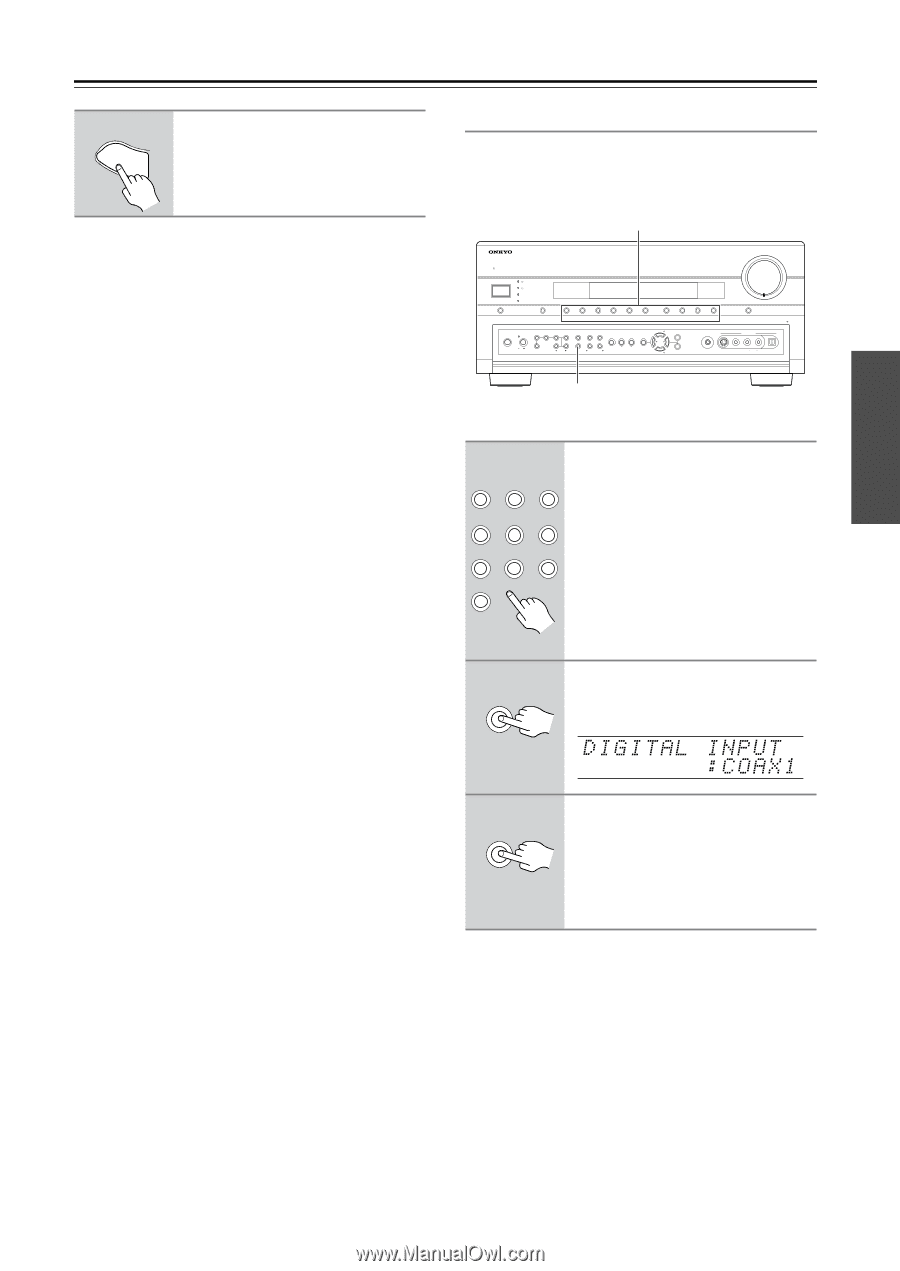
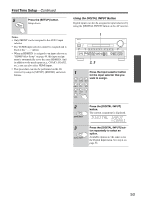
Using the DIGITAL INPUT Button, Press the [DIGITAL INPUT]
 |
UPC - 751398007606
View all Onkyo TX SR805 manuals
Add to My Manuals
Save this manual to your list of manuals |
Page 53 highlights
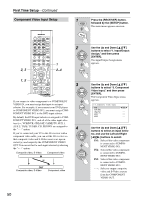
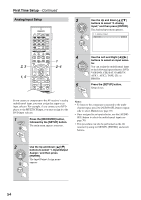
First Time Setup-Continued 5 SETUP Press the [SETUP] button. Setup closes. Using the DIGITAL INPUT Button Digital inputs can also be assigned to input selectors by using the [DIGITAL INPUT] button on the AV receiver. Notes: • Only FRONT can be assigned to the AUX 2 input selector. • The TUNER input selector cannot be assigned and is fixed at the "- - -" option. • When an HDMI IN is assigned to an input selector in "HDMI Video Setup" on page 48, this input assignment is automatically set to the same HDMI IN. And in addition to the usual inputs (e.g., COAX1, COAX2, etc.), you can also select HDMI inputs. • This procedure can also be performed on the AV receiver by using its [SETUP], [ENTER], and arrow buttons. 1 STANDBY/ON STANDBY READY ZONE 2 ZONE 3 MASTER VOLUME PURE AUDIO AUDIO SEL DVD VCR/DVR CBL/SAT GAME/TV AUX 1 AUX 2 TAPE TUNER PHONES POWER ZONE 2 OFF LEVEL TONE HDMI OUT STEREO THX TUNING RT/PTY/TP MEMORY MODE SETUP ON OFF ZONE 3 DIGITAL INPUT LISTENING MODE CLEAR TUNING PRESET TUNING RETURN ENTER CD PHONO SETUP MIC DISPLAY AUX 2 INPUT PUSH TO OPEN S VIDEO VIDEO L AUDIO R DIGITAL 2, 3 1 Press the input selector button for the input selector that you want to assign. DVD VCR/DVR CBL/SAT GAME/TV AUX 1 AUX 2 TAPE TUNER CD PHONO 2 DIGITAL INPUT Press the [DIGITAL INPUT] button. The current assignment is displayed. 3 DIGITAL INPUT Press the [DIGITAL INPUT] button repeatedly to select an option. Available options are the same as for the Digital Input menu. See step 4 on page 52. 53
-
 1
1 -
2
-
3
-
4
-
5
-
6
-
7
-
8
-
9
-
10
-
11
-
12
-
13
-
14
-
15
-
16
-
17
-
18
-
19
-
20
-
21
-
22
-
23
-
24
-
25
-
26
-
27
-
28
-
29
-
30
-
31
-
32
-
33
-
34
-
35
-
36
-
37
-
38
-
39
-
40
-
41
-
42
-
43
-
44
-
45
-
46
-
47
-
 48
48 -
 49
49 -
 50
50 -
 51
51 -
 52
52 -
 53
53 -
 54
54 -
 55
55 -
 56
56 -
 57
57 -
 58
58 -
59
-
60
-
61
-
62
-
63
-
64
-
65
-
66
-
67
-
68
-
69
-
70
-
71
-
72
-
73
-
74
-
75
-
76
-
77
-
78
-
79
-
80
-
81
-
82
-
83
-
84
-
85
-
86
-
87
-
88
-
89
-
90
-
91
-
92
-
93
-
94
-
95
-
96
-
97
-
98
-
99
-
100
-
101
-
102
-
103
-
104
-
105
-
106
-
107
-
108
-
109
-
110
-
111
-
112
-
113
-
114
-
115
-
116
-
117
-
118
-
119
-
120
 |
 |