Onkyo TX SR805 Owner Manual - Page 90
Speaker Level Calibration, Setup, and then press [ENTER].
 |
UPC - 751398007606
View all Onkyo TX SR805 manuals
Add to My Manuals
Save this manual to your list of manuals |
Page 90 highlights
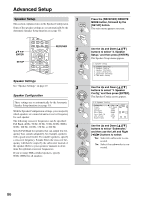
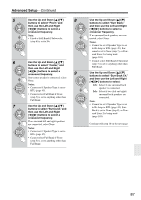
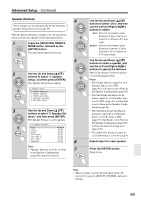
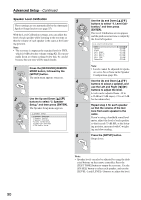
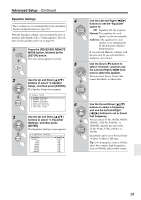
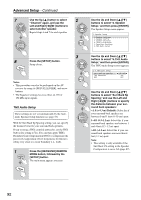
Advanced Setup-Continued Speaker Level Calibration These settings are set automatically by the Automatic Speaker Setup function (see page 55). With the Level Calibration settings, you can adjust the level of each speaker while listening to the test tone so that the volume of each speaker is the same at the listening position. Note: • The test tone is output at the standard level for THX, which is 0 dB (absolute volume setting 82). If you normally listen at volume settings below this, be careful because the test tone will be much louder. 1 RECEIVER Press the [RECEIVER] REMOTE MODE button, followed by the [SETUP] button. The main menu appears onscreen. SETUP 2 ENTER ENTER Use the Up and Down [ ]/[ ] buttons to select "2. Speaker Setup," and then press [ENTER]. The Speaker Setup menu appears. 2.Speaker Setup 1.Speaker Settings 2.Speaker Config 3.Speaker Distance 4.Level Calibration 5.Equalizer Settings 6.THX Audio Setup 3 ENTER ENTER 4 ENTER 5 6 SETUP Use the Up and Down [ ]/[ ] buttons to select "4. Level Calibration," and then press [ENTER]. The Level Calibration screen appears and the pink noise test tone is output by the front left speaker. 2-4.Level Calibration Left Center Right Surr Right Surr Back R Surr Back L Surr Left Subwoofer -12.0dB -12.0dB -12.0dB -12.0dB -12.0dB -12.0dB -12.0dB -15.0dB Note: • Levels cannot be adjusted for speak- ers set to No or None in the Speaker Configuration (page 86). Use the Up and Down [ ]/[ ] buttons to select a speaker, and use the Left and Right [ ]/[ ] buttons to adjust the level. Levels can be adjusted from -12 to +12 dB in 0.5 dB steps (-15 to +12 dB for the subwoofer). Repeat step 4 for each speaker so that the volume of the test tone from each speaker is the same. If you're using a handheld sound level meter, adjust the level of each speaker so that it reads 75 dB SPL at the listening position, measured with C-weighting and slow reading. Press the [SETUP] button. Setup closes. Note: • Speaker levels can also be adjusted by using the dedi- cated buttons on the remote controller. Press the [TEST TONE] button to output the test tone. Use the [CH SEL] button to select each speaker, and use the [LEVEL-] and [LEVEL+] buttons to adjust the level. 90
-
 1
1 -
2
-
3
-
4
-
5
-
6
-
7
-
8
-
9
-
10
-
11
-
12
-
13
-
14
-
15
-
16
-
17
-
18
-
19
-
20
-
21
-
22
-
23
-
24
-
25
-
26
-
27
-
28
-
29
-
30
-
31
-
32
-
33
-
34
-
35
-
36
-
37
-
38
-
39
-
40
-
41
-
42
-
43
-
44
-
45
-
46
-
47
-
48
-
49
-
50
-
51
-
52
-
53
-
54
-
55
-
56
-
57
-
58
-
59
-
60
-
61
-
62
-
63
-
64
-
65
-
66
-
67
-
68
-
69
-
70
-
71
-
72
-
73
-
74
-
75
-
76
-
77
-
78
-
79
-
80
-
81
-
82
-
83
-
84
-
 85
85 -
 86
86 -
 87
87 -
 88
88 -
 89
89 -
 90
90 -
 91
91 -
 92
92 -
 93
93 -
 94
94 -
 95
95 -
96
-
97
-
98
-
99
-
100
-
101
-
102
-
103
-
104
-
105
-
106
-
107
-
108
-
109
-
110
-
111
-
112
-
113
-
114
-
115
-
116
-
117
-
118
-
119
-
120
 |
 |