Pioneer AVIC-F30BT Operation Manual - Page 143
Changing to the splash screen, stored in the SD memory card, Setting for rear view camera
 |
View all Pioneer AVIC-F30BT manuals
Add to My Manuals
Save this manual to your list of manuals |
Page 143 highlights
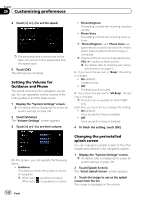
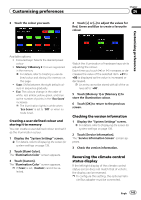
Customising preferences Chapter 26 Customising preferences 4 Touch [OK]. The image is set as the splash screen, and the "System Settings" screen returns. Changing to the splash screen stored in the SD memory card You can change the splash screen to other images stored in the SD memory card. Copy your chosen image to the SD memory card, and select the image to import. p Splash screen images should be used with- in the following formats; ! BMP or JPEG files ! Allowable horizontal and vertical size are 2 592 pixels x 1 944 pixels or smaller ! Allowable data size is 6 MB or smaller p Proper compatibility with allowable files is not guaranteed. p Imported original images will be stored in the built-in memory, but the ability to save these images cannot be guaranteed completely. If your original image data is deleted, insert the SD memory card again and re-import the original image. p The maximum number of images, including the images in the built-in memory, that can be imported and displayed on the list is 200. 1 Create a folder named "Pictures" on the top-most directory of the SD memory card. 2 Store the picture files in the "Pictures" folder. 3 Insert an SD memory card into the SD card slot. = For details of the operation, refer to Inserting and ejecting an SD memory card on page 17. 4 Display the "System Settings" screen. = For details, refer to Displaying the screen for system settings on page 139. 5 Touch [Splash Screen]. The "Select Splash Screen" screen appears. 6 Touch [Select from SD]. The "Select Splash Screen" screen appears. 7 Touch the image to use as the splash screen from the list. The image is displayed on the screen. 8 Touch [OK]. The image is set as the splash screen, and the "System Settings" screen returns. p Images imported from the SD memory card are added to the list on "Select Splash Screen". Setting for rear view camera The following two functions are available. The rear view camera feature requires a separately sold rear view camera (e.g. ND-BC4). (For details, consult your dealer.) Rear view camera The navigation system features a function that automatically switches to the full-screen image of the rear view camera installed on your vehicle. When the gearstick is in the REVERSE (R) position, the screen automatically switches to full-screen rear view camera image. Switching to the "Parking Assist" screen When the following conditions are met, touch on the screen of the rear view camera to switch to the "Parking Assist" screen. ! Vehicle Bus adapter must be connected. ! Your vehicle must be equipped with a park- ing sensor. = For details of the operations, refer to Dis- playing obstacle detection information on page 160. Engb 143
-
 1
1 -
2
-
3
-
4
-
5
-
6
-
7
-
8
-
9
-
10
-
11
-
12
-
13
-
14
-
15
-
16
-
17
-
18
-
19
-
20
-
21
-
22
-
23
-
24
-
25
-
26
-
27
-
28
-
29
-
30
-
31
-
32
-
33
-
34
-
35
-
36
-
37
-
38
-
39
-
40
-
41
-
42
-
43
-
44
-
45
-
46
-
47
-
48
-
49
-
50
-
51
-
52
-
53
-
54
-
55
-
56
-
57
-
58
-
59
-
60
-
61
-
62
-
63
-
64
-
65
-
66
-
67
-
68
-
69
-
70
-
71
-
72
-
73
-
74
-
75
-
76
-
77
-
78
-
79
-
80
-
81
-
82
-
83
-
84
-
85
-
86
-
87
-
88
-
89
-
90
-
91
-
92
-
93
-
94
-
95
-
96
-
97
-
98
-
99
-
100
-
101
-
102
-
103
-
104
-
105
-
106
-
107
-
108
-
109
-
110
-
111
-
112
-
113
-
114
-
115
-
116
-
117
-
118
-
119
-
120
-
121
-
122
-
123
-
124
-
125
-
126
-
127
-
128
-
129
-
130
-
131
-
132
-
133
-
134
-
135
-
136
-
137
-
 138
138 -
 139
139 -
 140
140 -
 141
141 -
 142
142 -
 143
143 -
 144
144 -
 145
145 -
 146
146 -
 147
147 -
 148
148 -
149
-
150
-
151
-
152
-
153
-
154
-
155
-
156
-
157
-
158
-
159
-
160
-
161
-
162
-
163
-
164
-
165
-
166
-
167
-
168
-
169
-
170
-
171
-
172
-
173
-
174
-
175
-
176
-
177
-
178
-
179
-
180
-
181
-
182
-
183
-
184
-
185
-
186
-
187
-
188
-
189
-
190
-
191
-
192
-
193
-
194
-
195
-
196
-
197
-
198
-
199
-
200
-
201
-
202
-
203
-
204
-
205
-
206
-
207
-
208
 |
 |