Pioneer AVIC-F30BT Operation Manual - Page 147
Displaying the screen for, AV system settings, Customising preferences
 |
View all Pioneer AVIC-F30BT manuals
Add to My Manuals
Save this manual to your list of manuals |
Page 147 highlights
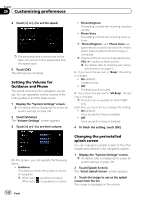
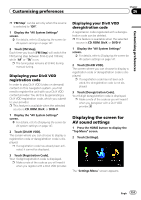
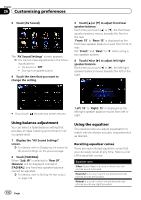
Customising preferences Chapter 26 Customising preferences You can adjust the picture for each source and rear view camera. 1 Press and hold the MODE button. The "Picture Adjustment" screen appears. 2 Touch [+] or [-] to adjust the desired item. ! Brightness: Adjusts the black intensity. ! Contrast: Adjusts the contrast. ! Colour: Adjusts the colour saturation. ! Colour Temp.: Adjusts the tone of colour (which colour is emphasised, red or blue). ! Dimmer: Adjusts the brightness of display. p Touching [Camera] switches to the picture adjustment screen for the rear view camera. p Touching [Source] while adjusting the rear view camera image returns you to the previous screen. p The adjustments of "Brightness" and "Contrast" are stored separately when your vehicle's headlights are off (daytime) and when your vehicle's headlights are on (nighttime). These are switched automatically depending on whether the vehicle's headlights are on or off. p The adjustments of "Dimmer" is stored separately when your vehicle's headlights are off (daytime) and when your vehicle's headlights are on (nighttime). "Dimmer" is switched automatically only when the value of nighttime is lower than the value of daytime. p You cannot adjust "Colour" for the source without a video and navigation map display. p The setting contents can be memorised separately for the following screen and the video image. ! Audio source - AM/FM/CD/ROM/iPod(Music)/SD (audio)/USB(audio)/Bluetooth audio/source off screen/menu screens/others ! Video source - AV1 and iPod(Video) - DVD-V and DivX - SD(Video) and USB(Video) - AV2(Video) - Rear view camera image ! Map screen p The picture adjustment may not be avail- able with some rear view cameras. p Because of the LCD screen characteristics, you may not be able to adjust the screen at low temperatures. 3 Touch [+] or [-] to adjust the desired item. Each touch of [+] or [-] increases or decreases the level of the desired item. 4 Touch . The previous screen returns. Displaying the screen for AV system settings 1 Press the HOME button to display the "Top Menu" screen. 2 Touch [Settings]. The "Settings Menu" screen appears. Engb 147
-
 1
1 -
2
-
3
-
4
-
5
-
6
-
7
-
8
-
9
-
10
-
11
-
12
-
13
-
14
-
15
-
16
-
17
-
18
-
19
-
20
-
21
-
22
-
23
-
24
-
25
-
26
-
27
-
28
-
29
-
30
-
31
-
32
-
33
-
34
-
35
-
36
-
37
-
38
-
39
-
40
-
41
-
42
-
43
-
44
-
45
-
46
-
47
-
48
-
49
-
50
-
51
-
52
-
53
-
54
-
55
-
56
-
57
-
58
-
59
-
60
-
61
-
62
-
63
-
64
-
65
-
66
-
67
-
68
-
69
-
70
-
71
-
72
-
73
-
74
-
75
-
76
-
77
-
78
-
79
-
80
-
81
-
82
-
83
-
84
-
85
-
86
-
87
-
88
-
89
-
90
-
91
-
92
-
93
-
94
-
95
-
96
-
97
-
98
-
99
-
100
-
101
-
102
-
103
-
104
-
105
-
106
-
107
-
108
-
109
-
110
-
111
-
112
-
113
-
114
-
115
-
116
-
117
-
118
-
119
-
120
-
121
-
122
-
123
-
124
-
125
-
126
-
127
-
128
-
129
-
130
-
131
-
132
-
133
-
134
-
135
-
136
-
137
-
138
-
139
-
140
-
141
-
 142
142 -
 143
143 -
 144
144 -
 145
145 -
 146
146 -
 147
147 -
 148
148 -
 149
149 -
 150
150 -
 151
151 -
 152
152 -
153
-
154
-
155
-
156
-
157
-
158
-
159
-
160
-
161
-
162
-
163
-
164
-
165
-
166
-
167
-
168
-
169
-
170
-
171
-
172
-
173
-
174
-
175
-
176
-
177
-
178
-
179
-
180
-
181
-
182
-
183
-
184
-
185
-
186
-
187
-
188
-
189
-
190
-
191
-
192
-
193
-
194
-
195
-
196
-
197
-
198
-
199
-
200
-
201
-
202
-
203
-
204
-
205
-
206
-
207
-
208
 |
 |
