Pioneer VSX 82TXS Owner's Manual
Pioneer VSX 82TXS - AV Receiver Manual
 |
UPC - 012562820453
View all Pioneer VSX 82TXS manuals
Add to My Manuals
Save this manual to your list of manuals |
Pioneer VSX 82TXS manual content summary:
- Pioneer VSX 82TXS | Owner's Manual - Page 1
AUDIO/VIDEO MULTI-CHANNEL RECEIVER VSX-84TXSi VSX-84TXSi-S VSX-82TXS VSX-82TXS-S Register your product at www.pioneerelectronics.com (US) www.pioneerelectronics.ca (Canada) Operating Instructions - Pioneer VSX 82TXS | Owner's Manual - Page 2
CONFORMITY This device complies with part 15 of the FCC Rules CHANNEL RECEIVER Model Number: VSX-84TXSi, VSX-84TXSi-S, VSX-82TXS, VSX-82TXS-S Responsible Party Name: PIONEER ELECTRONICS SERVICE accordance with the instructions, may cause la norme NMB-003 du Canada. D8-10-1-3_EF Information - Pioneer VSX 82TXS | Owner's Manual - Page 3
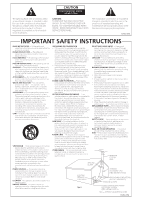
SERVICEABLE PARTS INSIDE. REFER SERVICING TO QUALIFIED SERVICE PERSONNEL. The exclamation point within an equilateral triangle is intended to alert the user to the presence of important operating and maintenance (servicing) instructions of the mast and supporting structure, grounding of the - Pioneer VSX 82TXS | Owner's Manual - Page 4
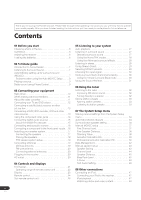
. Contents 01 Before you start Checking what's in the box 6 Ventilation 6 Installing the receiver 6 Loading the batteries 6 02 5 minute guide Introduction to home theater 7 Listening to Surround Sound 7 Automatically setting up for surround sound (MCACC 7 Problems when using the Auto MCACC - Pioneer VSX 82TXS | Owner's Manual - Page 5
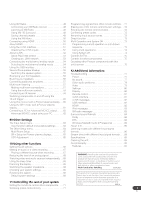
60 Using the SR+ mode with a Pioneer plasma display 61 Connecting a PC for Advanced MCACC output . . . . . 62 Advanced MCACC output using your PC 62 12 Additional information Troubleshooting 77 Power 77 No sound 77 Other audio problems 78 Video 79 Settings 80 Display 80 Remote control 81 - Pioneer VSX 82TXS | Owner's Manual - Page 6
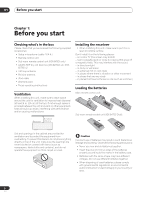
1: Before you start Checking what's in the box Please check that you've received the following supplied accessories: • Setup microphone (cable: 16.4 ft.) • Remote control unit • Sub room remote control unit (VSX-84TXSi only) • AA/IEC R6P dry cell batteries (VSX-84TXSi) x4 / (VSX- 82TXS) x2 • AM - Pioneer VSX 82TXS | Owner's Manual - Page 7
to Surround Sound This receiver was designed with the easiest possible setup in mind, so with the following quick setup guide, you should have your you've set the video input on your TV to this receiver. Check the manual that came with the TV if you don't know how to do this. • Set the subwoofer - Pioneer VSX 82TXS | Owner's Manual - Page 8
and check the speaker connections. If there doesn't seem to be a problem, you can simply use / to select the speaker and / to change the setting ( is displayed on-screen while the receiver outputs more test tones to determine the optimum receiver settings for channel level, speaker distance, and - Pioneer VSX 82TXS | Owner's Manual - Page 9
.) 2 If you need to manually switch the input signal type press SIGNAL SEL (page 30). 3 • You may need to check the digital audio output settings on your DVD player or digital satellite receiver. It should be set to output Dolby Digital, DTS and 88.2 kHz / 96 kHz PCM (2 channel) audio, and if there - Pioneer VSX 82TXS | Owner's Manual - Page 10
HDMI connectors (x4) (VSX-82TXS) (x5) (VSX-84TXSi) Multiple inputs and one output for high-quality audio/ video connection to compatible HDMI devices. Connecting using HDMI system on and off according to the input function of the receiver. Switching components on and off using the 12 volt trigger on - Pioneer VSX 82TXS | Owner's Manual - Page 11
The Input Setup menu on page 63), the converter gives priority to HDMI, component, S-video, then composite (in that order). • For optimal video performance, THX recommends switching Digital Video Conversion (in Setting the AV options on page 66) OFF. This product incorporates copyright protection - Pioneer VSX 82TXS | Owner's Manual - Page 12
(SAT) IN 2 (DVR/ VCR 1) IN 3 (DVR/ VCR 2) IN2 HDMI 12 V TRIGGER IN1 1 2 IN 1 (DC OUT 12V TOTAL 50 mA VIDEO R L AUDIO R SURR OUT CONTROL VSX-84TXSi component video jacks on page 14 if your receiver using an optical cable. When you set up the receiver you'll need to tell the receiver - Pioneer VSX 82TXS | Owner's Manual - Page 13
Connecting your equipment 03 Connecting a satellite/cable receiver or other set-top box Satellite and cable receivers, and terrestrial digital TV tuners are all examples of so-called 'set-top boxes'. VSX-84TXSi MULTI-ROOM & SOURCE / REC SEL OUT1 ROOM3 (ZONE3) OUT2 S400 (AUDIO) IR MULTI-ROOM - Pioneer VSX 82TXS | Owner's Manual - Page 14
See the manuals that came with your TV and source component to check whether they are compatible with progressive-scan video. VSX-84TXSi MULTI-ROOM inputs on this receiver using a coaxial digital audio cable. When you set up the receiver you'll need to tell the receiver which input you connected - Pioneer VSX 82TXS | Owner's Manual - Page 15
receiver has both digital inputs and outputs, allowing you to connect digital audio components for playback and for making digital recordings. Most digital components also have analog connections. See Connecting analog audio sources on the following page if you want to connect these too. VSX-84TXSi - Pioneer VSX 82TXS | Owner's Manual - Page 16
grounding terminal that most turntables require. 2 Turntable VSX-84TXSi FM UNBAL 75 Ω MONITOR OUT ANTENNA AUDIO PHONO , secure it to the ground terminal on this receiver. • If your turntable has line-level outputs equipment. SPEAKERS PHONES (TUNE +) AV PARAMETER (ST -) SETUP ENTER TUNER - Pioneer VSX 82TXS | Owner's Manual - Page 17
IN 3 (DVR/ VCR 2) IN2 HDMI 12 V TRIGGER IN1 1 2 IN 1 VSX-84TXSi CENTER AC OUTLET SWITCHED 100 W(0.8A) MAX R SURROUND L SURROUND R BACK / L(Single) B Surround left Surround right Surround back left Surround back right Connecting the speakers Each speaker connection on the receiver - Pioneer VSX 82TXS | Owner's Manual - Page 18
into the end of the speaker terminal. Important • Please refer to the manual that came with your speakers for details on how to connect the other center speaker above or below the TV so that the sound of the center channel is localized at the TV screen. Also, make sure the center speaker does not - Pioneer VSX 82TXS | Owner's Manual - Page 19
VSX-84TXSi MULTI-ROOM & SOURCE / REC SEL OUT1 ROOM3 (ZONE3) OUT2 S400 (AUDIO) IR MULTI-ROOM & SOURCE MAIN ROOM(ZONE1) IN1 ROOM2(ZONE2) OUT FM UNBAL 75 Ω MONITOR OUT USB AUDIO IN S400 IN 1 (SAT) IN 2 (DVR/ VCR 1) IN 3 (DVR/ VCR 2) IN2 HDMI Setting on page 46 to make the settings - Pioneer VSX 82TXS | Owner's Manual - Page 20
A damaged power cord can cause a fire or give you an electric shock. Check the power cord once in a while. If you find it damaged, ask your nearest Pioneer authorized independent service company for a replacement. • The receiver should be disconnected by removing the mains plug from the wall socket - Pioneer VSX 82TXS | Owner's Manual - Page 21
PRECISION PROCESSING 9 10 11 12 AUDIO/VIDEO MULTI-CHANNEL RECEIVER VSX-84TXSi HOME THX STANDARD SURROUND ADVANCED SURROUND MASTER VOLUME 13 Receives the signals from the remote control (see Operating range of remote control unit on page 22). 6 HDMI indicator Blinks when connecting an HDMI- - Pioneer VSX 82TXS | Owner's Manual - Page 22
VSX-84TXSi only) Lights when an i.LINK-Audio-equipped component is selected (page 51). DIGITAL VIDEO SCALER indicator (VSX-82TXS only) Lights when Resolution is set to a setting AV PARAMETER Use to access the AV channel receiver is located near a device that is emitting infrared rays. • The receiver - Pioneer VSX 82TXS | Owner's Manual - Page 23
SR HDMI DSD PCM receiver is set to select the input signal automatically (page 30). 2 Program format indicators These change according to which channels are active in digital sources. L - Left front channel C - Center channel R - Right front channel SL - Left surround channel S - Surround channel - Pioneer VSX 82TXS | Owner's Manual - Page 24
(DVD, DVR1, SAT etc.). The BAND and T.EDIT tuner controls are explained on page 32 and page 33. Press RECEIVER first to access the following controls: AV PARAMETER - Use to access the AV options (page 66). SETUP - Use to access the System Setup menu (page 34). CH LEVEL - Press repeatedly to select - Pioneer VSX 82TXS | Owner's Manual - Page 25
SELECT - Use to select the TV input signal. TV CH +/- - Use to select channels. 8 Component control buttons The main buttons ( , , etc.) are used to control a presets and radio frequencies (page 33). 9 STATUS Press to check selected receiver settings (page 69). 10 MULTIOPE Use this button to perform - Pioneer VSX 82TXS | Owner's Manual - Page 26
VSX-84TXSi only The second remote control supplied with this receiver is for use with the multi-room listening feature, as explained on page 57. Note that you must connect a separate IR receiver as explained in Connecting an IR receiver setting up your surround sound system (see page 34) and the AV - Pioneer VSX 82TXS | Owner's Manual - Page 27
RECEIVER • While listening to a source, press S.DIRECT (AUTO SURR/STREAM DIRECT)2 for auto playback of a source. AUTO SURROUND shows briefly in the display before showing the decoding or playback format. Check See Setting the AV options on page 66 to adjust them. 6 When listening to 2-channel sources - Pioneer VSX 82TXS | Owner's Manual - Page 28
available depending on the source and the setting for surround back channel processing (see Using surround back channel processing on page 30 for more on STEREO MULTI OPE THX STANDARD ADV. SURR SHIFT PHASE MCACC S.DIRECT RECEIVER • Press ADV.SURR (ADVANCED SURROUND) repeatedly to select a - Pioneer VSX 82TXS | Owner's Manual - Page 29
parameter in Setting the AV options on settings. You will hear sources according to the number of channels check and manage your current settings. Note 1 There are cases where a brief noise is heard before playback of sources other than PCM. Please select AUTO SURROUND or DIRECT if this is a problem - Pioneer VSX 82TXS | Owner's Manual - Page 30
Selects an optical or coaxial digital signal. • HDMI - Selects an HDMI signal.2 • - Selects an i.LINK signal (VSX-84TXSi only). • PCM - Only PCM signals are output.3 The receiver selects the first available signal in the following order: ; HDMI; DIGITAL. When set to DIGITAL or AUTO, 2 DIGITAL lights - Pioneer VSX 82TXS | Owner's Manual - Page 31
/PCM/WMA9 Pro encoded, DVD-Audio and SACD stereo sources Analog 2-channel (stereo) sources SBch Processing / Virtual SB mode ON AUTO ON 1 TV CONT XM RADIO TUNER ROOM2/3 RECEIVER SLEEP SR+ VIDEO SEL DIMMER ANALOG ATT S.RETRIEVER • Press RECEIVER then press S. RETRIEVER (SOUND RETRIEVER) to - Pioneer VSX 82TXS | Owner's Manual - Page 32
broadcasts using the automatic (search) and manual (step) tuning functions. If you TUNER ROOM2/3 RECEIVER SLEEP VIDEO SEL ANALOG ATT D.ACCESS +10 AV PARAMETER TOP MENU ì TUNE DTVMENU ST SETUP ENTER CLASS DISC ENTER CH LEVEL MENU ST T.EDIT ì RETURN CATEGORY TUNE GUIDE - Pioneer VSX 82TXS | Owner's Manual - Page 33
the effort of manually tuning in each time. This receiver can memorize up FM frequency, the MPX setting (see page 32) is also stored. RECEIVER INPUT SELECT SYSTEM OFF SOURCE AV PARAMETER TOP MENU ì TUNE DTVMENU ST SETUP ENTER CLASS DISC ENTER CH LEVEL MENU ST T.EDIT ì RETURN CATEGORY TUNE GUIDE - Pioneer VSX 82TXS | Owner's Manual - Page 34
are using your surround back speakers (see Surround back speaker setting on page 36). • Manual MCACC - Fine tune your speaker settings and customize the Acoustic Calibration EQ (see Manual MCACC setup on page 37). • Data Management - Check your MCACC presets and manage them through copying, renaming - Pioneer VSX 82TXS | Owner's Manual - Page 35
position: 2nd reference point 1 3rd reference point 2 3 Main listening position When you're finished settings the options, press RETURN to go back to the Auto MCACC main setup. 4 Follow the instructions on-screen. • Make sure the microphone is connected. • If you're using a subwoofer, it - Pioneer VSX 82TXS | Owner's Manual - Page 36
report is displayed on-screen while the receiver outputs more test tones to determine the optimum receiver settings for channel level, speaker distance, and Acoustic Calibration EQ. 1.Auto MCACC Now Analyzing... Subwoofer Check :Cancel 1.Auto MCACC Now Analyzing... (6/9) Surround Analyzing - Pioneer VSX 82TXS | Owner's Manual - Page 37
setting up for surround sound (MCACC) on page 7 if you're unsure how to do this. Also see Problems position. 1 Select 'Manual MCACC' from the System Setup menu. See Making receiver settings from the System Setup see Fine Channel Level below). • Fine SP Distance - Make precise delay settings for your - Pioneer VSX 82TXS | Owner's Manual - Page 38
which speaker you select. • If you want to go back and adjust a channel, simply use / to select it. 4 When you're finished, press RETURN. You will return to the Manual MCACC setup menu. Standing Wave • Default setting: ON Acoustic standing waves occur when, under certain conditions, sound waves from - Pioneer VSX 82TXS | Owner's Manual - Page 39
page 7 or Automatic MCACC (Expert) on page 34, you can also adjust these settings manually to get a frequency balance that suits your tastes. 1 Select 'EQ Adjust' from the Manual MCACC setup menu. 3.Manual MCACC a.Fine Ch Level b.Fine SP Distance c.Standing Wave d.EQ Adjust e.EQ Professional 3d - Pioneer VSX 82TXS | Owner's Manual - Page 40
is responding to certain frequencies. Differences in channel level and speaker distance are taken into receiver.1 Setting Professional Acoustic Calibration EQ according to your room characteristics Using the manual setup, you can set problem (i.e. excessive reverb) with your listening room. 40 En - Pioneer VSX 82TXS | Owner's Manual - Page 41
then press ENTER. 3.Manual MCACC a.Fine Ch troubleshooting information. 4 If you selected 'Reverb View', you can check the reverb characteristics for each channel will alter the settings you made in Automatically setting up for surround performed by this receiver (after calibration).1 Note - Pioneer VSX 82TXS | Owner's Manual - Page 42
Setup menu. See Making receiver settings from the System Setup menu Check 1.Speaker Setting 2.Channel Level 3.Speaker Distance 4.Standing Wave 5.Acoustic Cal EQ :Return ENTER:Next :Return 2 Select the setting you want to check to manually adjust the Acoustic Calibration EQ (see Manual MCACC - Pioneer VSX 82TXS | Owner's Manual - Page 43
Data Management setup menu. 4.Data Management a.MCACC Data Check b.MCACC Data Copy c.Memory Rename d.Memory Clear :Return setting applies to all MCACC presets, and cannot be set independently. 1 Select 'Speaker Setting' from the Manual SP Setup menu. 5.Manual SP Setup a.Speaker Setting b.Channel - Pioneer VSX 82TXS | Owner's Manual - Page 44
The test tones will start after you press ENTER. 5b.Channel Level Test Tone [ Manual ] Setting Start Please Wait . . . 20 Caution! Loud test tones set to PLUS and YES or the front speakers set to LARGE and SMALL alternatively and let your ears judge which sounds best. If you're having problems, - Pioneer VSX 82TXS | Owner's Manual - Page 45
distance of your speakers from the listening position. The receiver can then add the proper delay needed for effective surround sound. 1 Select 'Speaker Distance' from the Manual SP Setup menu. 5.Manual SP Setup a.Speaker Setting b.Channel Level c.Speaker Distance d.Bass Peak Level e.X-Curve f.THX - Pioneer VSX 82TXS | Owner's Manual - Page 46
page 18 for more on THX speaker placement.3 1 Select 'THX Audio Setting' from the Manual SP Setup menu. 5.Manual SP Setup a.Speaker Setting b.Channel Level c.Speaker Distance d.Bass Peak Level e.X-Curve f.THX Audio Setting :Return 2 Specify the distance of your surround back speakers from each other - Pioneer VSX 82TXS | Owner's Manual - Page 47
. • For detailed instructions on using the iPod, please refer to the manual supplied with the iPod. • The connected iPod should be updated with iPod updater software higher than version 2004-10-20. 3 • The controls of your iPod will be inoperable when connected to this receiver (Pioneer shows in the - Pioneer VSX 82TXS | Owner's Manual - Page 48
for more details on this service. Connecting your XM Radio receiver After purchasing a Connect- VSX-84TXSi Connect-and-Play antenna Note 1 If you're in the song category, you can also press ENTER to start playback. 2 Hardware and required basic monthly subscription sold separately. Premium Channel - Pioneer VSX 82TXS | Owner's Manual - Page 49
of this receiver. You will also need to activate the XM Radio service. When Check Antenna, try disconnecting the antenna and reconnecting.2 Listening to XM Radio After connecting, you will be able to use this receiver to select channels Surround™ represents the latest advancement in surround - Pioneer VSX 82TXS | Owner's Manual - Page 50
VIDEO R L AUDIO R SURROUN BAC MUL IN OUT CONTROL VSX-84TXSi HDMI IN HDMI/DVI-compatible monitor or plasma display 1 Use an HDMI cable to connect on of the HDMI IN interconnects on this receiver to an HDMI output on your HDMI component. HDMI appears on the front panel when an HDMIequipped - Pioneer VSX 82TXS | Owner's Manual - Page 51
source and AV devices such as DTVs. HDMI, the logo and High-Definition Multi- media Interface are trademarks or registered trademarks of HDMI licensing LLC. Using the i.LINK interface VSX-84TXSi only If you have a component with an i.LINK connector, you can connect it to this receiver using an - Pioneer VSX 82TXS | Owner's Manual - Page 52
Check (1/2) ( End ) * DVD-Audio5 : TV 1 DVD-Audio1 : DVD 2 DVD-Audio2 : DVR 3 DVD-Audio3 : i.LINK 4 DVD-Audio4 : i.LINK 5 VSX-59TXi : ---- ( Next ) :Return 2 Scroll through the list to confirm your settings. When a number of i.LINK-equipped components are connected to your receiver - Pioneer VSX 82TXS | Owner's Manual - Page 53
causes network interruptions. Check the operating instructions supplied with your other i.LINK components for compatibility information. This receiver is DTCP (Digital Transmission Content Protection) compliant, so you can play DVD-A, DVDVideo, and SACD i.LINK audio. When setting up an i.LINK - Pioneer VSX 82TXS | Owner's Manual - Page 54
10 decibels) and SW IN 0dB (default) in the subwoofer channel. Using the USB interface VSX-84TXSi only It is possible to listen to two channels of audio from your computer by connecting to the USB interface on the rear of this receiver. Depending on your model of computer and the software installed - Pioneer VSX 82TXS | Owner's Manual - Page 55
're using. Please refer to the manual that came with the software to make these settings. 6 Turn up the volume control on your computer and this receiver. You may want to start with a fairly low volume on this receiver and turn it up as necessary after you've checked your levels. 7 Start playback of - Pioneer VSX 82TXS | Owner's Manual - Page 56
sources will be downmixed to 2 channels). • SP (off) - No which set (front or surround back) is powering which part (High amplifier. See your speaker manual for more information. • setting on page 36. • To bi-wire a speaker, connect two speaker cords to the speaker terminal on the receiver - Pioneer VSX 82TXS | Owner's Manual - Page 57
UND L ACK RS-232C ULTI CH IN VSX-84TXSi ANALOG INPUT L R ANALOG INPUT ANALOG INPUT Front channel amplifier Center channel amplifier (mono) Powered subwoofer ANALOG INPUT L R ANALOG INPUT L R Surround channel amplifier Surround back channel amplifier • You can use the additional - Pioneer VSX 82TXS | Owner's Manual - Page 58
the multi-room feature with the VSX-82TXS. ROOM3 (ZONE3) Only , both on the rear of this receiver. You should have a pair of speakers ) IN 2 (DVR/ VCR 1) IN 3 (DVR/ VCR 2) IN2 HDMI 12 V TRIGGER IN1 1 2 IN 1 (DC OUT 12V TOTAL 50 MR&S in Surround back speaker setting on page 36 to use this - Pioneer VSX 82TXS | Owner's Manual - Page 59
AUDIO/VIDEO MULTI-CHANNEL RECEIVER VSX-84TXSi HOME THX to set the listening volume in the currently selected sub room (ZONE/ROOM2 only). Connecting an IR receiver manual that came with your component to check for IR compatibility. • If using two remote controls (at the same time), the IR receiver - Pioneer VSX 82TXS | Owner's Manual - Page 60
of this receiver. If you also plan to use a separate IR receiver in the sub room, connect this to the ROOM2(ZONE2) jack. This will allow you to use the sub room remote control as explained in (VSX-84TXSi only) Sub remote control unit on page 26. Closet or shelving unit Non-Pioneer IR component - Pioneer VSX 82TXS | Owner's Manual - Page 61
to make a few settings in the receiver. See The Input Setup menu on page 63 and SR+ Setup for Pioneer plasma displays on page 65 for detailed instructions. • Use a AUDIO/VIDEO MULTI-CHANNEL RECEIVER VSX-84TXSi HOME THX STANDARD SURROUND ADVANCED SURROUND MASTER VOLUME This receiver To make the - Pioneer VSX 82TXS | Owner's Manual - Page 62
on the back panel of this receiver (the cable must be cross type, female-female). The software to output the results is available from the support area of the Pioneer website (http:// www.pioneerelectronics.com/pna/ci/codes/ 0,,2076_262707270,00.html). Instructions for using the software are also - Pioneer VSX 82TXS | Owner's Manual - Page 63
Manual MCACC 4.Data Management 5.Manual SP Setup 6.Input Setup 7.Other Setup : Exit 6.Input Setup (1/2) Input DVD Digital In [ COAX-1 ] HDMI way (to check your settings after doing so, see Checking the i.LINK inputs Setting the AV options on page 66), you must connect your TV to this receiver - Pioneer VSX 82TXS | Owner's Manual - Page 64
(HDMI-2) HDMI 3 ì ì (HDMI-3) HDMI 4 ì (VSX-84TXSi ) ì (HDMI-4) USB XM CD COAX 2 ì CD-R/TAPE/MD OPT 4 ì TUNER PHONO MULTI CH IN iPod iLINK The Other Setup menu The Other Setup menu is where you can make customized settings to reflect how you are using the receiver. RECEIVER INPUT - Pioneer VSX 82TXS | Owner's Manual - Page 65
amplifier (such as another Pioneer VSX receiver) in the sub room and want to use that receiver's volume controls. (This setting is not available if the surround back system setting is set to Multi Room & Source.) With the Fixed setting, the source is sent from this receiver at maximum volume, so - Pioneer VSX 82TXS | Owner's Manual - Page 66
settings and status of the receiver. 1 Press AV PARAMETER. 2 Use / to select the setting you want to adjust. Depending on the current status / mode of the receiver, certain options may not be able to be selected. Check OFF Enhance- channel to make it the HDMI audio signal out of this receiver - Pioneer VSX 82TXS | Owner's Manual - Page 67
-check the component's instruction manual if you're unsure. 4 Start recording, then start playback of the source component. Playing a different source when recording Using this receiver, it's possible to listen to a different source than the one you're recording. SPEAKERS PHONES (TUNE +) AV - Pioneer VSX 82TXS | Owner's Manual - Page 68
Press SLEEP repeatedly to set the sleep time. 30 min 60 min Off 90 min • You can check the remaining sleep time switch the impedance setting if you plan to use speakers with a 6 Ω impedance rating. • With the receiver in standby, HDMI video inputs. 4 You can also switch off the sleep - Pioneer VSX 82TXS | Owner's Manual - Page 69
. OK appears in the display to indicate that the receiver has been reset to the factory default settings. • Note that all settings will be saved, even if the receiver is unplugged. Default system settings Setting Default HDMI Audio Amp Digital Video Conversion On Speakers A Surround Back - Pioneer VSX 82TXS | Owner's Manual - Page 70
Inputs Listening Mode (2 ch) AUTO SURROUND Listening Mode (x ch) AUTO SURROUND Listening Mode (HP) STEREO See also Setting the AV options on page 66 for other default DSP settings. MCACC Channel level (M1-M6) 0 dB Speaker Distance (M1-M6) 10 ft Standing Wave Standing Wave On/ ON (M1 - Pioneer VSX 82TXS | Owner's Manual - Page 71
your system Setting the remote This should be the manufacturer's name (for example, P for Pioneer). 5 Use / to select the manufacturer's name from the RECEIVER D.ACCESS +10 AV PARAMETER TOP MENU ì TUNE DTVMENU ST SETUP ENTER CLASS DISC ENTER CH LEVEL MENU ST T.EDIT ì RETURN CATEGORY TUNE GUIDE - Pioneer VSX 82TXS | Owner's Manual - Page 72
RECEIVER 7 Press and hold the RECEIVER button for a couple of seconds to exit and store the operation(s). Erasing one of the remote control button settings +10 AV PARAMETER TOP MENU ì TUNE DTVMENU ST SETUP ENTER CLASS DISC ENTER CH LEVEL MENU ST T.EDIT ì RETURN CATEGORY TUNE GUIDE TV CONTROL - Pioneer VSX 82TXS | Owner's Manual - Page 73
you want to check the preset code ENTER. The LCD shows OK to confirm the setting. Multi Operation and System Off The Multi RECEIVER SLEEP VIDEO ANALOG D.ACCESS +10 AV PARAMETER TOP MENU ì TUNE DTVMENU ST SETUP ENTER CLASS DISC ENTER CH LEVEL MENU ST T.EDIT ì RETURN CATEGORY TUNE GUIDE - Pioneer VSX 82TXS | Owner's Manual - Page 74
TUNE GUIDE TV CONTROL BAND TV CONTROL TV VOL INPUT SELECT TV CH VOL REC DTV INFO MUTE MPX REC STOP MEMORY AUDIO SUBTITLE HDD DISP CH PHOTO STATUS SIGNAL SEL SBch DVD CH STEREO • You don't need to program the receiver to switch on or off. This is done automatically. With Pioneer - Pioneer VSX 82TXS | Owner's Manual - Page 75
components after entering the proper codes or teaching the receiver the commands (see Setting the remote to control other components on page 71 for the previously selected channel. Cable TV/Satellite TV/TV/DTV DTV MENU Press to display the DTV menu. DTV GUIDE Use as the GUIDE button for - Pioneer VSX 82TXS | Owner's Manual - Page 76
remote control, refer to Setting the remote to control other components on page 71. If you have connected a remote control to the CONTROL IN jack (using a mini-plug cable), you won't be able to control this unit using the remote sensor. • See Using this receiver with a Pioneer plasma display on page - Pioneer VSX 82TXS | Owner's Manual - Page 77
. • The receiver may have a serious problem. Disconnect from the power and call a Pioneer authorized independent service company. No sound Symptom Remedy No sound is output when an input source is selected. No sound output from the front speakers. • Check the volume, mute setting (press MUTE - Pioneer VSX 82TXS | Owner's Manual - Page 78
listening modes (see Listening in surround sound on page 27). • Check that the surround/center speakers are not set to NO (see Speaker Setting on page 43). • Check the channel level settings (see Channel Level on page 44). • Check the speaker connections (see Connecting the speakers on page 17). No - Pioneer VSX 82TXS | Owner's Manual - Page 79
not be converted. If adjusting this receiver's Resolution setting (in Setting the AV options on page 66) and/or the resolution settings on your component or display doesn't work, try switching Digital Video Conversion (in Setting the AV options on page 66) OFF. • Check that the source is not copy - Pioneer VSX 82TXS | Owner's Manual - Page 80
problem. Can't adjust the Fine Speaker Distance setting (page 38) properly. • Check that the speakers are all in phase (make sure the positive (+) and negative (-) terminals are matched up properly). The display shows KEY LOCK ON when you try to make settings. • With the receiver channel) - Pioneer VSX 82TXS | Owner's Manual - Page 81
channel material. Check the disc packaging for more on what audio of the receiver's format tracks are recorded on the disc. indicators light. When playing a disc, the • Make sure that the receiver is set right jack (see Using this receiver with a Pioneer the connected components can't plasma - Pioneer VSX 82TXS | Owner's Manual - Page 82
source component, it's possible that it will not work with this receiver (even if it is HDCP-compatible). • If the problem still persists when connecting your HDMI component directly to your monitor, please consult the component or monitor manual or contact the manufacturer for support. 82 En - Pioneer VSX 82TXS | Owner's Manual - Page 83
connecting your HDMI component directly to your monitor, please consult the component or monitor manual or contact the manufacturer for support. iPod messages Symptom Error I1 Error I2 No Track Cause Action There is a problem with the signal path from the Switch off the receiver and reconnect - Pioneer VSX 82TXS | Owner's Manual - Page 84
the source, as well as its own processing to determine channel localization (with two channel sources, the ".1" subwoofer channel is generated by bass management in the receiver). Two modes (Cinema and Music) are available using DTS Neo:6 with two channel sources. DTS 96/24 DTS 96/24 is an extension - Pioneer VSX 82TXS | Owner's Manual - Page 85
support up to 5.1/7.1 channel a personal computer, or with an AV amplifier with on-board WMA9 Pro decoding web site at www.dolby.com. Only receiver and controller products bearing the THX Surround to go THX Audio Set-up screen and choose the setting that most closely corresponds manually select 85 En - Pioneer VSX 82TXS | Owner's Manual - Page 86
2 PRO LOGICa Neo:6 CINEMA Neo:6 MUSIC As above As above As above a.2 PRO LOGIC has a maximum of 5.1 channel playback. b.Unavailable with only one surround back speaker connected. c.VSX-82TXS only - SACD DIRECT is automatically selected with SACD sources. THX 2 Pro Logic IIx MOVIE+THX 2 PRO LOGIC - Pioneer VSX 82TXS | Owner's Manual - Page 87
agged) Dolby Digital DTS and DTS 96/24 WMA9 Pro (5.1 channel encoding) DVD-A and SACDb (5.1 channel encoding) Straight decoding Straight decoding a.Unavailable with only one surround back speaker connected. b.VSX-82TXS only - SACD DIRECT is automatically selected with SACD sources. c.Automatically - Pioneer VSX 82TXS | Owner's Manual - Page 88
flagged) Dolby Digital DTS and DTS 96/24 WMA9 Pro (5.1 channel encoding) DVD-A sources SACD sourcesb (5.1 channel encoding) a.Unavailable with only one surround back speaker connected. b.VSX-82TXS only - SACD DIRECT is automatically selected with SACD sources. As above As above Straight decoding - Pioneer VSX 82TXS | Owner's Manual - Page 89
Channel Selectivity Parts Setup microphone (for Auto MCACC setup 1 AA/IEC R6P dry cell batteries VSX-84TXSi 4 VSX-82TXS 2 Remote control unit 1 Sub room remote control unit (VSX-84TXSi only 1 AM loop antenna 1 FM wire antenna 1 iPod cable 1 Warranty card 1 These operating instructions - Pioneer VSX 82TXS | Owner's Manual - Page 90
Pioneer • i.LINK digital interface (VSX-84TXSi only) The i.LINK interface makes it possible to connect this receiver to i.LINK-equipped components, all with a single cable. • HDMI and digital video conversion This receiver is compatible with the HDMI digital video format, providing you high- - Pioneer VSX 82TXS | Owner's Manual - Page 91
. • Slowly increase the sound until you can hear it comfortably and clearly, and without distortion. Once you have established a comfortable sound level: • Set the dial and leave it there. Taking a minute to do this now will help to prevent hearing damage or loss in the future. After all, - Pioneer VSX 82TXS | Owner's Manual - Page 92
or if you wish to purchase replacement parts, operating instructions, service manuals, or accessories, please call the number shown below. 8 0 0 - 4 2 1 - 1 4 0 4 Please do not ship your product to Pioneer without first calling the Customer Support Division at the above listed number for assistance
-
 1
1 -
 2
2 -
 3
3 -
 4
4 -
 5
5 -
 6
6 -
 7
7 -
8
-
9
-
10
-
11
-
12
-
13
-
14
-
15
-
16
-
17
-
18
-
19
-
20
-
21
-
22
-
23
-
24
-
25
-
26
-
27
-
28
-
29
-
30
-
31
-
32
-
33
-
34
-
35
-
36
-
37
-
38
-
39
-
40
-
41
-
42
-
43
-
44
-
45
-
46
-
47
-
48
-
49
-
50
-
51
-
52
-
53
-
54
-
55
-
56
-
57
-
58
-
59
-
60
-
61
-
62
-
63
-
64
-
65
-
66
-
67
-
68
-
69
-
70
-
71
-
72
-
73
-
74
-
75
-
76
-
77
-
78
-
79
-
80
-
81
-
82
-
83
-
84
-
85
-
86
-
87
-
88
-
89
-
90
-
91
-
92
 |
 |
AUDIO/VIDEO MULTI-CHANNEL
RECEIVER
VSX-84TXSi
VSX-84TXSi-S
VSX-82TXS
VSX-82TXS-S
Operating Instructions
Register your product at
www.pioneerelectronics.com
(US)
www.pioneerelectronics.ca
(Canada)