Ricoh MP C6502 Manuals - Page 101
Standard Printing, When Using the PCL 6 Printer Driver - pcl 6 driver
 |
View all Ricoh MP C6502 manuals
Add to My Manuals
Save this manual to your list of manuals |
Page 101 highlights
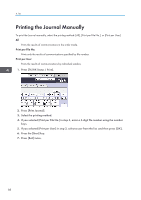
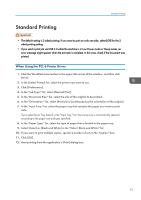
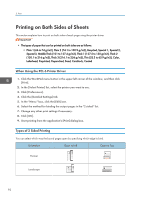
Standard Printing Standard Printing • The default setting is 2 sided printing. If you want to print on only one side, select [Off] for the 2 sided printing setting. • If you send a print job via USB 2.0 while the machine is in Low Power mode or Sleep mode, an error message might appear when the print job is complete. In this case, check if the document was printed. When Using the PCL 6 Printer Driver 1. Click the WordPad menu button in the upper left corner of the window, and then click [Print]. 2. In the [Select Printer] list, select the printer you want to use. 3. Click [Preferences]. 4. In the "Job Type:" list, select [Normal Print]. 5. In the "Document Size:" list, select the size of the original to be printed. 6. In the "Orientation:" list, select [Portrait] or [Landscape] as the orientation of the original. 7. In the "Input Tray:" list, select the paper tray that contains the paper you want to print onto. If you select [Auto Tray Select] in the "Input Tray:" list, the source tray is automatically selected according to the paper size and type specified. 8. In the "Paper Type:" list, select the type of paper that is loaded in the paper tray. 9. Select [Color] or [Black and White] in the "Color/ Black and White:" list. 10. If you want to print multiple copies, specify a number of sets in the "Copies:" box. 11. Click [OK]. 12. Start printing from the application's [Print] dialog box. 91
-
 1
1 -
2
-
3
-
4
-
5
-
6
-
7
-
8
-
9
-
10
-
11
-
12
-
13
-
14
-
15
-
16
-
17
-
18
-
19
-
20
-
21
-
22
-
23
-
24
-
25
-
26
-
27
-
28
-
29
-
30
-
31
-
32
-
33
-
34
-
35
-
36
-
37
-
38
-
39
-
40
-
41
-
42
-
43
-
44
-
45
-
46
-
47
-
48
-
49
-
50
-
51
-
52
-
53
-
54
-
55
-
56
-
57
-
58
-
59
-
60
-
61
-
62
-
63
-
64
-
65
-
66
-
67
-
68
-
69
-
70
-
71
-
72
-
73
-
74
-
75
-
76
-
77
-
78
-
79
-
80
-
81
-
82
-
83
-
84
-
85
-
86
-
87
-
88
-
89
-
90
-
91
-
92
-
93
-
94
-
95
-
 96
96 -
 97
97 -
 98
98 -
 99
99 -
 100
100 -
 101
101 -
 102
102 -
 103
103 -
 104
104 -
 105
105 -
 106
106 -
107
-
108
-
109
-
110
-
111
-
112
-
113
-
114
-
115
-
116
-
117
-
118
-
119
-
120
-
121
-
122
-
123
-
124
-
125
-
126
-
127
-
128
-
129
-
130
-
131
-
132
-
133
-
134
-
135
-
136
-
137
-
138
-
139
-
140
-
141
-
142
-
143
-
144
-
145
-
146
-
147
-
148
-
149
-
150
-
151
-
152
-
153
-
154
-
155
-
156
-
157
-
158
-
159
-
160
-
161
-
162
-
163
-
164
-
165
-
166
-
167
-
168
-
169
-
170
-
171
-
172
-
173
-
174
-
175
-
176
-
177
-
178
-
179
-
180
-
181
-
182
-
183
-
184
-
185
-
186
-
187
-
188
-
189
-
190
-
191
-
192
-
193
-
194
-
195
-
196
-
197
-
198
-
199
-
200
-
201
-
202
-
203
-
204
-
205
-
206
-
207
-
208
-
209
-
210
-
211
-
212
-
213
-
214
-
215
-
216
-
217
-
218
-
219
-
220
-
221
-
222
-
223
-
224
-
225
-
226
-
227
-
228
-
229
-
230
-
231
-
232
-
233
-
234
-
235
-
236
-
237
-
238
-
239
-
240
-
241
-
242
-
243
-
244
-
245
-
246
-
247
-
248
 |
 |