Ricoh MP C6502 Manuals - Page 42
Drawer, Paper trays Trays 1-3, Lower front cover, Vents, Copy tray, Main power switch - waste toner
 |
View all Ricoh MP C6502 manuals
Add to My Manuals
Save this manual to your list of manuals |
Page 42 highlights
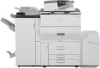
2. Getting Started 5. Drawer Pull out the drawer when a paper jam occurs. 6. Paper trays (Trays 1-3) Load paper here. Tray 1 is a tandem tray where paper on the left side automatically moves to the right when paper there has run out. 7. Lower front cover Open to change the waste toner bottle. 8. Vents Prevent overheating. 9. Copy tray Copied/printed paper and fax messages are delivered here. 10. Main power switch To operate the machine, the main power switch must be on. If it is off, open the main power switch's cover and turn the switch on. 32
-
 1
1 -
2
-
3
-
4
-
5
-
6
-
7
-
8
-
9
-
10
-
11
-
12
-
13
-
14
-
15
-
16
-
17
-
18
-
19
-
20
-
21
-
22
-
23
-
24
-
25
-
26
-
27
-
28
-
29
-
30
-
31
-
32
-
33
-
34
-
35
-
36
-
 37
37 -
 38
38 -
 39
39 -
 40
40 -
 41
41 -
 42
42 -
 43
43 -
 44
44 -
 45
45 -
 46
46 -
 47
47 -
48
-
49
-
50
-
51
-
52
-
53
-
54
-
55
-
56
-
57
-
58
-
59
-
60
-
61
-
62
-
63
-
64
-
65
-
66
-
67
-
68
-
69
-
70
-
71
-
72
-
73
-
74
-
75
-
76
-
77
-
78
-
79
-
80
-
81
-
82
-
83
-
84
-
85
-
86
-
87
-
88
-
89
-
90
-
91
-
92
-
93
-
94
-
95
-
96
-
97
-
98
-
99
-
100
-
101
-
102
-
103
-
104
-
105
-
106
-
107
-
108
-
109
-
110
-
111
-
112
-
113
-
114
-
115
-
116
-
117
-
118
-
119
-
120
-
121
-
122
-
123
-
124
-
125
-
126
-
127
-
128
-
129
-
130
-
131
-
132
-
133
-
134
-
135
-
136
-
137
-
138
-
139
-
140
-
141
-
142
-
143
-
144
-
145
-
146
-
147
-
148
-
149
-
150
-
151
-
152
-
153
-
154
-
155
-
156
-
157
-
158
-
159
-
160
-
161
-
162
-
163
-
164
-
165
-
166
-
167
-
168
-
169
-
170
-
171
-
172
-
173
-
174
-
175
-
176
-
177
-
178
-
179
-
180
-
181
-
182
-
183
-
184
-
185
-
186
-
187
-
188
-
189
-
190
-
191
-
192
-
193
-
194
-
195
-
196
-
197
-
198
-
199
-
200
-
201
-
202
-
203
-
204
-
205
-
206
-
207
-
208
-
209
-
210
-
211
-
212
-
213
-
214
-
215
-
216
-
217
-
218
-
219
-
220
-
221
-
222
-
223
-
224
-
225
-
226
-
227
-
228
-
229
-
230
-
231
-
232
-
233
-
234
-
235
-
236
-
237
-
238
-
239
-
240
-
241
-
242
-
243
-
244
-
245
-
246
-
247
-
248
 |
 |

5. Drawer
Pull out the drawer when a paper jam occurs.
6.
Paper trays (Trays 1–3)
Load paper here. Tray 1 is a tandem tray where paper on the left side automatically moves to the right when
paper there has run out.
7.
Lower front cover
Open to change the waste toner bottle.
8. Vents
Prevent overheating.
9.
Copy tray
Copied/printed paper and fax messages are delivered here.
10.
Main power switch
To operate the machine, the main power switch must be on. If it is off, open the main power switch's cover and
turn the switch on.
2. Getting Started
32