Ricoh MP C6502 Manuals - Page 139
Loading Paper into the Bypass Tray
 |
View all Ricoh MP C6502 manuals
Add to My Manuals
Save this manual to your list of manuals |
Page 139 highlights
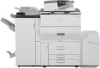
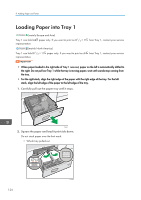
Loading Paper into the Bypass Tray Loading Paper into the Bypass Tray Use the bypass tray to use OHP transparencies, adhesive labels, translucent paper, and paper that cannot be loaded in the paper trays. • The maximum number of sheets you can load at the same time depends on paper type. Do not stack paper over the limit mark. For the maximum number of sheets you can load, see page 146 "Recommended Paper Sizes and Types". 1. Open the bypass tray. CVA012 2. Insert the paper print side up as far as it will go into the machine. 3. Align the paper guides to the paper size. If the guides are not flush against the paper, images might be skewed or paper misfeeds might occur. CVA073 • When you use the bypass tray, it is recommended to load the paper in orientation. • Certain types of paper might not be detected properly when placed on the bypass tray. If this happens, remove the paper and place it on the bypass tray again. • Pull the extender out when loading A4 , 81/2 × 11 or larger sheets in the bypass tray. 129
-
 1
1 -
2
-
3
-
4
-
5
-
6
-
7
-
8
-
9
-
10
-
11
-
12
-
13
-
14
-
15
-
16
-
17
-
18
-
19
-
20
-
21
-
22
-
23
-
24
-
25
-
26
-
27
-
28
-
29
-
30
-
31
-
32
-
33
-
34
-
35
-
36
-
37
-
38
-
39
-
40
-
41
-
42
-
43
-
44
-
45
-
46
-
47
-
48
-
49
-
50
-
51
-
52
-
53
-
54
-
55
-
56
-
57
-
58
-
59
-
60
-
61
-
62
-
63
-
64
-
65
-
66
-
67
-
68
-
69
-
70
-
71
-
72
-
73
-
74
-
75
-
76
-
77
-
78
-
79
-
80
-
81
-
82
-
83
-
84
-
85
-
86
-
87
-
88
-
89
-
90
-
91
-
92
-
93
-
94
-
95
-
96
-
97
-
98
-
99
-
100
-
101
-
102
-
103
-
104
-
105
-
106
-
107
-
108
-
109
-
110
-
111
-
112
-
113
-
114
-
115
-
116
-
117
-
118
-
119
-
120
-
121
-
122
-
123
-
124
-
125
-
126
-
127
-
128
-
129
-
130
-
131
-
132
-
133
-
 134
134 -
 135
135 -
 136
136 -
 137
137 -
 138
138 -
 139
139 -
 140
140 -
 141
141 -
 142
142 -
 143
143 -
 144
144 -
145
-
146
-
147
-
148
-
149
-
150
-
151
-
152
-
153
-
154
-
155
-
156
-
157
-
158
-
159
-
160
-
161
-
162
-
163
-
164
-
165
-
166
-
167
-
168
-
169
-
170
-
171
-
172
-
173
-
174
-
175
-
176
-
177
-
178
-
179
-
180
-
181
-
182
-
183
-
184
-
185
-
186
-
187
-
188
-
189
-
190
-
191
-
192
-
193
-
194
-
195
-
196
-
197
-
198
-
199
-
200
-
201
-
202
-
203
-
204
-
205
-
206
-
207
-
208
-
209
-
210
-
211
-
212
-
213
-
214
-
215
-
216
-
217
-
218
-
219
-
220
-
221
-
222
-
223
-
224
-
225
-
226
-
227
-
228
-
229
-
230
-
231
-
232
-
233
-
234
-
235
-
236
-
237
-
238
-
239
-
240
-
241
-
242
-
243
-
244
-
245
-
246
-
247
-
248
 |
 |