Samsung SPH-M380 User Manual (user Manual) (ver.f7) (English(north America)) - Page 144
Using Outlook to Send SMS Messages
 |
View all Samsung SPH-M380 manuals
Add to My Manuals
Save this manual to your list of manuals |
Page 144 highlights
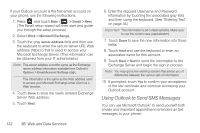
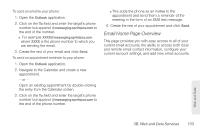
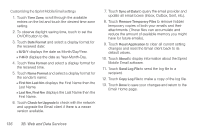
If your Outlook account is the first email account on your phone, use the following instructions: 1. Press and touch Main ( Main ) > Email > Next. (The Email setup wizard will then start and guide you through the setup process.) 2. Select Work > Microsoft Exchange. 3. Touch the gray server address field and then use the keyboard to enter the secure server URL Web address (https://) that is used to access your Microsoft Exchange Server. (This information can be obtained from your IT administrator.) Note: This server address is not the same as the Exchange server address information available from Outlook's Options > Email Account Settings page. This information is the same as the Web address used to access your Microsoft Exchange email client via a Web browser. 4. Touch Done to store the newly entered Exchange Server Web address. 5. Touch Next. 6. Enter the required Username and Password information by touching the associated gray field and then using the keyboard. (See "Entering Text" on page 34.) Important: This information is all context sensitive. Make sure to use the correct case (capitalization). 7. Touch Done to save the new information into those fields. 8. Touch Next and use the keyboard to enter an associated name for this account. 9. Touch Next > Next to send the information to the Exchange Server and begin the sign in process. Note: You may get some warning screens that advise you of differences between the various sets of information. 10. If prompted, touch Yes to confirm your acceptance of the site certificate and continue accessing your Outlook account. Using Outlook to Send SMS Messages You can use Microsoft Outlook® to send yourself both emails and important appointment reminders as text messages to your phone. 132 3B. Web and Data Services
-
 1
1 -
2
-
3
-
4
-
5
-
6
-
7
-
8
-
9
-
10
-
11
-
12
-
13
-
14
-
15
-
16
-
17
-
18
-
19
-
20
-
21
-
22
-
23
-
24
-
25
-
26
-
27
-
28
-
29
-
30
-
31
-
32
-
33
-
34
-
35
-
36
-
37
-
38
-
39
-
40
-
41
-
42
-
43
-
44
-
45
-
46
-
47
-
48
-
49
-
50
-
51
-
52
-
53
-
54
-
55
-
56
-
57
-
58
-
59
-
60
-
61
-
62
-
63
-
64
-
65
-
66
-
67
-
68
-
69
-
70
-
71
-
72
-
73
-
74
-
75
-
76
-
77
-
78
-
79
-
80
-
81
-
82
-
83
-
84
-
85
-
86
-
87
-
88
-
89
-
90
-
91
-
92
-
93
-
94
-
95
-
96
-
97
-
98
-
99
-
100
-
101
-
102
-
103
-
104
-
105
-
106
-
107
-
108
-
109
-
110
-
111
-
112
-
113
-
114
-
115
-
116
-
117
-
118
-
119
-
120
-
121
-
122
-
123
-
124
-
125
-
126
-
127
-
128
-
129
-
130
-
131
-
132
-
133
-
134
-
135
-
136
-
137
-
138
-
 139
139 -
 140
140 -
 141
141 -
 142
142 -
 143
143 -
 144
144 -
 145
145 -
 146
146 -
 147
147 -
 148
148 -
 149
149 -
150
-
151
-
152
-
153
-
154
-
155
-
156
-
157
-
158
-
159
-
160
-
161
-
162
-
163
-
164
-
165
-
166
-
167
-
168
-
169
-
170
-
171
-
172
-
173
-
174
-
175
-
176
-
177
-
178
-
179
-
180
-
181
-
182
-
183
-
184
-
185
-
186
-
187
-
188
-
189
-
190
-
191
-
192
 |
 |
