Samsung SPH-i350 User Manual(SPH-I350 (Intrepid) Eng) (ENGLISH) - Page 110
Running the Sync Program, Synchronization Overview
 |
UPC - 695874506897
View all Samsung SPH-i350 manuals
Add to My Manuals
Save this manual to your list of manuals |
Page 110 highlights
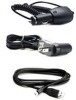
Note The setup program will detect any existing or previous versions of the sync programs on your computer. Follow the instructions to repair or replace any existing installations. Running the Sync Program Once ActiveSync or Windows Mobile Device Center is installed, launching it is as simple as connecting your device to your computer. ᮣ Insert the small end of the supplied USB cable to your device's charger/accessory jack and connect the other end to an available USB port on your computer. Ⅲ Synchronization will begin automatically the first time you connect your device to your computer. Ⅲ All selected synchronization items will be copied from your computer to your device. Windows Explorer will create a shortcut to the Mobile drive. Synchronization Overview Once you begin the synchronization process (by connecting your device to your computer) the ActiveSync or Windows Mobile Device Center window should automatically open. Your device will remain connected to the computer after synchronization is complete. If any selected content is changed on your computer (new email, photos, playlist updates, etc.) the program automatically resyncs the information on the device. You can open the device's file directory within the ActiveSync application by: ⅷ Clicking the Explore tab or Tools > Explore Device (ActiveSync). ⅷ Clicking File Management > Browse the contents of your device (Windows Mobile Device Center). You can then copy files quickly and easily from the device to the computer, or vice versa. 102 2G. Synchronizing With Your Computer
-
 1
1 -
2
-
3
-
4
-
5
-
6
-
7
-
8
-
9
-
10
-
11
-
12
-
13
-
14
-
15
-
16
-
17
-
18
-
19
-
20
-
21
-
22
-
23
-
24
-
25
-
26
-
27
-
28
-
29
-
30
-
31
-
32
-
33
-
34
-
35
-
36
-
37
-
38
-
39
-
40
-
41
-
42
-
43
-
44
-
45
-
46
-
47
-
48
-
49
-
50
-
51
-
52
-
53
-
54
-
55
-
56
-
57
-
58
-
59
-
60
-
61
-
62
-
63
-
64
-
65
-
66
-
67
-
68
-
69
-
70
-
71
-
72
-
73
-
74
-
75
-
76
-
77
-
78
-
79
-
80
-
81
-
82
-
83
-
84
-
85
-
86
-
87
-
88
-
89
-
90
-
91
-
92
-
93
-
94
-
95
-
96
-
97
-
98
-
99
-
100
-
101
-
102
-
103
-
104
-
 105
105 -
 106
106 -
 107
107 -
 108
108 -
 109
109 -
 110
110 -
 111
111 -
 112
112 -
 113
113 -
 114
114 -
 115
115 -
116
-
117
-
118
-
119
-
120
-
121
-
122
-
123
-
124
-
125
-
126
-
127
-
128
-
129
-
130
-
131
-
132
-
133
-
134
-
135
-
136
-
137
-
138
-
139
-
140
-
141
-
142
-
143
-
144
-
145
-
146
-
147
-
148
-
149
-
150
-
151
-
152
-
153
-
154
-
155
-
156
-
157
-
158
-
159
-
160
-
161
-
162
-
163
-
164
-
165
-
166
-
167
-
168
-
169
-
170
-
171
-
172
-
173
-
174
-
175
-
176
-
177
-
178
-
179
-
180
-
181
-
182
-
183
-
184
-
185
-
186
-
187
-
188
-
189
-
190
-
191
-
192
-
193
-
194
-
195
-
196
-
197
-
198
-
199
-
200
-
201
-
202
-
203
-
204
-
205
-
206
-
207
-
208
-
209
-
210
-
211
-
212
-
213
-
214
-
215
-
216
-
217
-
218
-
219
-
220
-
221
-
222
-
223
-
224
-
225
-
226
-
227
-
228
-
229
-
230
-
231
-
232
-
233
-
234
 |
 |
