Samsung SPH-i350 User Manual(SPH-I350 (Intrepid) Eng) (ENGLISH) - Page 74
D. Contacts, Adding a New Contacts Entry
 |
UPC - 695874506897
View all Samsung SPH-i350 manuals
Add to My Manuals
Save this manual to your list of manuals |
Page 74 highlights
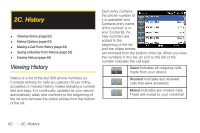
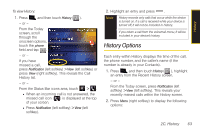
2D. Contacts ࡗ Adding a New Contacts Entry (page 66) ࡗ Saving a Phone Number (page 67) ࡗ Contacts Entry Options (page 67) ࡗ Editing a Contacts Entry (page 69) ࡗ Adding a Number to a Contacts Entry (page 69) ࡗ Editing a Contacts Entry's Numbers (page 69) ࡗ Deleting a Contact (page 70) ࡗ Assigning Speed Dial Numbers (page 70) ࡗ Adding a New Group (page 71) ࡗ Selecting a Ringer Type for an Entry (page 71) ࡗ Assigning a Picture to an Entry (page 72) ࡗ Finding Contacts Entries (page 72) ࡗ Dialing Sprint Services (page 74) 66 2D. Contacts Adding a New Contacts Entry The number of Contacts entries you can store in your device is limited only by available memory space. Each entry can contain up to nine phone numbers, three email addresses, and one Web address. Contacts names may contain up to 70 characters. 1. Press > Contacts > New (left softkey) > Outlook Contact. Shortcut Enter the phone number in standby mode and press Menu (right softkey) > Save to Contacts. Proceed with "Saving a Phone Number" on page 67. 2. Enter a name for the new entry and press the navigation key down. See "Entering Text" on page 35. 3. Enter the phone number(s) for the entry. 4. Press to store the new Contacts entry. After saving the number, your device displays the new entry. (See "Contacts Entry Options" on page 67.)
-
 1
1 -
2
-
3
-
4
-
5
-
6
-
7
-
8
-
9
-
10
-
11
-
12
-
13
-
14
-
15
-
16
-
17
-
18
-
19
-
20
-
21
-
22
-
23
-
24
-
25
-
26
-
27
-
28
-
29
-
30
-
31
-
32
-
33
-
34
-
35
-
36
-
37
-
38
-
39
-
40
-
41
-
42
-
43
-
44
-
45
-
46
-
47
-
48
-
49
-
50
-
51
-
52
-
53
-
54
-
55
-
56
-
57
-
58
-
59
-
60
-
61
-
62
-
63
-
64
-
65
-
66
-
67
-
68
-
 69
69 -
 70
70 -
 71
71 -
 72
72 -
 73
73 -
 74
74 -
 75
75 -
 76
76 -
 77
77 -
 78
78 -
 79
79 -
80
-
81
-
82
-
83
-
84
-
85
-
86
-
87
-
88
-
89
-
90
-
91
-
92
-
93
-
94
-
95
-
96
-
97
-
98
-
99
-
100
-
101
-
102
-
103
-
104
-
105
-
106
-
107
-
108
-
109
-
110
-
111
-
112
-
113
-
114
-
115
-
116
-
117
-
118
-
119
-
120
-
121
-
122
-
123
-
124
-
125
-
126
-
127
-
128
-
129
-
130
-
131
-
132
-
133
-
134
-
135
-
136
-
137
-
138
-
139
-
140
-
141
-
142
-
143
-
144
-
145
-
146
-
147
-
148
-
149
-
150
-
151
-
152
-
153
-
154
-
155
-
156
-
157
-
158
-
159
-
160
-
161
-
162
-
163
-
164
-
165
-
166
-
167
-
168
-
169
-
170
-
171
-
172
-
173
-
174
-
175
-
176
-
177
-
178
-
179
-
180
-
181
-
182
-
183
-
184
-
185
-
186
-
187
-
188
-
189
-
190
-
191
-
192
-
193
-
194
-
195
-
196
-
197
-
198
-
199
-
200
-
201
-
202
-
203
-
204
-
205
-
206
-
207
-
208
-
209
-
210
-
211
-
212
-
213
-
214
-
215
-
216
-
217
-
218
-
219
-
220
-
221
-
222
-
223
-
224
-
225
-
226
-
227
-
228
-
229
-
230
-
231
-
232
-
233
-
234
 |
 |
