Singer 6699 I STARLET Instruction Manual - Page 58
hilo de la bobina debajo del material a un
 |
View all Singer 6699 I STARLET manuals
Add to My Manuals
Save this manual to your list of manuals |
Page 58 highlights
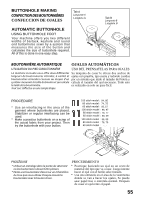
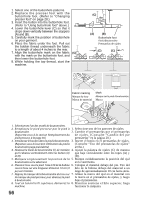
1. Select one of the buttonhole patterns. 2. R e p l a c e t h e p r e s s e r f o o t w i t h t h e buttonhole foot. (Refer to "Changing presser foot" on page 28.) 3. Insert the button into the buttonhole foot. (Refer to "Using buttonhole foot" above.) 4. Lower the buttonhole lever (C) so that it drops down vertically between the stoppers (A) and (B). 5. Carefully mark the position of buttonhole on your garment. 6. Place the fabric under the foot. Pull out the bobbin thread underneath the fabric to a length of about 4 inches to the rear. 7. Align the buttonhole mark on the fabric (C) with the mark on the buttonhole foot, and then lower the buttonhole foot. 8. While holding the top thread, start the machine. (C) (A) (B) Buttonhole foot Pied à Boutonnière Prensatelas de ojales (C) (C) Fabric marking Marque du tissu Marca de material Mark Marque sur le pied à boutonnière Marca 1. Sélectionnez l'un des motifs de boutonnières. 2. Remplacez le pied presseur par le pied à 1. Seleccione uno de los patrones de ojales. boutonnière. 2. Cambie el prensatelas por el prensatelas (Reportez-vous à la section Remplacement du de ojales. (Consulte "Cambio del pie pied presseur, à la page 28.) prensatelas" en la página 28.) 3. Introduisez le bouton dans le pied à boutonnière. 3. Inserte el botón en el prensatelas de ojales. (Reportez-vous à la section Uttilisation du pied à (Consulte "Uso del prensatelas de ojales" boutonnière page précédente) arriba.) 4. Abaissez le levier de boutonnière (C) de manière 4. Ajuste la palanca de ojales (C) de manera qu'il s'abaisse verticalement entre les butées (A) que baje verticalmente entre los topes (A) y et (B). (B). 5. Marquez soigneusement la position de la 5. Marque cuidadosamente la posición del ojal boutonnière sur le vêtement. en la vestimenta. 6. Placez le tissu sous le pied. Tirez le fil de la bobine 6. Coloque el material debajo del pie. Tire del sous le tissu sur une longueur d'environ 10 cm (4 hilo de la bobina debajo del material a un po) vers l'arrière. largo de aproximadamente 10 cm hacia atrás. 7. Alignez la marque de la boutonnière du tissu sur 7. Alinee la marca del ojal en el material con la marque du pied presseur, puis abaissez le pied la marca en el prensatelas de ojales, y luego à boutonnière. baje el prensatelas. 8. Tout en tenant le fil supérieur, démarrez la 8. Mientras sostiene el hilo superior, haga machine. funcionar la máquina. 56
-
 1
1 -
2
-
3
-
4
-
5
-
6
-
7
-
8
-
9
-
10
-
11
-
12
-
13
-
14
-
15
-
16
-
17
-
18
-
19
-
20
-
21
-
22
-
23
-
24
-
25
-
26
-
27
-
28
-
29
-
30
-
31
-
32
-
33
-
34
-
35
-
36
-
37
-
38
-
39
-
40
-
41
-
42
-
43
-
44
-
45
-
46
-
47
-
48
-
49
-
50
-
51
-
52
-
 53
53 -
 54
54 -
 55
55 -
 56
56 -
 57
57 -
 58
58 -
 59
59 -
 60
60 -
 61
61 -
 62
62 -
 63
63 -
64
-
65
-
66
-
67
-
68
-
69
-
70
-
71
-
72
-
73
-
74
-
75
-
76
 |
 |
