Sony MZ-DH10P Operating Instructions - Page 76
Import a CD]., If necessary, change the format and bit rate for audio CD recording.
 |
UPC - 027242661127
View all Sony MZ-DH10P manuals
Add to My Manuals
Save this manual to your list of manuals |
Page 76 highlights
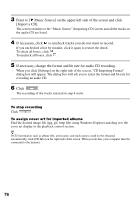
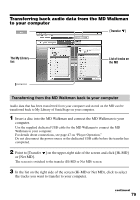
3 Point to [ Music Source] on the upper-left side of the screen and click [Import a CD]. The screen switches to the "Music Source" (Importing CD) screen and all the tracks on the audio CD are listed. 4 If necessary, click to uncheck tracks you do not want to record. If you unchecked a box by mistake, click it again to restore the check. To check all boxes, click . To uncheck all boxes, click . 5 If necessary, change the format and bit rate for audio CD recording. When you click [Settings] on the right side of the screen, "CD Importing Format" dialog box will appear. The dialog box will ask you to select the format and bit rate for recording an audio CD. 6 Click . The recording of the tracks selected in step 4 starts. To stop recording Click . To assign cover art for imported albums Find the desired image file (jpg, gif, bmp file) using Windows Explorer and drag it to the cover art display in the playback control section. z If CD information such as album title, artist name, and track names could not be obtained automatically, click [CD Info] on the right side of the screen. When you do this, your computer must be connected to the Internet. 76
-
 1
1 -
2
-
3
-
4
-
5
-
6
-
7
-
8
-
9
-
10
-
11
-
12
-
13
-
14
-
15
-
16
-
17
-
18
-
19
-
20
-
21
-
22
-
23
-
24
-
25
-
26
-
27
-
28
-
29
-
30
-
31
-
32
-
33
-
34
-
35
-
36
-
37
-
38
-
39
-
40
-
41
-
42
-
43
-
44
-
45
-
46
-
47
-
48
-
49
-
50
-
51
-
52
-
53
-
54
-
55
-
56
-
57
-
58
-
59
-
60
-
61
-
62
-
63
-
64
-
65
-
66
-
67
-
68
-
69
-
70
-
 71
71 -
 72
72 -
 73
73 -
 74
74 -
 75
75 -
 76
76 -
 77
77 -
 78
78 -
 79
79 -
 80
80 -
 81
81 -
82
-
83
-
84
-
85
-
86
-
87
-
88
-
89
-
90
-
91
-
92
-
93
-
94
-
95
-
96
-
97
-
98
-
99
 |
 |
