Sony MZ-N707 Operating Instructions - Page 21
About the DSP TYPE-R for ATRAC, Notes - type r
 |
UPC - 027242590915
View all Sony MZ-N707 manuals
Add to My Manuals
Save this manual to your list of manuals |
Page 21 highlights
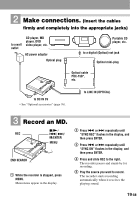
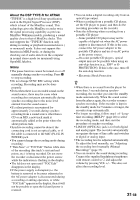
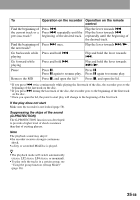
About the DSP TYPE-R for ATRAC "TYPE-R" is a high-level Sony specification used in the Digital Signal Processor (DSP), which is heart of the MiniDisc sound. This technology gives the MiniDisc recorder twice the signal processing capability as previous MiniDisc Walkman models, producing a sound quality close to that of MiniDisc decks. This unit supports the "TYPE-R" function only during recording or playback in normal stereo ( or monaural) mode. It does not support this function in MDLP mode, or during the checking out of audio data from the computer in normal stereo mode (or monaural) using OpenMG Jukebox. Notes • The pause function cannot be turned on or off manually during synchro-recording. Press x to stop recording. • Do not change SYNC REC setting while recording. Recording may not be done properly. • Even when there is no recorded sound on the sound source, there may be cases when recording does not pause automatically during synchro-recording due to the noise level emitted from the sound source. • If a silent portion is encountered for approximately 2 seconds during synchrorecording from a sound source other than a CD or an MD, a new track mark is automatically added at the point where the silent portion ends. • Synchro-recording cannot be done if the connecting cord is not an optical cable, or if the cable is connected to the MIC (PLUG IN POWER) jack. • You cannot change the recording mode during recording. • "Data Save" or "TOC Edit" flashes while data of the recording (the track's start and end points, etc.) is being recorded. Do not move the recorder or disconnect the power source while the indication is flashing in the display. • The lid does not open until "TOC Edit" disappears in the display. • If the power supply is disrupted (i.e. the battery is removed or becomes exhausted or the AC power adaptor is disconnected) during a recording or editing operation, or while "TOC Edit" appears in the display, then it will not be possible to open the lid until power is restored. • You can make a digital recording only from an optical type output. • When recording from a portable CD player, set the CD player to pause, and then do the recording procedure on the recorder. • Note the following when recording from a portable CD player: -Some portable CD players may not be capable of digital out when the AC power adaptor is disconnected. If this is the case, connect the AC power adaptor to the portable CD player and use it on AC power as the power source. -On some portable CD players, optical output may not be possible when using an anti-skip function (e.g., ESP* or GPROTECTION). If this is the case, turn off the anti-skip function. ∗ Electronic Shock Protection z • When there is no sound from the player for more than 3 seconds during synchrorecording, the recorder goes into the standby mode automatically. When the sound comes from the player again, the recorder resumes synchro-recording. If the recorder is kept in the standby mode for 5 minutes or longer, the recorder stops automatically. • For longer recording, follow step 1 of "Longtime recording (MDLP)" (page 28) to select the recording mode, and then start the procedure of synchro-recording. • LINE IN (OPTICAL) jack is for both digital and analog input. The recorder automatically recognizes the type of line cable and switches to digital or analog input. • The recording level is adjusted automatically. To adjust the level manually, see "Adjusting the recording level manually (Manual Recording)" (page 33). • You can monitor the sound during recording. Connect the supplied headphones/earphones with remote control to i and adjust the volume by pressing VOL +/-. This does not affect the recording level. 21-GB
-
 1
1 -
2
-
3
-
4
-
5
-
6
-
7
-
8
-
9
-
10
-
11
-
12
-
13
-
14
-
15
-
 16
16 -
 17
17 -
 18
18 -
 19
19 -
 20
20 -
 21
21 -
 22
22 -
 23
23 -
 24
24 -
 25
25 -
 26
26 -
27
-
28
-
29
-
30
-
31
-
32
-
33
-
34
-
35
-
36
-
37
-
38
-
39
-
40
-
41
-
42
-
43
-
44
-
45
-
46
-
47
-
48
-
49
-
50
-
51
-
52
-
53
-
54
-
55
-
56
-
57
-
58
-
59
-
60
-
61
-
62
-
63
-
64
-
65
-
66
-
67
-
68
-
69
-
70
-
71
-
72
-
73
-
74
-
75
-
76
-
77
-
78
-
79
-
80
-
81
-
82
-
83
-
84
-
85
-
86
-
87
-
88
-
89
-
90
-
91
-
92
-
93
-
94
-
95
-
96
-
97
-
98
-
99
-
100
-
101
-
102
-
103
-
104
-
105
-
106
-
107
-
108
-
109
-
110
-
111
-
112
-
113
-
114
-
115
-
116
-
117
-
118
-
119
-
120
-
121
-
122
-
123
-
124
-
125
-
126
-
127
-
128
-
129
-
130
-
131
-
132
-
133
-
134
-
135
-
136
-
137
-
138
-
139
-
140
-
141
-
142
-
143
-
144
-
145
-
146
-
147
-
148
-
149
-
150
-
151
-
152
-
153
-
154
-
155
-
156
-
157
-
158
-
159
-
160
 |
 |
