Sony MZ-N707 Operating Instructions - Page 32
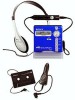
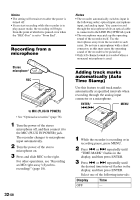
Recording from a microphone, Adding track marks automatically (Auto Time Stamp), to MIC PLUG IN POWER
 |
UPC - 027242590915
View all Sony MZ-N707 manuals
Add to My Manuals
Save this manual to your list of manuals |
Page 32 highlights
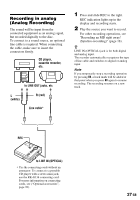
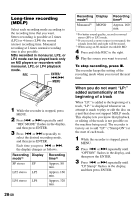
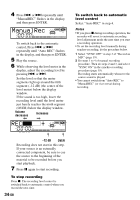
Notes • The setting will remain even after the power is turned off. • If you start recording while the recorder is in play-pause mode, the recording will begin from the point at which it is paused even when the "REC-Posi" is set to "From End". Recording from a microphone Stereo microphone* REC to MIC (PLUG IN POWER) ∗ See "Optional accessories" (page 76). 1 Turn the power of the stereo microphone off, and then connect it to the MIC (PLUG IN POWER) jack. The recorder changes to microphone input automatically. 2 Turn the power of the stereo microphone on. 3 Press and slide REC to the right. For other operations, see "Recording an MD right away! (Synchrorecording)" (page 18). 32-GB Notes • The recorder automatically switches input in the following order; optical input, microphone input, and analog input. You cannot record through the microphone while an optical cable is connected to the LINE IN (OPTICAL) jack. • The microphone may pick up the operating sound of the recorder itself. Use the microphone away from the recorder in such cases. Do not use a microphone with a short connector, as this may cause the operating sound of the recorder to be picked up. • Only left-channel sound is recorded when a monaural microphone is used. Adding track marks automatically (Auto Time Stamp) Use this feature to add track marks automatically at specified intervals when recording through the analog input connector or a microphone. ENTER/ ./> MENU 1 While the recorder is recording or in recording pause, press MENU. 2 Press . or > repeatedly until "TIME MARK" flashes in the display, and then press ENTER. 3 Press . or > repeatedly until the desired time interval flashes in the display, and then press ENTER. Select one of the following intervals: Display Time OFF -
-
 1
1 -
2
-
3
-
4
-
5
-
6
-
7
-
8
-
9
-
10
-
11
-
12
-
13
-
14
-
15
-
16
-
17
-
18
-
19
-
20
-
21
-
22
-
23
-
24
-
25
-
26
-
 27
27 -
 28
28 -
 29
29 -
 30
30 -
 31
31 -
 32
32 -
 33
33 -
 34
34 -
 35
35 -
 36
36 -
 37
37 -
38
-
39
-
40
-
41
-
42
-
43
-
44
-
45
-
46
-
47
-
48
-
49
-
50
-
51
-
52
-
53
-
54
-
55
-
56
-
57
-
58
-
59
-
60
-
61
-
62
-
63
-
64
-
65
-
66
-
67
-
68
-
69
-
70
-
71
-
72
-
73
-
74
-
75
-
76
-
77
-
78
-
79
-
80
-
81
-
82
-
83
-
84
-
85
-
86
-
87
-
88
-
89
-
90
-
91
-
92
-
93
-
94
-
95
-
96
-
97
-
98
-
99
-
100
-
101
-
102
-
103
-
104
-
105
-
106
-
107
-
108
-
109
-
110
-
111
-
112
-
113
-
114
-
115
-
116
-
117
-
118
-
119
-
120
-
121
-
122
-
123
-
124
-
125
-
126
-
127
-
128
-
129
-
130
-
131
-
132
-
133
-
134
-
135
-
136
-
137
-
138
-
139
-
140
-
141
-
142
-
143
-
144
-
145
-
146
-
147
-
148
-
149
-
150
-
151
-
152
-
153
-
154
-
155
-
156
-
157
-
158
-
159
-
160
 |
 |
