Sony MZ-N707 Operating Instructions - Page 23
Record audio data to the OpenMG, Jukebox., Transfer the music file to the, recorder Check-out - instructions
 |
UPC - 027242590915
View all Sony MZ-N707 manuals
Add to My Manuals
Save this manual to your list of manuals |
Page 23 highlights
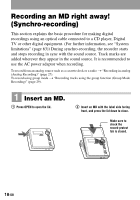
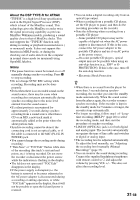
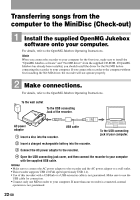
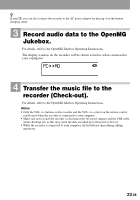
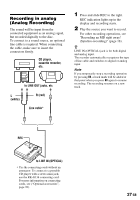
z In step 3, you can also connect the recorder to the AC power adaptor by placing it on the battery charging stand. 3 Record audio data to the OpenMG Jukebox. For details, refer to the OpenMG Jukebox Operating Instructions. The display window on the recorder will be shown as below when connected to your copmputer. 4 Transfer the music file to the recorder (Check-out). For details, refer to the OpenMG Jukebox Operating Instructions. Notes • Only the VOL +/- buttons on the recorder and the VOL +/- control on the remote control can be used when the recorder is connected to your computer. • Make sure not to touch the recorder or disconnect the AC power adaptor and the USB cable while checking out, as this may cause the data recorded up to that point to be lost. • While the recorder is connected to your computer, the lid will not open during editing operations. 23-GB
-
 1
1 -
2
-
3
-
4
-
5
-
6
-
7
-
8
-
9
-
10
-
11
-
12
-
13
-
14
-
15
-
16
-
17
-
 18
18 -
 19
19 -
 20
20 -
 21
21 -
 22
22 -
 23
23 -
 24
24 -
 25
25 -
 26
26 -
 27
27 -
 28
28 -
29
-
30
-
31
-
32
-
33
-
34
-
35
-
36
-
37
-
38
-
39
-
40
-
41
-
42
-
43
-
44
-
45
-
46
-
47
-
48
-
49
-
50
-
51
-
52
-
53
-
54
-
55
-
56
-
57
-
58
-
59
-
60
-
61
-
62
-
63
-
64
-
65
-
66
-
67
-
68
-
69
-
70
-
71
-
72
-
73
-
74
-
75
-
76
-
77
-
78
-
79
-
80
-
81
-
82
-
83
-
84
-
85
-
86
-
87
-
88
-
89
-
90
-
91
-
92
-
93
-
94
-
95
-
96
-
97
-
98
-
99
-
100
-
101
-
102
-
103
-
104
-
105
-
106
-
107
-
108
-
109
-
110
-
111
-
112
-
113
-
114
-
115
-
116
-
117
-
118
-
119
-
120
-
121
-
122
-
123
-
124
-
125
-
126
-
127
-
128
-
129
-
130
-
131
-
132
-
133
-
134
-
135
-
136
-
137
-
138
-
139
-
140
-
141
-
142
-
143
-
144
-
145
-
146
-
147
-
148
-
149
-
150
-
151
-
152
-
153
-
154
-
155
-
156
-
157
-
158
-
159
-
160
 |
 |