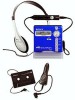
Sony MZ-N707 Operating Instructions - Page 68
List of menus - manual
 |
UPC - 027242590915
View all Sony MZ-N707 manuals
Add to My Manuals
Save this manual to your list of manuals |
Page 68 highlights
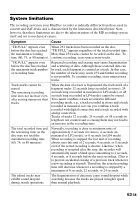
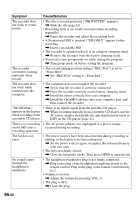
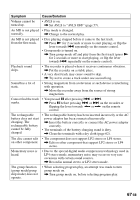
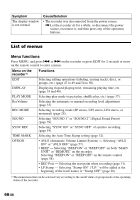
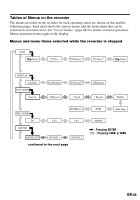
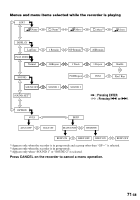
Symptom The display window is not normal. Cause/Solution • The recorder was disconnected from the power source. , Let the recorder sit for a while, or disconnect the power source, reconnect it, and then press any of the operation buttons. List of menus Menu functions Press MENU, and press . or > on the recorder or press EDIT for 2 seconds or more on the remote control to enter a menu. Menu on the recorder1) EDIT DISPLAY PLAY MODE RecVolume REC MODE SOUND SYNC REC TIME MARK OPTION Functions Selecting editing operations (labeling, erasing tracks, discs, or groups, etc.) (page 47 to 49 and 54 to 56). Displaying elapsed playing time, remaining playing time, etc. (page 35 and 40). Selecting play mode (repeat play, shuffle play, etc.) (page 37). Selecting the automatic or manual recording level adjustment (page 33). Selecting recording mode (SP stereo, LP2 stereo, LP4 stereo, or monaural) (page 28). Selecting "SOUND 1" or "SOUND 2" (Digital Sound Preset) (page 39). Selecting "SYNC ON" or "SYNC OFF" of synchro recording (page 19). Selecting the Auto Time Stamp setting (page 32). • AVLS (Automatic Volume Limiter System) - Selecting "AVLS ON" or "AVLS OFF" (page 57). • BEEP - Selecting "BEEP ON" or "BEEP OFF" on both "MAIN UNIT" or "REMOTE" on the recorder. Selecting "BEEP ON" or "BEEP OFF" on the remote control (page 58). • REC-Posi - Selecting the start point when recording (page 31). • LP Stamp - Selecting "Stamp ON" ("LP:" will be added at the beginning of the track name) or "Stamp OFF" (page 28). 1) The menu items that can be selected vary according to the on/off status of group mode or the operating status of the recorder. 68-GB
-
 1
1 -
2
-
3
-
4
-
5
-
6
-
7
-
8
-
9
-
10
-
11
-
12
-
13
-
14
-
15
-
16
-
17
-
18
-
19
-
20
-
21
-
22
-
23
-
24
-
25
-
26
-
27
-
28
-
29
-
30
-
31
-
32
-
33
-
34
-
35
-
36
-
37
-
38
-
39
-
40
-
41
-
42
-
43
-
44
-
45
-
46
-
47
-
48
-
49
-
50
-
51
-
52
-
53
-
54
-
55
-
56
-
57
-
58
-
59
-
60
-
61
-
62
-
 63
63 -
 64
64 -
 65
65 -
 66
66 -
 67
67 -
 68
68 -
 69
69 -
 70
70 -
 71
71 -
 72
72 -
 73
73 -
74
-
75
-
76
-
77
-
78
-
79
-
80
-
81
-
82
-
83
-
84
-
85
-
86
-
87
-
88
-
89
-
90
-
91
-
92
-
93
-
94
-
95
-
96
-
97
-
98
-
99
-
100
-
101
-
102
-
103
-
104
-
105
-
106
-
107
-
108
-
109
-
110
-
111
-
112
-
113
-
114
-
115
-
116
-
117
-
118
-
119
-
120
-
121
-
122
-
123
-
124
-
125
-
126
-
127
-
128
-
129
-
130
-
131
-
132
-
133
-
134
-
135
-
136
-
137
-
138
-
139
-
140
-
141
-
142
-
143
-
144
-
145
-
146
-
147
-
148
-
149
-
150
-
151
-
152
-
153
-
154
-
155
-
156
-
157
-
158
-
159
-
160
 |
 |
