TRENDnet TEW-453APB User Guide - Page 14
Setup using a Web Browser, Your Browser must support JavaScript, Password Dialog - default password
 |
UPC - 710931502732
View all TRENDnet TEW-453APB manuals
Add to My Manuals
Save this manual to your list of manuals |
Page 14 highlights
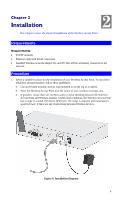
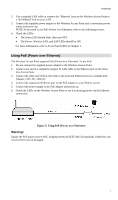
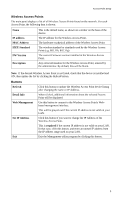
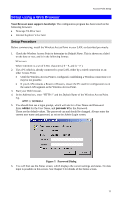
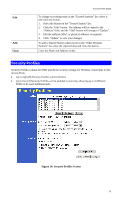
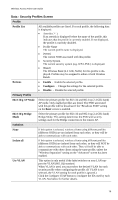
Access Point Setup Setup using a Web Browser Your Browser must support JavaScript. The configuration program has been tested on the following browsers: • Netscape V4.08 or later • Internet Explorer V4 or later Setup Procedure Before commencing, install the Wireless Access Point in your LAN, as described previously. 1. Check the Wireless Access Point to determine its Default Name. This is shown on a label on the base or rear, and is in the following format: SCxxxxxx Where xxxxxx is a set of 6 Hex characters ( 0 ~ 9, and A ~ F ). 2. Use a PC which is already connected to your LAN, either by a wired connection or another Access Point. • Until the Wireless Access Point is configured, establishing a Wireless connection to it may be not possible. • If your LAN contains a Router or Routers, ensure the PC used for configuration is on the same LAN segment as the Wireless Access Point. 3. Start your Web browser. 4. In the Address box, enter "HTTP://" and the Default Name of the Wireless Access Point e.g. HTTP://SC2D631A 5. You should then see a login prompt, which will ask for a User Name and Password. Enter admin for the User Name, and password for the Password. These are the default values. The password can and should be changed. Always enter the current user name and password, as set on the Admin Login screen. Figure 7: Password Dialog 6. You will then see the Status screen, which displays the current settings and status. No data input is possible on this screen. See Chapter 5 for details of the Status screen. 11
-
 1
1 -
2
-
3
-
4
-
5
-
6
-
7
-
8
-
 9
9 -
 10
10 -
 11
11 -
 12
12 -
 13
13 -
 14
14 -
 15
15 -
 16
16 -
 17
17 -
 18
18 -
 19
19 -
20
-
21
-
22
-
23
-
24
-
25
-
26
-
27
-
28
-
29
-
30
-
31
-
32
-
33
-
34
-
35
-
36
-
37
-
38
-
39
-
40
-
41
-
42
-
43
-
44
-
45
-
46
-
47
-
48
-
49
-
50
-
51
-
52
-
53
-
54
-
55
-
56
-
57
-
58
-
59
-
60
-
61
-
62
-
63
-
64
-
65
-
66
-
67
-
68
-
69
-
70
-
71
-
72
-
73
-
74
-
75
-
76
-
77
-
78
-
79
-
80
-
81
-
82
-
83
-
84
-
85
-
86
-
87
-
88
-
89
-
90
-
91
-
92
-
93
-
94
-
95
-
96
-
97
-
98
-
99
-
100
-
101
-
102
-
103
-
104
-
105
-
106
-
107
-
108
-
109
-
110
-
111
-
112
-
113
-
114
-
115
 |
 |