TRENDnet TEW-453APB User Guide - Page 50
DHCP server configuration, CA Screen
 |
UPC - 710931502732
View all TRENDnet TEW-453APB manuals
Add to My Manuals
Save this manual to your list of manuals |
Page 50 highlights
PC and Server Configuration Figure 25: CA Screen 7. Click Next if you don't want to change the CA's configuration data. 8. Installation will warn you that Internet Information Services are running, and must be stopped before continuing. Click Ok, then Finish. DHCP server configuration 1. Click on the Start - Programs - Administrative Tools - DHCP 2. Right-click on the server entry as shown, and select New Scope. Figure 26: DHCP Screen 3. Click Next when the New Scope Wizard Begins. 4. Enter the name and description for the scope, click Next. 5. Define the IP address range. Change the subnet mask if necessary. Click Next. 47
-
 1
1 -
2
-
3
-
4
-
5
-
6
-
7
-
8
-
9
-
10
-
11
-
12
-
13
-
14
-
15
-
16
-
17
-
18
-
19
-
20
-
21
-
22
-
23
-
24
-
25
-
26
-
27
-
28
-
29
-
30
-
31
-
32
-
33
-
34
-
35
-
36
-
37
-
38
-
39
-
40
-
41
-
42
-
43
-
44
-
 45
45 -
 46
46 -
 47
47 -
 48
48 -
 49
49 -
 50
50 -
 51
51 -
 52
52 -
 53
53 -
 54
54 -
 55
55 -
56
-
57
-
58
-
59
-
60
-
61
-
62
-
63
-
64
-
65
-
66
-
67
-
68
-
69
-
70
-
71
-
72
-
73
-
74
-
75
-
76
-
77
-
78
-
79
-
80
-
81
-
82
-
83
-
84
-
85
-
86
-
87
-
88
-
89
-
90
-
91
-
92
-
93
-
94
-
95
-
96
-
97
-
98
-
99
-
100
-
101
-
102
-
103
-
104
-
105
-
106
-
107
-
108
-
109
-
110
-
111
-
112
-
113
-
114
-
115
 |
 |
PC and Server Configuration
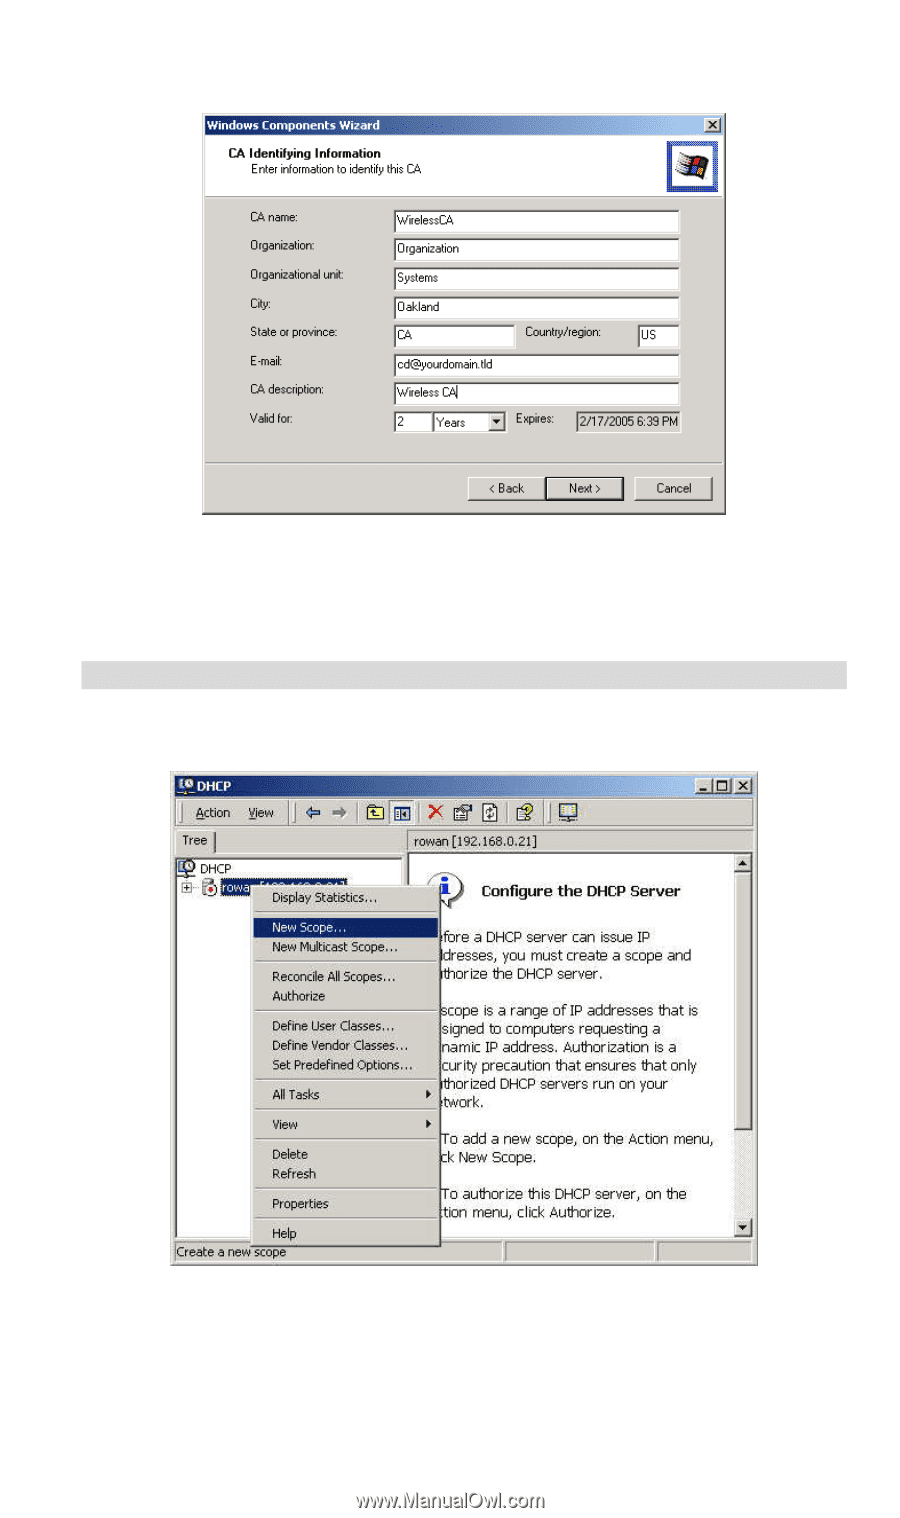
Figure 25: CA Screen
7.
Click
Next
if you don't want to change the CA's configuration data.
8.
Installation will warn you that Internet Information Services are running, and must be
stopped before continuing. Click
Ok
, then
Finish
.
DHCP server configuration
1.
Click on the
Start
-
Programs
-
Administrative Tools
-
DHCP
2.
Right-click on the server entry as shown, and select
New Scope
.
Figure 26: DHCP Screen
3.
Click
Next
when the New Scope Wizard Begins.
4.
Enter the name and description for the scope, click
Next
.
5.
Define the IP address range. Change the subnet mask if necessary. Click
Next
.
47