TRENDnet TEW-453APB User Guide - Page 25
Radius-based MAC authentication Screen, Radius Server, Address, Radius Port, Client Login Name
 |
UPC - 710931502732
View all TRENDnet TEW-453APB manuals
Add to My Manuals
Save this manual to your list of manuals |
Page 25 highlights
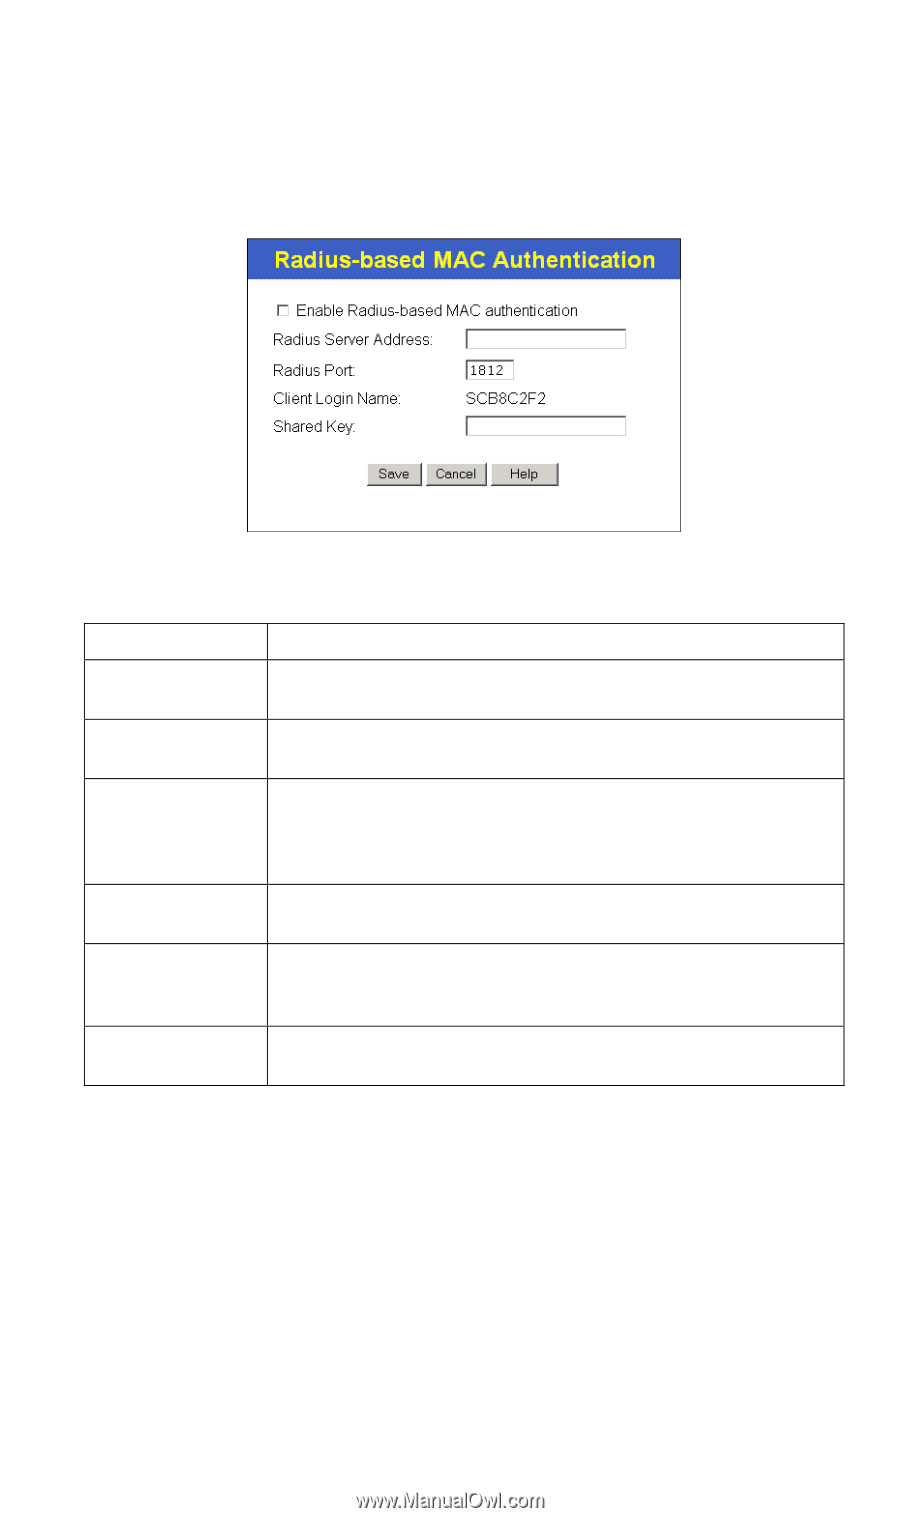
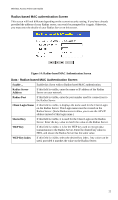
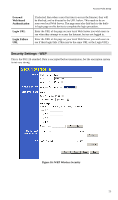
Wireless Access Point User Guide Radius-based MAC authentication Screen This screen will look different depending on the current security setting. If you have already provided the address of your Radius server, you won't be prompted for it again. Otherwise, you must enter the details of your Radius Server on this screen. Figure 14: Radius-based MAC Authentication Screen Data - Radius-based MAC Authentication Screen Enable ... Enable this if you wish to Radius-based MAC authentication. Radius Server Address If this field is visible, enter the name or IP address of the Radius Server on your network. Radius Port If this field is visible, enter the port number used for connections to the Radius Server. Client Login Name If this field is visible, it displays the name used for the Client Login on the Radius Server. This Login name must be created on the Radius Server. (Some Radius servers allow you to use the AP's IP address instead of this login name.) Shared Key If this field is visible, it is used for the Client Login on the Radius Server. Enter the key value to match the value on the Radius Server. WEP Key If this field is visible, it is for the WEP key used to encrypt data transmissions to the Radius Server. Enter the desired key value in HEX, and ensure the Radius Server has the same value. WEP Key Index If this field is visible, select the desired key index. Any value can be used, provided it matches the value on the Radius Server. 22
-
 1
1 -
2
-
3
-
4
-
5
-
6
-
7
-
8
-
9
-
10
-
11
-
12
-
13
-
14
-
15
-
16
-
17
-
18
-
19
-
 20
20 -
 21
21 -
 22
22 -
 23
23 -
 24
24 -
 25
25 -
 26
26 -
 27
27 -
 28
28 -
 29
29 -
 30
30 -
31
-
32
-
33
-
34
-
35
-
36
-
37
-
38
-
39
-
40
-
41
-
42
-
43
-
44
-
45
-
46
-
47
-
48
-
49
-
50
-
51
-
52
-
53
-
54
-
55
-
56
-
57
-
58
-
59
-
60
-
61
-
62
-
63
-
64
-
65
-
66
-
67
-
68
-
69
-
70
-
71
-
72
-
73
-
74
-
75
-
76
-
77
-
78
-
79
-
80
-
81
-
82
-
83
-
84
-
85
-
86
-
87
-
88
-
89
-
90
-
91
-
92
-
93
-
94
-
95
-
96
-
97
-
98
-
99
-
100
-
101
-
102
-
103
-
104
-
105
-
106
-
107
-
108
-
109
-
110
-
111
-
112
-
113
-
114
-
115
 |
 |