TRENDnet TN-200 User's Guide - Page 11
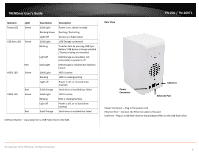
Wizard, Workgroup, Description, Time Zone, Static, Static IP, IP Address, Subnet, Gateway IP, DNS 1
 |
View all TRENDnet TN-200 manuals
Add to My Manuals
Save this manual to your list of manuals |
Page 11 highlights
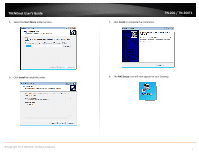
TRENDnet User's Guide 3. The Wizard automatically generates a Workgroup name, a Name, and a Description. You can edit these fields accordingly. Click Skip to move on to the next step. TN‐200 / TN‐200T1 5. Select either a DHCP or a Static Network. With DHCP, your router automatically generates an IP address for the TN‐200 / TN‐200T1. With Static IP, you must enter the IP address details. 4. Select a Time Zone from the drop‐down list. Click Next to continue. When selecting Static IP, click the radio button. Enter the IP Address, Subnet Mask, Gateway IP, DNS 1 and DNS 2. Click Next to continue. © Copyright 2013 TRENDnet. All Rights Reserved. 9
-
 1
1 -
2
-
3
-
4
-
5
-
 6
6 -
 7
7 -
 8
8 -
 9
9 -
 10
10 -
 11
11 -
 12
12 -
 13
13 -
 14
14 -
 15
15 -
 16
16 -
17
-
18
-
19
-
20
-
21
-
22
-
23
-
24
-
25
-
26
-
27
-
28
-
29
-
30
-
31
-
32
-
33
-
34
-
35
-
36
-
37
-
38
-
39
-
40
-
41
-
42
-
43
-
44
-
45
-
46
-
47
-
48
-
49
-
50
-
51
-
52
-
53
-
54
-
55
-
56
-
57
-
58
-
59
-
60
-
61
-
62
-
63
-
64
-
65
-
66
-
67
-
68
-
69
-
70
-
71
-
72
-
73
-
74
-
75
-
76
-
77
-
78
-
79
-
80
-
81
-
82
-
83
-
84
-
85
 |
 |

© Copyright 2013 TRENDnet. All Rights Reserved.
TRENDnet User’s Guide
TN
‐
200 / TN
‐
200T1
9
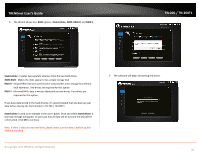
3.
The
Wizard
automatically generates a
Workgroup
name, a
Name
, and a
Description
. You can edit these fields accordingly. Click
Skip
to move on to the
next step.
4.
Select a
Time Zone
from the drop
‐
down list. Click
Next
to continue.
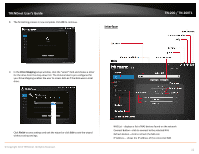
5.
Select either a
DHCP
or a
Static
Network. With
DHCP
, your router
automatically generates an IP address for the TN
‐
200 / TN
‐
200T1. With
Static
IP
, you must enter the IP address details.
When selecting
Static IP,
click the radio button. Enter the
IP Address
,
Subnet
Mask
,
Gateway IP
,
DNS 1
and
DNS 2
. Click
Next
to continue.