TRENDnet TN-200 User's Guide - Page 23
None, Read Only, and Read/Write - volume_1
 |
View all TRENDnet TN-200 manuals
Add to My Manuals
Save this manual to your list of manuals |
Page 23 highlights
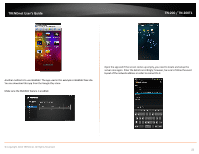
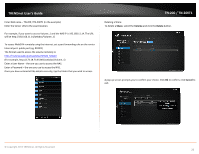
TRENDnet User's Guide Share List The Share List is created by default and is organized by Volume. Example: Volume_1. A Share List consists of a Share Name (usually the Volume), a Path (the directory where it resides), and its permissions (CIFS/FTP/NFS/WebDAV). To create a new Share List, click the Create button. TN‐200 / TN‐200T1 Note: Clicking the FTP brings up further options (None, Read Only, and Read/Write). Select the option that best suites you. Once you have clicked the Create button, select a Share from the pane on the left. Select one of the Public Access options (Read, Read/Write, or Deny) and select an Access Method (CIFS, AFP, FTP, NFS, WebDAV). Under Network Share Settings, Add a new Nickname for the share. Click the checkbox for Oplocks, Map Archive, and Recycle. Click Save to continue. Click Exit to cancel any changes. Under Network Share Settings, Add a new Nickname for the share. Changing the Nickname is not mandatory. Click the checkbox for Oplocks, Map Archive, and Recycle. Click Save to continue. Click Exit to cancel any changes. See the Glossary for a definitions list for Oplocks, Map Archive, and Recycle. Note: Clicking NFS brings up further options (A Host name, Root Squash, Write). Select the option that best suites you. You will be prompted to enter data for the fields provided; failure to do so will prompt a warning window. © Copyright 2013 TRENDnet. All Rights Reserved. 21
-
 1
1 -
2
-
3
-
4
-
5
-
6
-
7
-
8
-
9
-
10
-
11
-
12
-
13
-
14
-
15
-
16
-
17
-
 18
18 -
 19
19 -
 20
20 -
 21
21 -
 22
22 -
 23
23 -
 24
24 -
 25
25 -
 26
26 -
 27
27 -
 28
28 -
29
-
30
-
31
-
32
-
33
-
34
-
35
-
36
-
37
-
38
-
39
-
40
-
41
-
42
-
43
-
44
-
45
-
46
-
47
-
48
-
49
-
50
-
51
-
52
-
53
-
54
-
55
-
56
-
57
-
58
-
59
-
60
-
61
-
62
-
63
-
64
-
65
-
66
-
67
-
68
-
69
-
70
-
71
-
72
-
73
-
74
-
75
-
76
-
77
-
78
-
79
-
80
-
81
-
82
-
83
-
84
-
85
 |
 |
