TRENDnet TN-200 User's Guide - Page 28
Share, Volume, Delete, Cancel
 |
View all TRENDnet TN-200 manuals
Add to My Manuals
Save this manual to your list of manuals |
Page 28 highlights
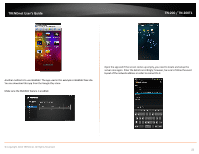
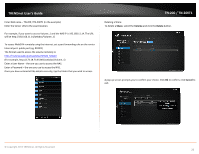
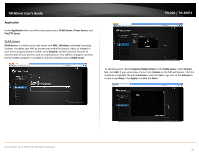
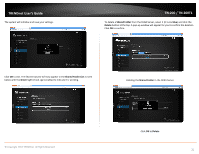
TRENDnet User's Guide Enter NAS name - TN‐200 / TN‐200T1 (in the example). Enter the Server URL to the exact location. For example, if you want to access Volume_1 and the NAS IP is 192.168.11.14. The URL will be http://192.168.11.14/webdav/Volume_1/ To access WebDAV remotely using the internet, set a port forwarding rule on the router. Internal port: public port (eg. 80:801) The format used to access the volume remotely is: http://routerip:publicport/webdav/SHARE_NAME/ (For example, http://172.18.73.45:801/webdav/Volume_1) Enter a User Name - the one you use to access the NAS. Enter a Password - the one you use to access the NAS. Once you have entered all the details correctly, tap the folder that you wish to access. TN‐200 / TN‐200T1 Deleting a Share To delete a Share, select the Volume and click the Delete button. A pop‐up screen prompts you to confirm your choice. Click Ok to confirm, click Cancel to exit. © Copyright 2013 TRENDnet. All Rights Reserved. 26
-
 1
1 -
2
-
3
-
4
-
5
-
6
-
7
-
8
-
9
-
10
-
11
-
12
-
13
-
14
-
15
-
16
-
17
-
18
-
19
-
20
-
21
-
22
-
 23
23 -
 24
24 -
 25
25 -
 26
26 -
 27
27 -
 28
28 -
 29
29 -
 30
30 -
 31
31 -
 32
32 -
 33
33 -
34
-
35
-
36
-
37
-
38
-
39
-
40
-
41
-
42
-
43
-
44
-
45
-
46
-
47
-
48
-
49
-
50
-
51
-
52
-
53
-
54
-
55
-
56
-
57
-
58
-
59
-
60
-
61
-
62
-
63
-
64
-
65
-
66
-
67
-
68
-
69
-
70
-
71
-
72
-
73
-
74
-
75
-
76
-
77
-
78
-
79
-
80
-
81
-
82
-
83
-
84
-
85
 |
 |
