TRENDnet TN-200 User's Guide - Page 33
Shared Folder List, Green, Shared Folder, Delete
 |
View all TRENDnet TN-200 manuals
Add to My Manuals
Save this manual to your list of manuals |
Page 33 highlights
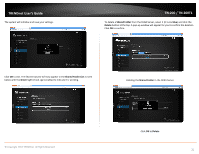
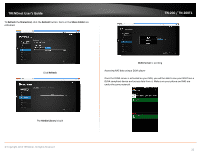
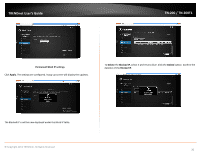
TRENDnet User's Guide The system will initialize and save your settings. TN‐200 / TN‐200T1 To delete a Shared Folder from the DLNA Server, select it (it turns blue) and click the Delete button at the top. A pop‐up window will appear for you to confirm the deletion. Click OK to confirm. Click OK to exit. The Shared Volume will now appear in the Shared Folder List as seen below with the Green light (check sign) enabled to indicate it is working. Deleting the Shared Folder in the DLNA Server © Copyright 2013 TRENDnet. All Rights Reserved. Click OK to Delete 31
-
 1
1 -
2
-
3
-
4
-
5
-
6
-
7
-
8
-
9
-
10
-
11
-
12
-
13
-
14
-
15
-
16
-
17
-
18
-
19
-
20
-
21
-
22
-
23
-
24
-
25
-
26
-
27
-
 28
28 -
 29
29 -
 30
30 -
 31
31 -
 32
32 -
 33
33 -
 34
34 -
 35
35 -
 36
36 -
 37
37 -
 38
38 -
39
-
40
-
41
-
42
-
43
-
44
-
45
-
46
-
47
-
48
-
49
-
50
-
51
-
52
-
53
-
54
-
55
-
56
-
57
-
58
-
59
-
60
-
61
-
62
-
63
-
64
-
65
-
66
-
67
-
68
-
69
-
70
-
71
-
72
-
73
-
74
-
75
-
76
-
77
-
78
-
79
-
80
-
81
-
82
-
83
-
84
-
85
 |
 |

© Copyright 2013 TRENDnet. All Rights Reserved.
TRENDnet User’s Guide
TN
‐
200 / TN
‐
200T1
31
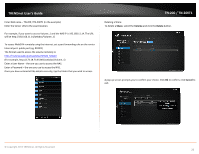
The system will initialize and save your settings.
Click
OK
to exit. The Shared Volume will now appear in the
Shared Folder List
as seen
below with the
Green
light (check sign) enabled to indicate it is working.
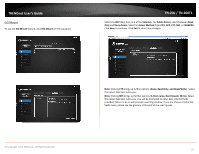
To delete a
Shared Folder
from the DLNA Server, select it (it turns
blue
) and click the
Delete
button at the top. A pop
‐
up window will appear for you to confirm the deletion.
Click
OK
to confirm.
Deleting the
Shared Folder
in the DLNA Server
Click
OK
to
Delete