TRENDnet TN-200 User's Guide - Page 9
Start Menu, Install, Finish, NAS Setup
 |
View all TRENDnet TN-200 manuals
Add to My Manuals
Save this manual to your list of manuals |
Page 9 highlights
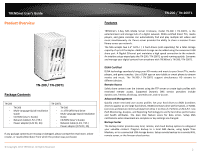
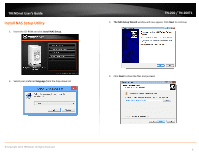
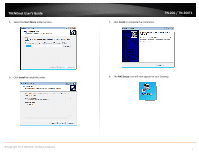
TRENDnet User's Guide 5. Select the Start Menu folder location. 6. Click Install to install the utility 7. Click Finish to complete the installation. TN‐200 / TN‐200T1 8. The NAS Setup icon will now appear on your Desktop. © Copyright 2013 TRENDnet. All Rights Reserved. 7
-
 1
1 -
2
-
3
-
 4
4 -
 5
5 -
 6
6 -
 7
7 -
 8
8 -
 9
9 -
 10
10 -
 11
11 -
 12
12 -
 13
13 -
 14
14 -
15
-
16
-
17
-
18
-
19
-
20
-
21
-
22
-
23
-
24
-
25
-
26
-
27
-
28
-
29
-
30
-
31
-
32
-
33
-
34
-
35
-
36
-
37
-
38
-
39
-
40
-
41
-
42
-
43
-
44
-
45
-
46
-
47
-
48
-
49
-
50
-
51
-
52
-
53
-
54
-
55
-
56
-
57
-
58
-
59
-
60
-
61
-
62
-
63
-
64
-
65
-
66
-
67
-
68
-
69
-
70
-
71
-
72
-
73
-
74
-
75
-
76
-
77
-
78
-
79
-
80
-
81
-
82
-
83
-
84
-
85
 |
 |

© Copyright 2013 TRENDnet. All Rights Reserved.
TRENDnet User’s Guide
TN
‐
200 / TN
‐
200T1
7
5.
Select the
Start Menu
folder location.
6.
Click
Install
to install the utility
7.
Click
Finish
to complete the installation.
8.
The
NAS Setup
icon will now appear on your Desktop.