Toshiba Tecra 9100 User Guide - Page 72
Inserting and removing PC Cards, Inserting a PC Card
 |
View all Toshiba Tecra 9100 manuals
Add to My Manuals
Save this manual to your list of manuals |
Page 72 highlights
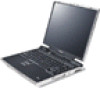
72 Connecting Other External Devices Inserting and removing PC Cards Inserting and removing PC Cards Your Tecra® 9100 Series computer comes with two stacked PC Card slots and supports three types of PC Cards: ❖ Type I cards-You can install up to two of these cards, one in each slot. ❖ Type II cards-You can install up to two of these cards, one in each slot. ❖ Type III cards-You can install just one of these cards. Inserting a PC Card Before you insert a PC Card, refer to the documentation that comes with the card to see if you need to do anything before you insert it. There are three different ways to insert a PC Card: ❖ Turn off the computer and follow the steps below. ❖ Insert the PC card while the computer is running. Follow the steps below. ❖ Hot swap the card (choose this method if there is already a PC Card in slot you wish to use). Stop the PC Card by clicking the Safely Remove Hardware icon on the System tray. After the PC Card is stopped, it is safe to remove it. Follow the steps below. 1 Locate the PC Card slot on the right side of the computer. 2 If the PC Card slots are locked, unlock them by turning the computer over, locating the PC Card lock, removing the retaining screw, sliding the lock into the unlocked position, and replacing the screw. If you are hot swapping a PC Card, see "Removing a PC Card" on page 74, steps 3 through 5.
-
 1
1 -
2
-
3
-
4
-
5
-
6
-
7
-
8
-
9
-
10
-
11
-
12
-
13
-
14
-
15
-
16
-
17
-
18
-
19
-
20
-
21
-
22
-
23
-
24
-
25
-
26
-
27
-
28
-
29
-
30
-
31
-
32
-
33
-
34
-
35
-
36
-
37
-
38
-
39
-
40
-
41
-
42
-
43
-
44
-
45
-
46
-
47
-
48
-
49
-
50
-
51
-
52
-
53
-
54
-
55
-
56
-
57
-
58
-
59
-
60
-
61
-
62
-
63
-
64
-
65
-
66
-
 67
67 -
 68
68 -
 69
69 -
 70
70 -
 71
71 -
 72
72 -
 73
73 -
 74
74 -
 75
75 -
 76
76 -
 77
77 -
78
-
79
-
80
-
81
-
82
-
83
-
84
-
85
-
86
-
87
-
88
-
89
-
90
-
91
-
92
-
93
-
94
-
95
-
96
-
97
-
98
-
99
-
100
-
101
-
102
-
103
-
104
-
105
-
106
-
107
-
108
-
109
-
110
-
111
-
112
-
113
-
114
-
115
-
116
-
117
-
118
-
119
-
120
-
121
-
122
-
123
-
124
-
125
-
126
-
127
-
128
-
129
-
130
-
131
-
132
-
133
-
134
-
135
-
136
-
137
-
138
-
139
-
140
-
141
-
142
-
143
-
144
-
145
-
146
-
147
-
148
-
149
-
150
-
151
-
152
-
153
-
154
-
155
-
156
-
157
-
158
-
159
-
160
-
161
-
162
-
163
-
164
-
165
-
166
-
167
-
168
-
169
-
170
-
171
-
172
-
173
-
174
-
175
-
176
-
177
-
178
-
179
-
180
-
181
-
182
-
183
-
184
-
185
-
186
-
187
-
188
-
189
-
190
-
191
-
192
-
193
-
194
-
195
-
196
-
197
-
198
-
199
-
200
-
201
-
202
-
203
-
204
-
205
-
206
-
207
-
208
-
209
-
210
-
211
-
212
-
213
-
214
-
215
-
216
-
217
-
218
-
219
-
220
-
221
-
222
-
223
-
224
-
225
-
226
-
227
-
228
-
229
-
230
-
231
-
232
-
233
-
234
-
235
-
236
-
237
-
238
-
239
-
240
-
241
-
242
-
243
-
244
-
245
-
246
-
247
-
248
-
249
-
250
-
251
-
252
-
253
-
254
-
255
-
256
-
257
-
258
-
259
-
260
-
261
-
262
-
263
-
264
-
265
 |
 |
