Yamaha YSP-5600 Owners Manual - Page 19
Attach the small wall mount brackets to the unit.
 |
View all Yamaha YSP-5600 manuals
Add to My Manuals
Save this manual to your list of manuals |
Page 19 highlights
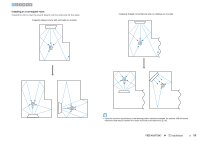
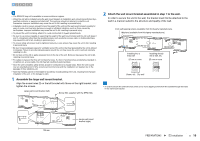
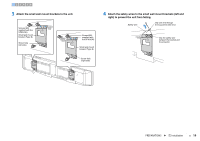
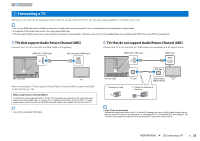
123456 3 Attach the small wall mount brackets to the unit. Screws (M4; supplied with the SPM-K30) Small wall mount bracket (Type B) Screw hole (left side) Screws(M4; supplied with the SPM-K30) Small wall mount bracket (Type B) Screw hole (right side) 4 Attach the safety wires to the small wall mount brackets (left and right) to prevent the unit from falling. Safety wire Slip one end through the loop at the other end Slip the safety wire between the bracket and the projector PREPARATIONS ➤ a Installation En 19
-
 1
1 -
2
-
3
-
4
-
5
-
6
-
7
-
8
-
9
-
10
-
11
-
12
-
13
-
 14
14 -
 15
15 -
 16
16 -
 17
17 -
 18
18 -
 19
19 -
 20
20 -
 21
21 -
 22
22 -
 23
23 -
 24
24 -
25
-
26
-
27
-
28
-
29
-
30
-
31
-
32
-
33
-
34
-
35
-
36
-
37
-
38
-
39
-
40
-
41
-
42
-
43
-
44
-
45
-
46
-
47
-
48
-
49
-
50
-
51
-
52
-
53
-
54
-
55
-
56
-
57
-
58
-
59
-
60
-
61
-
62
-
63
-
64
-
65
-
66
-
67
-
68
-
69
-
70
-
71
-
72
-
73
-
74
-
75
-
76
-
77
-
78
-
79
-
80
-
81
-
82
-
83
-
84
-
85
-
86
-
87
-
88
-
89
-
90
-
91
-
92
-
93
-
94
-
95
-
96
-
97
-
98
-
99
-
100
-
101
-
102
-
103
-
104
-
105
-
106
-
107
-
108
-
109
-
110
 |
 |

PREPARATIONS
➤
a
Installation
En
19
3
Attach the small wall mount brackets to the unit.
4
Attach the safety wires to the small wall mount brackets (left and
right) to prevent the unit from falling.
Screws (M4;
supplied with the
SPM-K30)
Small wall mount
bracket (Type B)
Small wall mount
bracket (Type B)
Screw hole
(left side)
Screw hole
(right side)
Screws(M4;
supplied with
the SPM-K30)
Safety wire
Slip one end through
the loop at the other end
Slip the safety wire
between the bracket and
the projector
1
2
3
4
5
6