Yamaha YSP-5600 Owners Manual - Page 66
SETTINGS, Setup menu, Setting the setup menu
 |
View all Yamaha YSP-5600 manuals
Add to My Manuals
Save this manual to your list of manuals |
Page 66 highlights
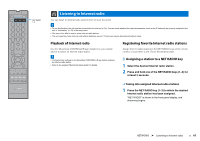
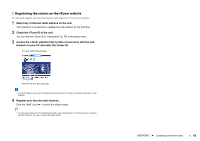
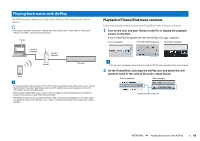
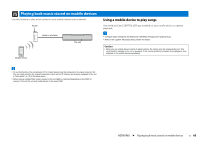
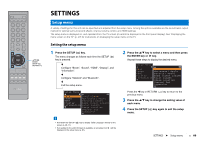
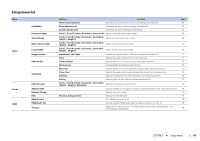
/ // ENTER SETUP ( ) RETURN ( ) SETTINGS Setup menu A variety of settings for this unit can be specified and adjusted from the setup menu. Among the options available are the sound beam output method for optimal surround sound effects, channel volume control, and HDMI settings. The setup menu is displayed on, and operated from, the TV screen (it cannot be displayed in the front panel display). See "Displaying the menu screen on the TV" (p. 27) for instructions on displaying the setup menu on the TV. Setting the setup menu 1 Press the SETUP ( ) key. The menu changes as follows each time the SETUP ( ) key is pressed. T Configure "Beam", "Sound", "HDMI", "Display", and "Information". T Configure "Network" and "Bluetooth". T Exit the setup menu. Setup Menu Beam Sound HDMI Display Information IntelliBeam Horizontal Angle Vertical Angle Beam Travel Length Focal Length Image Location Channel Out Subwoofer 2 Press the S/T key to select a menu and then press the ENTER key or X key. Repeat these steps to display the desired menu. Setup Menu Beam Sound HDMI Display Information IntelliBeam Horizontal Angle Vertical Angle Beam Travel Length Focal Length Image Location Channel Out Subwoofer Press the W key or RETURN ( ) key to return to the previous menu. 3 Press the S/T key to change the setting value of each menu. 4 Press the SETUP ( ) key again to exit the setup menu. • Hold down the SETUP ( ) key to display "OSD Language" directly on the screen (p. 28, 77). • If an update for the unit's firmware is available, an envelope icon ( ) will be displayed in the setup menu (p. 87). SETTINGS ➤ Setup menu En 66
-
 1
1 -
2
-
3
-
4
-
5
-
6
-
7
-
8
-
9
-
10
-
11
-
12
-
13
-
14
-
15
-
16
-
17
-
18
-
19
-
20
-
21
-
22
-
23
-
24
-
25
-
26
-
27
-
28
-
29
-
30
-
31
-
32
-
33
-
34
-
35
-
36
-
37
-
38
-
39
-
40
-
41
-
42
-
43
-
44
-
45
-
46
-
47
-
48
-
49
-
50
-
51
-
52
-
53
-
54
-
55
-
56
-
57
-
58
-
59
-
60
-
 61
61 -
 62
62 -
 63
63 -
 64
64 -
 65
65 -
 66
66 -
 67
67 -
 68
68 -
 69
69 -
 70
70 -
 71
71 -
72
-
73
-
74
-
75
-
76
-
77
-
78
-
79
-
80
-
81
-
82
-
83
-
84
-
85
-
86
-
87
-
88
-
89
-
90
-
91
-
92
-
93
-
94
-
95
-
96
-
97
-
98
-
99
-
100
-
101
-
102
-
103
-
104
-
105
-
106
-
107
-
108
-
109
-
110
 |
 |
