ZyXEL ES-315 User Guide - Page 53
Port Setup, Basic Setting
 |
View all ZyXEL ES-315 manuals
Add to My Manuals
Save this manual to your list of manuals |
Page 53 highlights
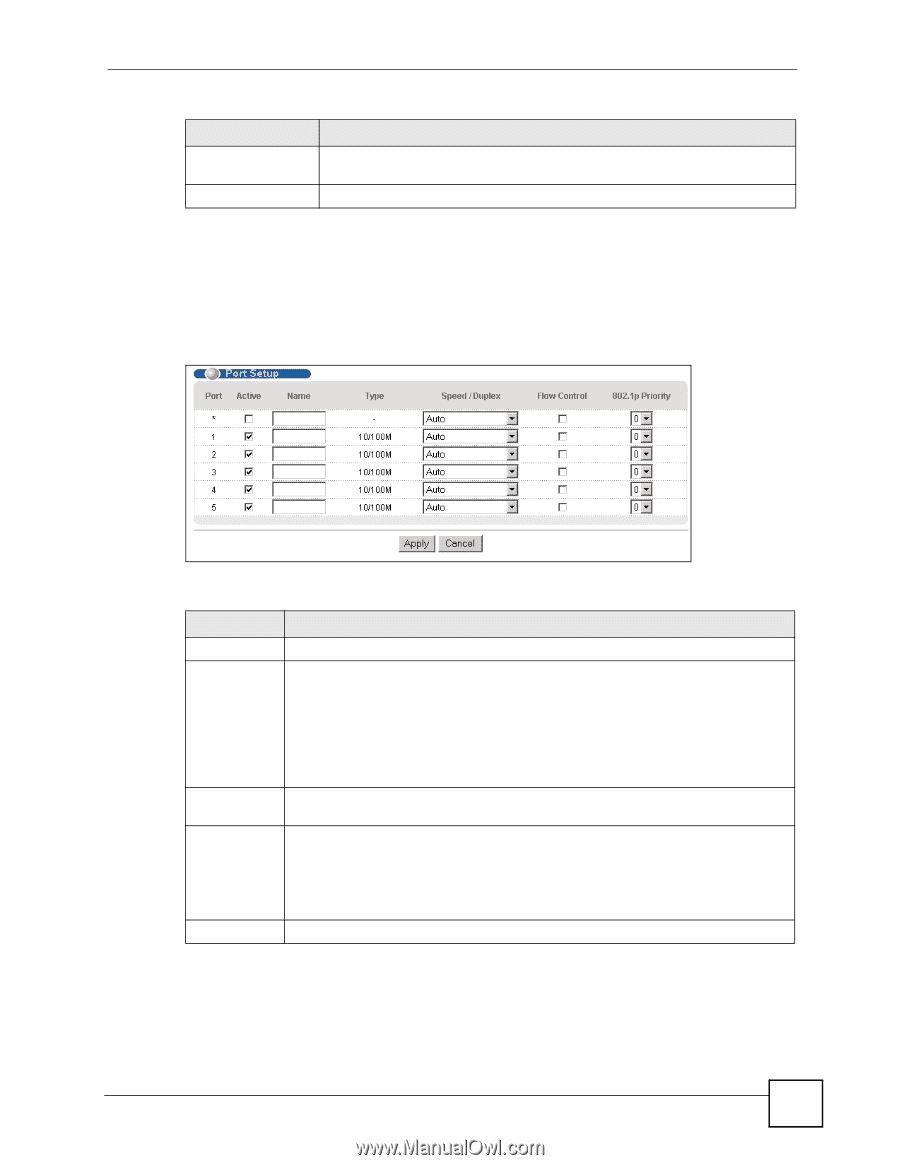
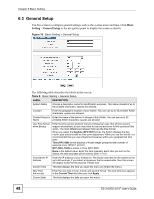
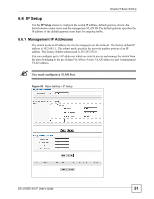
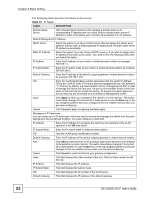
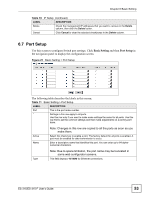
Chapter 6 Basic Setting Table 10 IP Setup (continued) LABEL DESCRIPTION Delete Check the management IP addresses that you want to remove in the Delete column, then click the Delete button. Cancel Click Cancel to clear the selected checkboxes in the Delete column. 6.7 Port Setup Use this screen to configure Switch port settings. Click Basic Setting and then Port Setup in the navigation panel to display the configuration screen. Figure 21 Basic Setting > Port Setup The following table describes the labels in this screen. Table 11 Basic Setting > Port Setup LABEL DESCRIPTION Port This is the port index number. * Settings in this row apply to all ports. Use this row only if you want to make some settings the same for all ports. Use this row first to set the common settings and then make adjustments on a port-by-port basis. Active Name Note: Changes in this row are copied to all the ports as soon as you make them. Select this check box to enable a port. The factory default for all ports is enabled. A port must be enabled for data transmission to occur. Enter a descriptive name that identifies this port. You can enter up to 64 alphanumerical characters. Note: Due to space limitation, the port name may be truncated in some web configurator screens. Type This field displays 10/100M for Ethernet connections. ES-315/ES-315-F User's Guide 53
-
 1
1 -
2
-
3
-
4
-
5
-
6
-
7
-
8
-
9
-
10
-
11
-
12
-
13
-
14
-
15
-
16
-
17
-
18
-
19
-
20
-
21
-
22
-
23
-
24
-
25
-
26
-
27
-
28
-
29
-
30
-
31
-
32
-
33
-
34
-
35
-
36
-
37
-
38
-
39
-
40
-
41
-
42
-
43
-
44
-
45
-
46
-
47
-
 48
48 -
 49
49 -
 50
50 -
 51
51 -
 52
52 -
 53
53 -
 54
54 -
 55
55 -
 56
56 -
 57
57 -
 58
58 -
59
-
60
-
61
-
62
-
63
-
64
-
65
-
66
-
67
-
68
-
69
-
70
-
71
-
72
-
73
-
74
-
75
-
76
-
77
-
78
-
79
-
80
-
81
-
82
-
83
-
84
-
85
-
86
-
87
-
88
-
89
-
90
-
91
-
92
-
93
-
94
-
95
-
96
-
97
-
98
-
99
-
100
-
101
-
102
-
103
-
104
-
105
-
106
-
107
-
108
-
109
-
110
-
111
-
112
-
113
-
114
-
115
-
116
-
117
-
118
-
119
-
120
-
121
-
122
-
123
-
124
-
125
-
126
-
127
-
128
-
129
-
130
-
131
-
132
-
133
-
134
-
135
-
136
-
137
-
138
-
139
-
140
-
141
-
142
-
143
-
144
-
145
-
146
-
147
-
148
-
149
-
150
-
151
-
152
-
153
-
154
-
155
-
156
-
157
-
158
-
159
-
160
-
161
-
162
-
163
-
164
-
165
-
166
 |
 |