ZyXEL ES-315 User Guide - Page 60
Table 14, The following table describes the related labels in this screen.
 |
View all ZyXEL ES-315 manuals
Add to My Manuals
Save this manual to your list of manuals |
Page 60 highlights
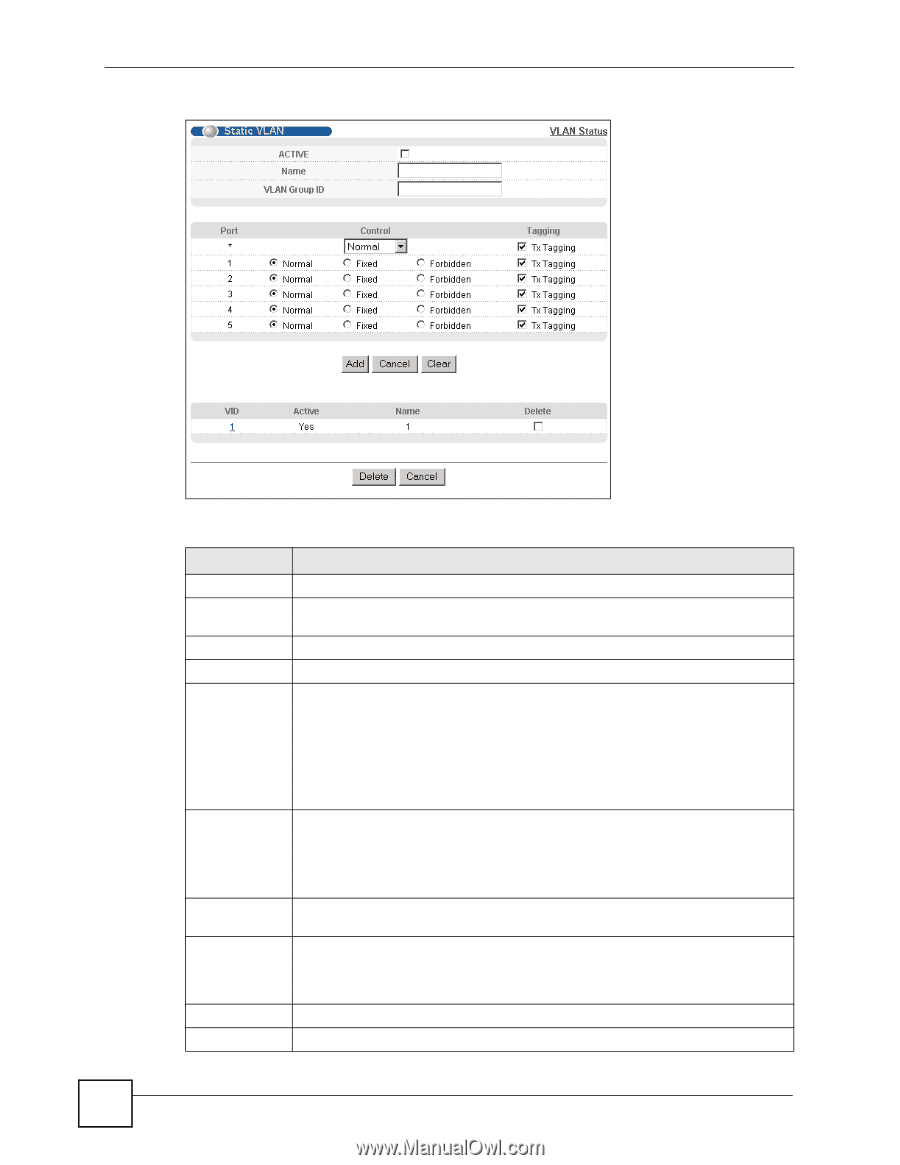
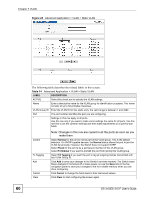
Chapter 7 VLAN Figure 24 Advanced Application > VLAN > Static VLAN The following table describes the related labels in this screen. Table 14 Advanced Application > VLAN > Static VLAN LABEL DESCRIPTION ACTIVE Select this check box to activate the VLAN settings. Name Enter a descriptive name for the VLAN group for identification purposes. This name consists of up to 64 printable characters. VLAN Group ID Enter the VLAN ID for this static entry; the valid range is between 1 and 4094. Port The port number identifies the port you are configuring. * Settings in this row apply to all ports. Use this row only if you want to make some settings the same for all ports. Use this row first to set the common settings and then make adjustments on a port-by-port basis. Control Tx Tagging Add Cancel Clear Note: Changes in this row are copied to all the ports as soon as you make them. Select Normal for the port to not be part of the VLAN group. This is the default selection. On GVRP-capable devices, the Normal status allows the port to join the VLAN dynamically. However, the Switch does not support GVRP. Select Fixed for the port to be a permanent member of this VLAN group. Select Forbidden if you want to prohibit the port from joining this VLAN group. Select TX Tagging if you want the port to tag all outgoing frames transmitted with this VLAN Group ID. Click Add to save your changes to the Switch's run-time memory. The Switch loses these changes if it is turned off or loses power, so use the Save link on the top navigation panel to save your changes to the non-volatile memory when you are done configuring. Click Cancel to change the fields back to their last saved values. Click Clear to start configuring the screen again. 60 ES-315/ES-315-F User's Guide
-
 1
1 -
2
-
3
-
4
-
5
-
6
-
7
-
8
-
9
-
10
-
11
-
12
-
13
-
14
-
15
-
16
-
17
-
18
-
19
-
20
-
21
-
22
-
23
-
24
-
25
-
26
-
27
-
28
-
29
-
30
-
31
-
32
-
33
-
34
-
35
-
36
-
37
-
38
-
39
-
40
-
41
-
42
-
43
-
44
-
45
-
46
-
47
-
48
-
49
-
50
-
51
-
52
-
53
-
54
-
 55
55 -
 56
56 -
 57
57 -
 58
58 -
 59
59 -
 60
60 -
 61
61 -
 62
62 -
 63
63 -
 64
64 -
 65
65 -
66
-
67
-
68
-
69
-
70
-
71
-
72
-
73
-
74
-
75
-
76
-
77
-
78
-
79
-
80
-
81
-
82
-
83
-
84
-
85
-
86
-
87
-
88
-
89
-
90
-
91
-
92
-
93
-
94
-
95
-
96
-
97
-
98
-
99
-
100
-
101
-
102
-
103
-
104
-
105
-
106
-
107
-
108
-
109
-
110
-
111
-
112
-
113
-
114
-
115
-
116
-
117
-
118
-
119
-
120
-
121
-
122
-
123
-
124
-
125
-
126
-
127
-
128
-
129
-
130
-
131
-
132
-
133
-
134
-
135
-
136
-
137
-
138
-
139
-
140
-
141
-
142
-
143
-
144
-
145
-
146
-
147
-
148
-
149
-
150
-
151
-
152
-
153
-
154
-
155
-
156
-
157
-
158
-
159
-
160
-
161
-
162
-
163
-
164
-
165
-
166
 |
 |