ZyXEL P-128 User Guide - Page 171
TFTP Transfer
 |
View all ZyXEL P-128 manuals
Add to My Manuals
Save this manual to your list of manuals |
Page 171 highlights
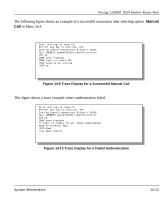
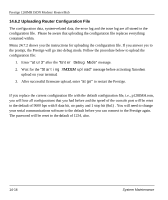
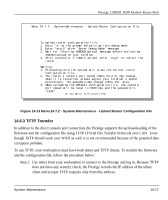
Prestige 128IMH ISDN Modem/ Router/Hub Menu 24.7.2 - System Maintenance - Upload Router Configuration File To upload router configuration file: 1. Enter "y" at the prompt below to go into debug mode. 2. Enter "atur3" after "Enter Debug Mode" message. 3. Wait for "Starting XMODEM upload" message before activating Xmodem upload on your terminal. 4. After successful firmware upload, enter "atgo" to restart the router. Warning: 1. Proceeding with the upload will erase the current router configuration file. 2. The router's console port speed (Menu 24.2.2) may change when it is restarted; please adjust your terminal's speed accordingly. The password may change (menu 23), also. 3. When uploading the DEFAULT configuration file, the console port speed will be reset to 9600 bps and the password to "1234". Do You Which To Proceed:(Y/N) Figure 14-13 Menu 24.7.2 - System Maintenance - Upload Router Configuration File 14.6.3 TFTP Transfer In addition to the direct console port connection, the Prestige supports the up/downloading of the firmware and the configuration file using TFTP (Trivial File Transfer Protocol) over LAN. Even though TFTP should work over WAN as well, it is not recommended because of the potential data corruption problem. To use TFTP, your workstatio n must have both telnet and TFTP clients. To transfer the firmware and the configuration file, follow the procedure below: Step 1. Use telnet from your workstation to connect to the Prestige and log in. Because TFTP does not have any security check, the Prestige records the IP address of the telnet client and accepts TFTP requests only from this address. System Maintenance 14-17
-
 1
1 -
2
-
3
-
4
-
5
-
6
-
7
-
8
-
9
-
10
-
11
-
12
-
13
-
14
-
15
-
16
-
17
-
18
-
19
-
20
-
21
-
22
-
23
-
24
-
25
-
26
-
27
-
28
-
29
-
30
-
31
-
32
-
33
-
34
-
35
-
36
-
37
-
38
-
39
-
40
-
41
-
42
-
43
-
44
-
45
-
46
-
47
-
48
-
49
-
50
-
51
-
52
-
53
-
54
-
55
-
56
-
57
-
58
-
59
-
60
-
61
-
62
-
63
-
64
-
65
-
66
-
67
-
68
-
69
-
70
-
71
-
72
-
73
-
74
-
75
-
76
-
77
-
78
-
79
-
80
-
81
-
82
-
83
-
84
-
85
-
86
-
87
-
88
-
89
-
90
-
91
-
92
-
93
-
94
-
95
-
96
-
97
-
98
-
99
-
100
-
101
-
102
-
103
-
104
-
105
-
106
-
107
-
108
-
109
-
110
-
111
-
112
-
113
-
114
-
115
-
116
-
117
-
118
-
119
-
120
-
121
-
122
-
123
-
124
-
125
-
126
-
127
-
128
-
129
-
130
-
131
-
132
-
133
-
134
-
135
-
136
-
137
-
138
-
139
-
140
-
141
-
142
-
143
-
144
-
145
-
146
-
147
-
148
-
149
-
150
-
151
-
152
-
153
-
154
-
155
-
156
-
157
-
158
-
159
-
160
-
161
-
162
-
163
-
164
-
165
-
 166
166 -
 167
167 -
 168
168 -
 169
169 -
 170
170 -
 171
171 -
 172
172 -
 173
173 -
 174
174 -
 175
175 -
 176
176 -
177
-
178
-
179
-
180
-
181
-
182
-
183
-
184
-
185
-
186
-
187
-
188
-
189
-
190
-
191
 |
 |