ZyXEL P-128 User Guide - Page 38
Prestige 128IMH Rear Panel and Connections
 |
View all ZyXEL P-128 manuals
Add to My Manuals
Save this manual to your list of manuals |
Page 38 highlights
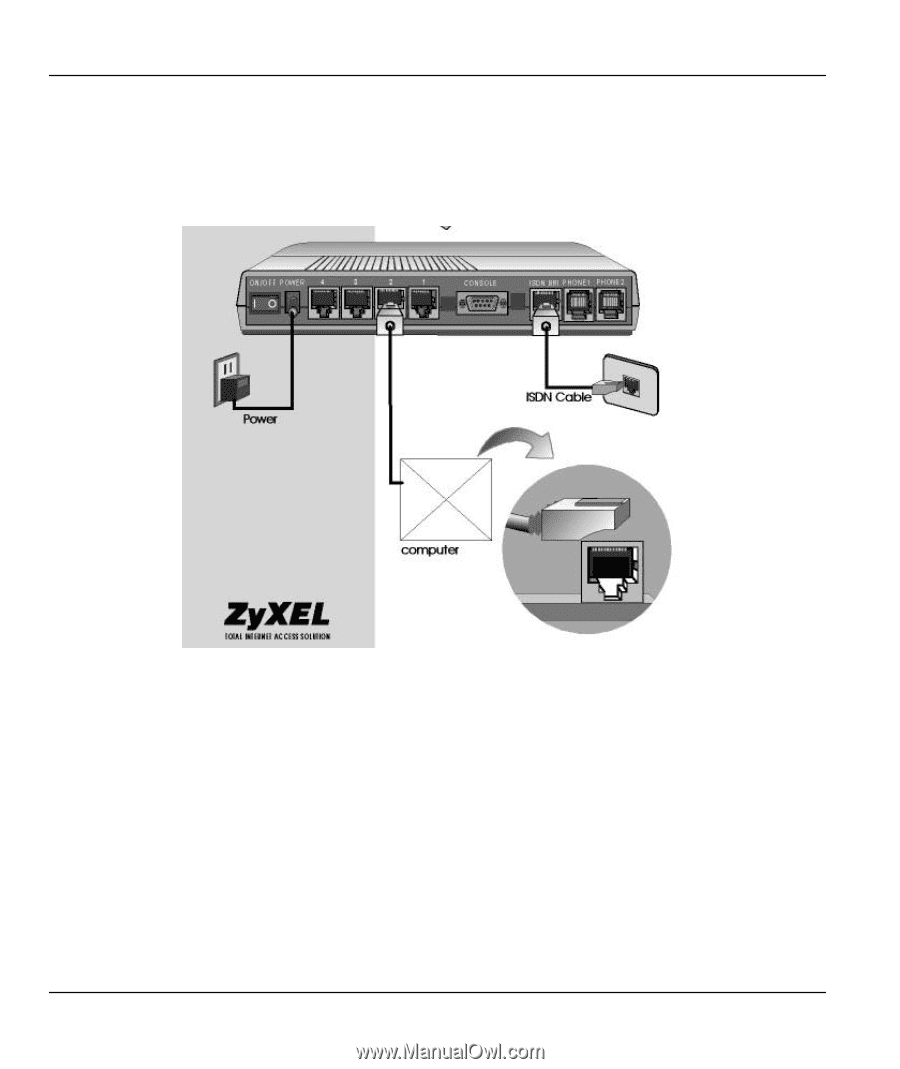
Prestige 128IMH ISDN Modem/ Router/Hub 2.2 Prestige 128IMH Rear Panel and Connections The figure below shows the rear panel of your Prestige 128MH and the connection diagram. Figure 2-2 Prestige 128IMH Rear Panel and Connections This section outlines how to connect your Prestige 128MH to the LAN and to the ISDN network. Step 1. Connecting the ISDN Line Connect the Prestige to the ISDN network using the included ISDN (black) cable. Plug one end of the cable into the port labeled ISDN BRI and the other to the ISDN wall jack. Step 2. Connecting a Workstation to the Prestige Connect a workstation to the built-in hub on the Prestige to create an Ethernet network. Connect one end of a straight through Ethernet cable to the NIC on the workstation and the other end to 2-2 Hardware Installation and Setup
-
 1
1 -
2
-
3
-
4
-
5
-
6
-
7
-
8
-
9
-
10
-
11
-
12
-
13
-
14
-
15
-
16
-
17
-
18
-
19
-
20
-
21
-
22
-
23
-
24
-
25
-
26
-
27
-
28
-
29
-
30
-
31
-
32
-
 33
33 -
 34
34 -
 35
35 -
 36
36 -
 37
37 -
 38
38 -
 39
39 -
 40
40 -
 41
41 -
 42
42 -
 43
43 -
44
-
45
-
46
-
47
-
48
-
49
-
50
-
51
-
52
-
53
-
54
-
55
-
56
-
57
-
58
-
59
-
60
-
61
-
62
-
63
-
64
-
65
-
66
-
67
-
68
-
69
-
70
-
71
-
72
-
73
-
74
-
75
-
76
-
77
-
78
-
79
-
80
-
81
-
82
-
83
-
84
-
85
-
86
-
87
-
88
-
89
-
90
-
91
-
92
-
93
-
94
-
95
-
96
-
97
-
98
-
99
-
100
-
101
-
102
-
103
-
104
-
105
-
106
-
107
-
108
-
109
-
110
-
111
-
112
-
113
-
114
-
115
-
116
-
117
-
118
-
119
-
120
-
121
-
122
-
123
-
124
-
125
-
126
-
127
-
128
-
129
-
130
-
131
-
132
-
133
-
134
-
135
-
136
-
137
-
138
-
139
-
140
-
141
-
142
-
143
-
144
-
145
-
146
-
147
-
148
-
149
-
150
-
151
-
152
-
153
-
154
-
155
-
156
-
157
-
158
-
159
-
160
-
161
-
162
-
163
-
164
-
165
-
166
-
167
-
168
-
169
-
170
-
171
-
172
-
173
-
174
-
175
-
176
-
177
-
178
-
179
-
180
-
181
-
182
-
183
-
184
-
185
-
186
-
187
-
188
-
189
-
190
-
191
 |
 |