2014 Nissan Pathfinder Navigation System Owner's Manual - Page 28
2014 Nissan Pathfinder Manual

Page 28 highlights
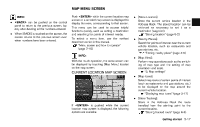
STORING HOME LOCATION/ ADDRESS SCROLLED LOCATION MAP SCREEN set them as a destination or waypoint. Use the same search method as the one for [Places]. "Finding nearby place" (page 4-5) . [Store Location]: Store in the Address Book the map location where was pushed. The stored location can be retrieved to set it as a destination or waypoint. "Storing location" (page 6-2) [Delete]: Delete a stored location. To delete it, place the cross pointer over the corresponding icon. [Incident Detail]: This function can be selected only when the traffic information icon is displayed. Display the details of the traffic information icon. Place the cross pointer over the icon you want to check. INFO: Incident details are a feature of Traffic Information, and that a NavTraffic subscription is required in order to receive Traffic Information. HOW TO STORE HOME LOCATION If a home location is already stored in the Address Book, it can be easily retrieved to set the route to the stored home location. The procedure to store the home location is the same as for storing any other location. "4. Setting destination" As an example, the procedure for storing the home location by searching for a destination by address is described here. If is pushed while a scrolled map screen is displayed, the following options are available. . [New Dest.]: Set the destination to the map location where was pushed. If a destination is already set, the location will be set as the new destination. "Setting point on map" (page 4-19) [Add to Route]: Set the map location where was pushed as a destination or a waypoint. This is available only when the suggested route is already set. "Setting destination or waypoint" (page 5-14) [Nearby Places]: Search for points of interest near the map location where was pushed and . . . 1. Push . 2. Highlight [Home (Add New)] and push . . 2-18 Getting started
-
 1
1 -
2
-
3
-
4
-
5
-
6
-
7
-
8
-
9
-
10
-
11
-
12
-
13
-
14
-
15
-
16
-
17
-
18
-
19
-
20
-
21
-
22
-
 23
23 -
 24
24 -
 25
25 -
 26
26 -
 27
27 -
 28
28 -
 29
29 -
 30
30 -
 31
31 -
 32
32 -
 33
33 -
34
-
35
-
36
-
37
-
38
-
39
-
40
-
41
-
42
-
43
-
44
-
45
-
46
-
47
-
48
-
49
-
50
-
51
-
52
-
53
-
54
-
55
-
56
-
57
-
58
-
59
-
60
-
61
-
62
-
63
-
64
-
65
-
66
-
67
-
68
-
69
-
70
-
71
-
72
-
73
-
74
-
75
-
76
-
77
-
78
-
79
-
80
-
81
-
82
-
83
-
84
-
85
-
86
-
87
-
88
-
89
-
90
-
91
-
92
-
93
-
94
-
95
-
96
-
97
-
98
-
99
-
100
-
101
-
102
-
103
-
104
-
105
-
106
-
107
-
108
-
109
-
110
-
111
-
112
-
113
-
114
-
115
-
116
-
117
-
118
-
119
-
120
-
121
-
122
-
123
-
124
-
125
-
126
-
127
-
128
-
129
-
130
-
131
-
132
-
133
-
134
-
135
-
136
-
137
-
138
-
139
-
140
-
141
-
142
-
143
-
144
-
145
-
146
-
147
-
148
-
149
-
150
-
151
-
152
-
153
-
154
-
155
-
156
-
157
-
158
-
159
-
160
-
161
-
162
-
163
-
164
-
165
-
166
-
167
-
168
-
169
-
170
-
171
-
172
-
173
-
174
-
175
-
176
-
177
-
178
-
179
-
180
-
181
-
182
-
183
-
184
-
185
-
186
-
187
-
188
-
189
-
190
-
191
-
192
-
193
-
194
-
195
-
196
-
197
-
198
-
199
-
200
-
201
-
202
-
203
-
204
-
205
-
206
-
207
-
208
-
209
-
210
-
211
-
212
-
213
-
214
-
215
-
216
-
217
-
218
-
219
-
220
-
221
-
222
-
223
-
224
-
225
-
226
-
227
-
228
-
229
-
230
-
231
-
232
-
233
-
234
-
235
-
236
-
237
-
238
-
239
-
240
-
241
-
242
-
243
-
244
-
245
-
246
-
247
-
248
-
249
-
250
-
251
-
252
 |
 |
