Belkin F5D7234-4 Version 4xxx User Manual - Page 33
Step 3 Con your Router for Connection to your Internet Service Provider ISP
 |
UPC - 722868680599
View all Belkin F5D7234-4 manuals
Add to My Manuals
Save this manual to your list of manuals |
Page 33 highlights
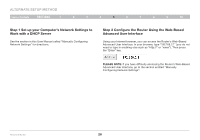
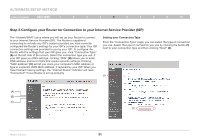
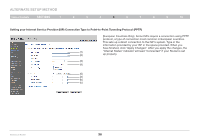
Alternate Setup Method Table of Contents sections 1 2 3 4 5 6 7 8 9 10 Step 3 Configure your Router for Connection to your Internet Service Provider (ISP) The "Internet/WAN" tab is where you will set up your Router to connect to your Internet Service Provider (ISP). The Router is capable of connecting to virtually any ISP's system provided you have correctly configured the Router's settings for your ISP's connection type. Your ISP connection settings are provided to you by your ISP. To configure the Router with the settings that your ISP gave you, click "Connection Type" (A) on the left side of the screen. Select the connection type you use. If your ISP gave you DNS settings, clicking "DNS" (B) allows you to enter DNS address entries for ISPs that require specific settings. Clicking "MAC address" (C) will let you clone your computer's MAC address or type in a specific WAN MAC address, if required by your ISP. When you have finished making settings, the "Internet Status" indicator will read "Connected" if your Router is set up properly. Setting your Connection Type From the "Connection Type" page, you can select the type of connection you use. Select the type of connection you use by clicking the button (1) next to your connection type and then clicking "Next" (2). (1) (A) (B) (C) (2) Wireless G Router 31
-
 1
1 -
2
-
3
-
4
-
5
-
6
-
7
-
8
-
9
-
10
-
11
-
12
-
13
-
14
-
15
-
16
-
17
-
18
-
19
-
20
-
21
-
22
-
23
-
24
-
25
-
26
-
27
-
 28
28 -
 29
29 -
 30
30 -
 31
31 -
 32
32 -
 33
33 -
 34
34 -
 35
35 -
 36
36 -
 37
37 -
 38
38 -
39
-
40
-
41
-
42
-
43
-
44
-
45
-
46
-
47
-
48
-
49
-
50
-
51
-
52
-
53
-
54
-
55
-
56
-
57
-
58
-
59
-
60
-
61
-
62
-
63
-
64
-
65
-
66
-
67
-
68
-
69
-
70
-
71
-
72
-
73
-
74
-
75
-
76
-
77
-
78
-
79
-
80
-
81
-
82
-
83
-
84
-
85
-
86
-
87
-
88
-
89
-
90
-
91
-
92
-
93
-
94
-
95
-
96
-
97
-
98
-
99
-
100
-
101
-
102
-
103
-
104
-
105
 |
 |
