Belkin F5D7234-4 Version 4xxx User Manual - Page 56
PBC: Click the Start PBC button located on the Wi-Fi Protected Setup
 |
UPC - 722868680599
View all Belkin F5D7234-4 manuals
Add to My Manuals
Save this manual to your list of manuals |
Page 56 highlights
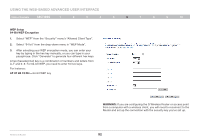
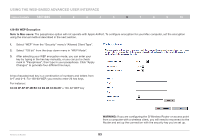
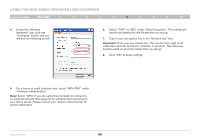
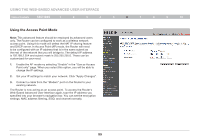
Using the Web-Based Advanced User Interface Table of Contents sections 1 2 3 4 5 6 7 8 9 10 Changing the Wireless Security Settings Your Router is equipped with the latest security standard called Wi-Fi Protected Access 2 (WPA2) and the legacy security standard called Wired Equivalent Privacy (WEP). Your Router also supports the Wi-Fi Protected Setup (WPS) specification, which simplifies the setup of a wireless network. WPS uses familiar methodologies, such as typing in a Personal Identification Number (PIN) or pushing a button, to enable users to automatically configure network names and strong WPA/WPA2 data encryption and authentication. By default, wireless security is disabled. To enable security, you will need to determine which standard you want to use. To access the security settings, click "Security" on the "Wireless" tab. Using Wi-Fi Protected Setup WPS uses WPA2 (described below) for encryption. It does not provide additional security, but rather, standardizes the method for securing your wireless network. You may use either the Push Button Configuration (PBC) method or PIN method to allow a device access to your wireless network. Conceptually, the two methods work as follows: PBC: Click the "Start PBC" button located on the Wi-Fi Protected Setup page. Then, initiate the WPS procedure on the client device within two minutes. Refer to your client's documentation on this procedure. Clicking the "Start PBC" button will automatically enable WPS. The client has now been securely added to your wireless network. PIN: The client device has a PIN number (either four or eight digits) that is associated with WPS. Enable WPS through the GUI. Enter the client's PIN into the Router's internal registrar (accessed through this GUI). The client will be automatically enrolled into your wireless network within two minutes. Wireless G Router 54
-
 1
1 -
2
-
3
-
4
-
5
-
6
-
7
-
8
-
9
-
10
-
11
-
12
-
13
-
14
-
15
-
16
-
17
-
18
-
19
-
20
-
21
-
22
-
23
-
24
-
25
-
26
-
27
-
28
-
29
-
30
-
31
-
32
-
33
-
34
-
35
-
36
-
37
-
38
-
39
-
40
-
41
-
42
-
43
-
44
-
45
-
46
-
47
-
48
-
49
-
50
-
 51
51 -
 52
52 -
 53
53 -
 54
54 -
 55
55 -
 56
56 -
 57
57 -
 58
58 -
 59
59 -
 60
60 -
 61
61 -
62
-
63
-
64
-
65
-
66
-
67
-
68
-
69
-
70
-
71
-
72
-
73
-
74
-
75
-
76
-
77
-
78
-
79
-
80
-
81
-
82
-
83
-
84
-
85
-
86
-
87
-
88
-
89
-
90
-
91
-
92
-
93
-
94
-
95
-
96
-
97
-
98
-
99
-
100
-
101
-
102
-
103
-
104
-
105
 |
 |